

In a macOS computer or any device, for that matter, there are several computing resources. CPU, GPU, and RAM are just a few of them. The RAM, also known as memory, in particular, is an essential resource as it’s what decides how fast the computer is able to perform certain tasks. Each task consumes a certain amount of memory. Some consume only a little bit, like 100KB to 500KB, while others are a bit intensive and consume over 1GB of RAM. If you have a maximum capacity of 16GB RAM, and you only have 2GB of memory remaining, the computer will no longer be able to perform tasks that require over 2GB of RAM.
That’s why you must know how you can optimize your current RAM capacity. That way, you won’t always run out of memory, especially when you need it the most. Let’s start by answering the question, “How much memory does my Mac have?”
Part 1: How Much Memory Does My Mac Have?
The answer to that question depends on what “memory” you’re referring to. If you’re referring to the maximum memory capacity of your computer, then it’s pretty easy, and there are two ways to go approach it. Here’s a look at the first method:
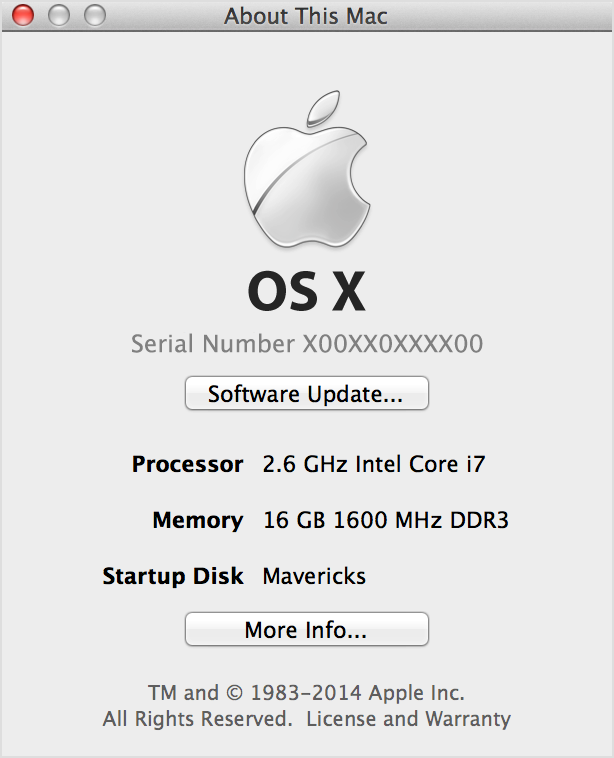
- Click the Apple logo at the top-left corner of your screen.
- Select About This Mac from the resulting dropdown menu.
- A popup window should appear. Navigate to the Overview tab, though it should be the default tab.
You’ll find a lot of information about your macOS computer, such as its operating system, the macOS version, processor, and most importantly, the memory. It should say something like 8 GB 1600 MHz or 16 GB 1600 MHz. That should tell you how much memory your macOS computer has. The other method is to look up the model of your computer and search it up on the internet. You should be able to find various information about the model, including its maximum memory capacity.
However, if the memory you’re referring to is the memory being used by the computer at the moment, then it’ll be a bit more complicated since Apple doesn’t show that in About This Mac. For that, you’ll need to use a utility app called Activity Monitor.
Part 2: How to Check Memory Usage With Activity Monitor
Activity Monitor is, as the name suggests, an app that allows you to monitor all the activities currently happening on your computers, such as the apps, background processes, and more. It has several parts, one of which shows you exactly how much memory is being used at the moment, the remaining memory available, and the maximum memory capacity. It also shows you the different types of memory. In short, it’s where you need to look. Here’s how you can open and use Activity Monitor:
- Open the Finder app on your computer.
- Click Applications from the left sidebar of the window.
- Find and open the Utilities folder.
- Once you’re in the Utilities folder, locate and double-click the Activity Monitor icon. The icon should look like the screen that a heart rate monitor outputs when it’s recording the heart rate of a patient in hospital.
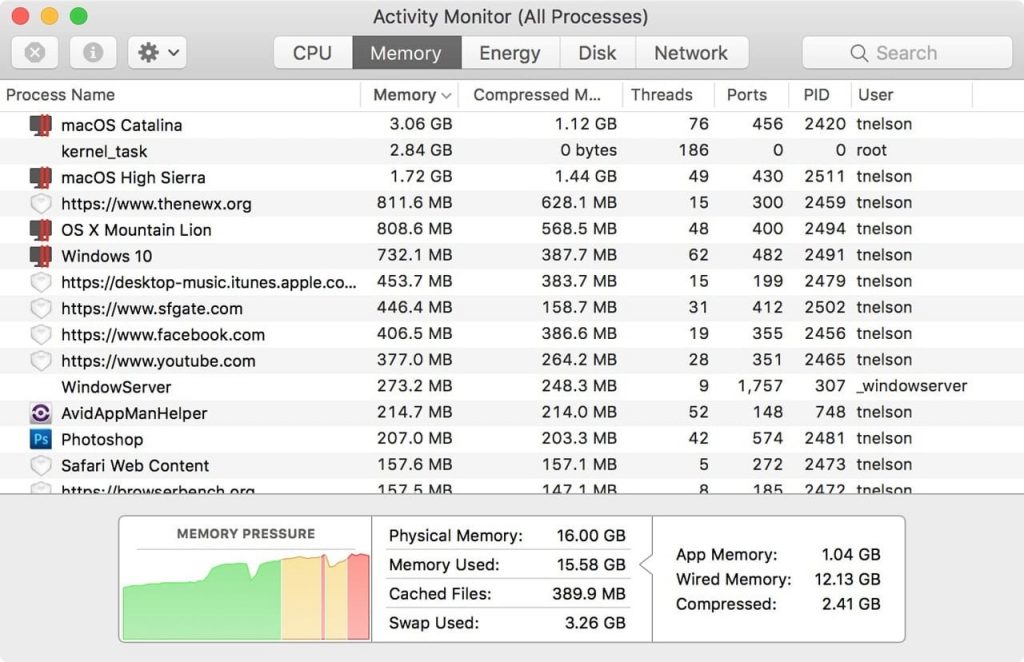
- There are a total of five tabs on the Activity Monitor window, namely (1) CPU, (2) Memory, (3) Energy, (4) Disk, and (5) Network. You obviously need to go to the Memory tab since you want to check the memory usage of your Mac.
Once you’re on the Memory tab, look at the bottom area of the window. It should show you several pieces of information about the memory, including the Physical Memory, Memory Used, Cached Files, and Swap Used. The Physical Memory refers to the maximum memory capacity of your macOS computer. It’s the number you’ll find in the About This Mac window earlier.
The Memory Used is the current memory usage of your computer. It will always be lower than the Physical Memory. The Cached Files correspond to the memory used by the cached files. The Swap Used is the memory used to swap unused files.
In addition to these four, you’ll also find at the left-most part of the window the three terms, App Memory, Wired Memory, and Compressed Memory. These are the three types of memory and they make up Memory Used. If you add them, it should be equivalent to the number that corresponds to Memory Used. Ideally, you’d want the Memory Used to be about 75% of your computer, meaning if you have a maximum memory capacity of 16GB, it should be around 12GB and not more.
Part 3: Reduce Memory Usage With Mac Cleaner
Though being able to check how much memory does my Mac have is useful, it’s not as useful as when you have a way to control the memory usage. After all, if you can monitor your memory usage and optimize it accordingly at the same time, you should be able to make the most out of your computer. Unfortunately, at the moment, there are only a handful of methods that you can use to reduce memory usage on macOS computers using its built-in features. That’s where Mac Cleaner comes in.
Mac Cleaner is a software designed to get rid of unnecessary files, hence the name. But it has additional features, such as its optimization module. It allows you to speed up your computer and reduce memory usage. Here’s how you can use it:
Step #1: Download, Install, and Open Mac Cleaner
To clear your memory using the software, you must first get it into your computer. To do so, you need to first this link. That should take you to the download site of Mac Cleaner where you can find the Download Now button. Click that button to download a DMG file, and once the download is complete, open it to start the installer. Follow the onscreen instructions from start to finish, and once the installation is complete, the software should open automatically.
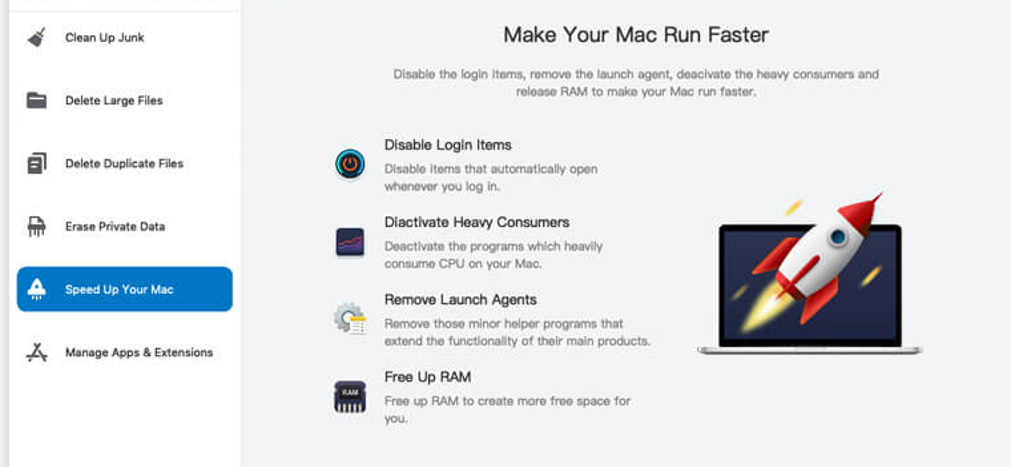
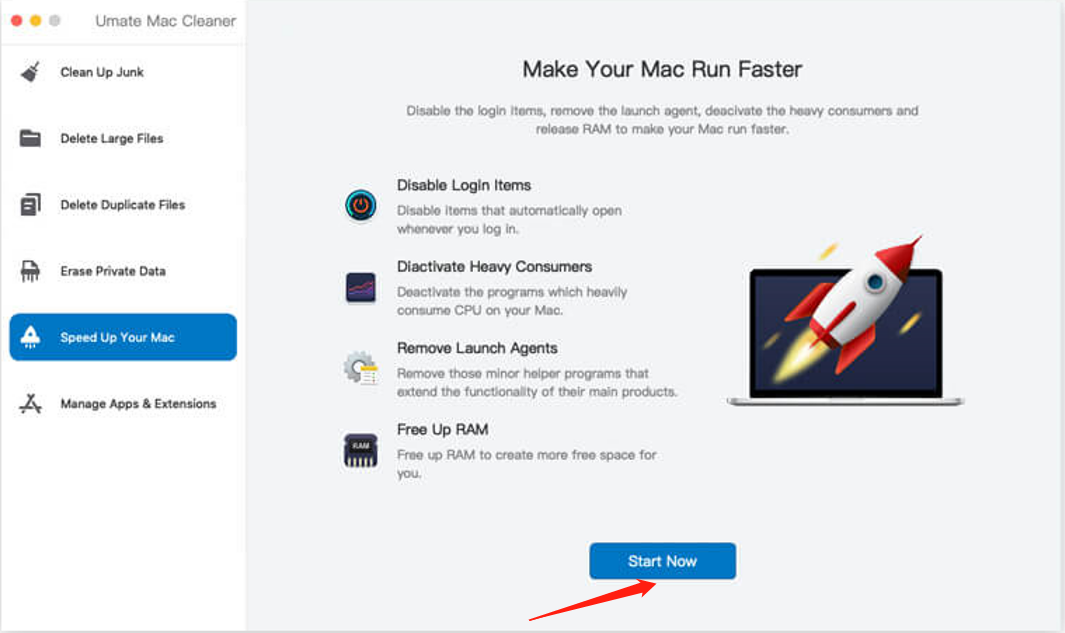
Step #2: Pick Speed up Your Mac
The software offers six different functionalities in the form of modules. You can find each module on the left side of the interface, and these include (1) Clean Up Junk, (2) Delete Large Files, (3) Delete Duplicate Files, (4) Erase Private Data, (5) Speed Up Your Mac, and (6) Manage Apps & Extensions. If you want to optimize the computer’s memory usage, you’ll mostly need the Speed Up Your Mac module which allows you to perform various tasks that can optimize CPU, GPU, and RAM usage. Doing so can maximize your computer’s performance. Select the module by clicking on it from the left side of the interface.
Step #3: Click Start Now
Upon selecting a module, the software displays information in the form of blocks of text. It explains how the module works and what the available features are. You can read it if you want to learn about the module. But to proceed, you must click Start Now.
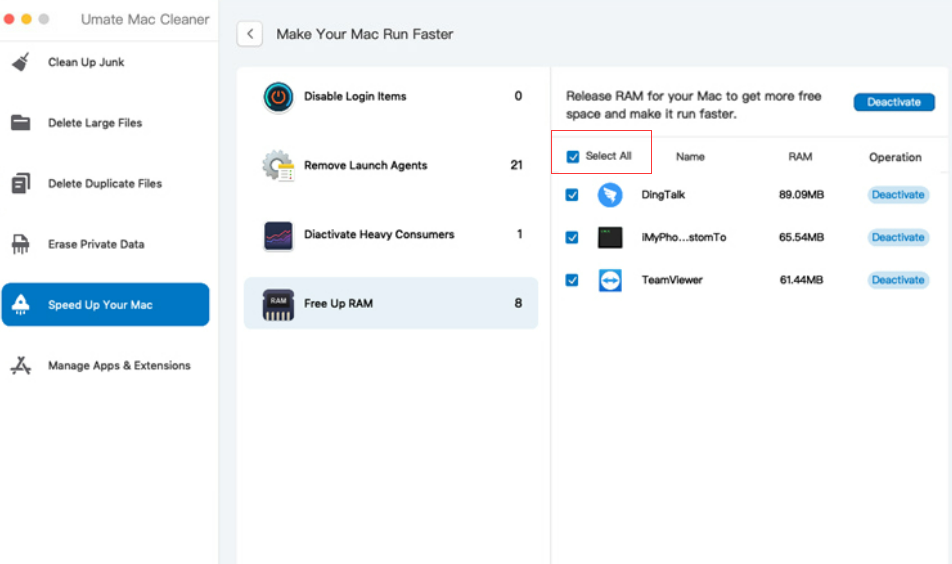
Step #4: Select an Action
For the fourth step, you need to select which action you want to take using the Speed Up Your Mac module. There are currently four actions available, and you can find them on a list on the left side of the interface after you click the Start Now button.
Here’s a look at what each of the actions does:
- Disable Login Items temporarily closes the apps and processes that automatically open upon startup.
- Deactivate Heavy Consumers disables the programs that consume too much CPU on your macOS computer.
- Remove Launch Agents force quits the apps and processes that open alongside other programs.
- Free Up RAM reduces RAM usage by forcing closing apps and processes that consume RAM excessively.
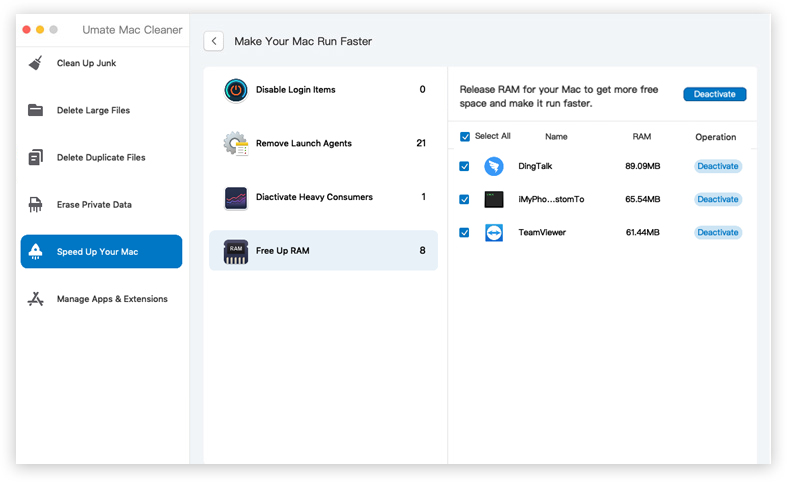
Since your goal is to minimize the memory usage of your computer and not to speed up the computer in general, you must select Free Up RAM. Upon doing so, a new list will appear on the right side of the interface, and you’ll find a list of apps and processes. Select the ones you want to deactivate by clicking their checkboxes. You can click Select All to include all items.
Step #5: Deactivate the App/Process
Now all you have to do is force close the selected apps and processes. To do that, you simply need to click the Deactivate button at the top-right corner of the window. It might take a few minutes or so, but that should be the final step in the process.
With this, you should be able to reduce the RAM or memory usage of your computer to a minimum. The best part about this is that the software only detects apps and processes that aren’t vital to the operating system. Therefore, it should be fine if you were to temporarily disable all the items in the list.
Takeaways
“How much memory does my Mac have?” It only takes a while to figure out how much memory your macOS computer has. You only need a few clicks here and there and you should be able to find the corresponding interface. The issue is how you can maintain a healthy RAM on your computer, since, as stated in this guide, excessive RAM usage can lead to various issues. Not only are the methods to optimize RAM fairly ineffective, but it also takes a lot of time to pull off. That’s why a tool like Mac Cleaner goes a long way in streamlining the process. Either way, with this guide, you shouldn’t have any problem with your macOS memory capacity anytime soon.
Latest Articles