

Spotify is among the most popular apps on macOS computers. It’s even more commonly used than the built-in Music app of the operating system. The interface is intuitive, collecting songs is relatively easy, and it has a ton of features that you cannot find in the built-in music app. However, one thing that Spotify is lacking is the fact that its files are relatively difficult to manage, not just the audio files, but also the cache. If you aren’t aware, the cache contains all the songs that you’ve recently listened to but haven’t downloaded yet. It’s basically the folder that contains temporary data from Spotify.
Though it may not be immediately impactful, it can pile up to become a large collection of files that consumes tens of GBs worth of storage space. This article tackles how to clear Spotify cache on Mac. But can you even clear it in the first place?
Can You Clear Spotify Cache on Mac?
It’s a common misconception that the cache files of an app are untouchable since it’s directly tied to an app. People think the only way to delete the cache is to completely uninstall the app. However, it’s actually rather easy to delete certain cache files without touching the app directly. So, to answer your question, yes, you can clear Spotify cache on Mac, or pretty much any application on macOS computers. In doing so, you can fix issues that might be happening on that particular application.
In the case of Spotify, since the cache is the holding area of all the songs you’ve listened to but haven’t downloaded if you clear the cache, the history will most likely become empty. That’s because the records of the songs are cleared or deleted.
Therefore, while you can very easily clear Spotify cache on macOS computers, that doesn’t mean you must do it since you may need the records later on. But if you decide to do it despite the consequences, here are the three ways to go about it.

Method #1: Use The Go to Folder Feature
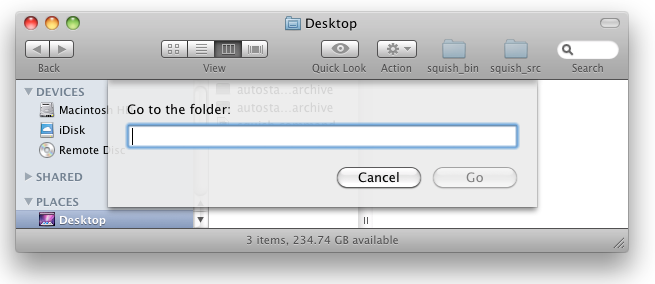
The Finder app is the file management app for macOS computers. It’s the Apple counterpart of Windows PC’s File Explorer, and it allows you to jump from one folder to another. Though these apps have numerous similarities, one particular difference that they have is the fact that Finder has a Go to Folder feature. What the feature does is it basically allows you to jump to a specific folder immediately without opening its parent folders. Of course, you must know the file path of the folder first to make it work. That’s what you’ll use for the first method. Here’s how you can use it to clear Spotify cache on Mac:
- Open a session of Finder on your computer.
- Click the Go tab from the top menu bar of the window.
- Select Go to Folder… from the dropdown menu.
- A popup window will appear. On the text bar, type in the following text: ~/Library/Caches
Note: The tilde signor ~ is an important part of the file path since removing it will take you to a completely different location. The ~ sign before the file path implies that it’s not a system folder, but instead a user folder.
- Once you’re on the Caches folder, locate the Spotify folder.
- Open the folder and find the files you want to delete.
The Spotify cache folder consists mostly of unnecessary stuff, so there should be no problem deleting all the files here. But keep in mind that the cache folder may be somewhere else entirely. In that case, you need a different method.
Method #2: Clear Cache on The Spotify App
If you want a simpler method, you can instead clear Spotify cache on Mac using the app itself. Here’s how you can do it:
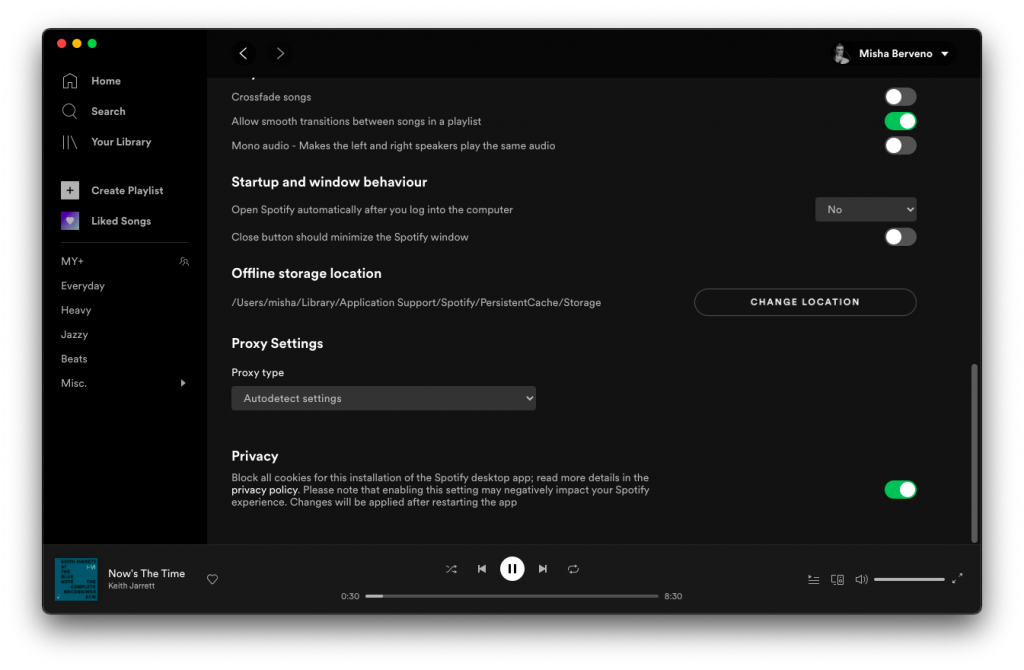
- Open the Spotify app on your computer.
- On your keyboard, press the Command key + ,. That should open the Preferences window.
- At the bottom of the new window, you’ll find a button that says Show Advanced Settings. Click that button.
- Scroll down until you find the Offline storage location.
- Under that section, you’ll find the exact file path of the cache folder.
With this, you’ll be able to figure out exactly where the cache folder of Spotify is. Simply follow the file path and you’ll find it eventually. You can also use the first method in conjunction with this to maximize your chances of success.
Method #3: Use Mac Cleaner
The issue with the aforementioned methods is that they may or may not get rid of the cache files completely. In some cases, you may have a couple of files left on the Spotify cache. Furthermore, as stated earlier, there’s a chance the cache isn’t in the default folder. In that case, you may have to look for it manually. In short, you’ll have to spend more time either finding the remaining files or looking for the new cache directory. That’s where tools like Mac Cleaner comes into play.
Mac Cleaner is software designed to help macOS users delete certain files from their computers. One such file that you can delete is app junk, and that should include the cache. here’s how to clear Spotify cache on Mac with this method:
Step #1: Download, Install, and Open Mac Cleaner
Before anything else, you must get the software on your computer. To do so, you need to click this link to go to the Mac Cleaner download page. There, you must click the Download Now button. That should download a DMG file which you must then open once it’s downloaded. Doing so will start the installer, and all you have to do is follow the onscreen instructions from that point onwards. The software should open automatically once the installation is complete.
Step #2: Pick Clean up Junk
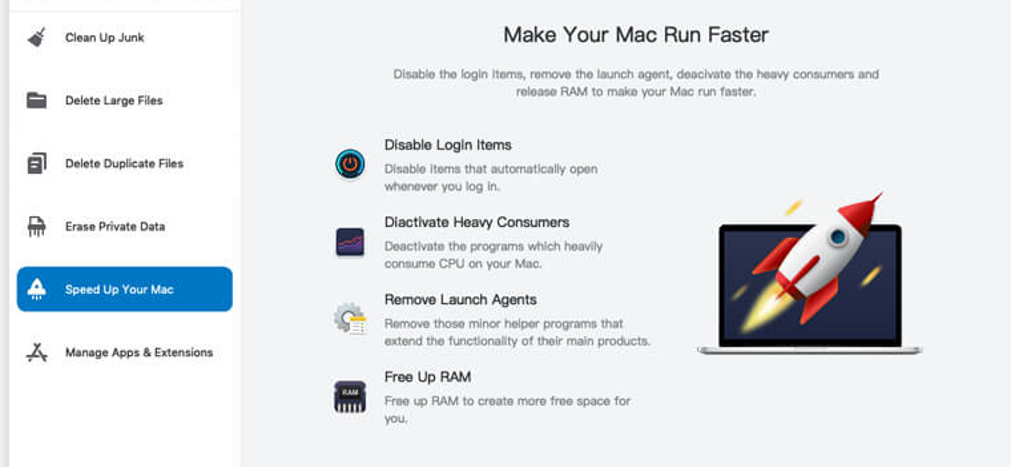
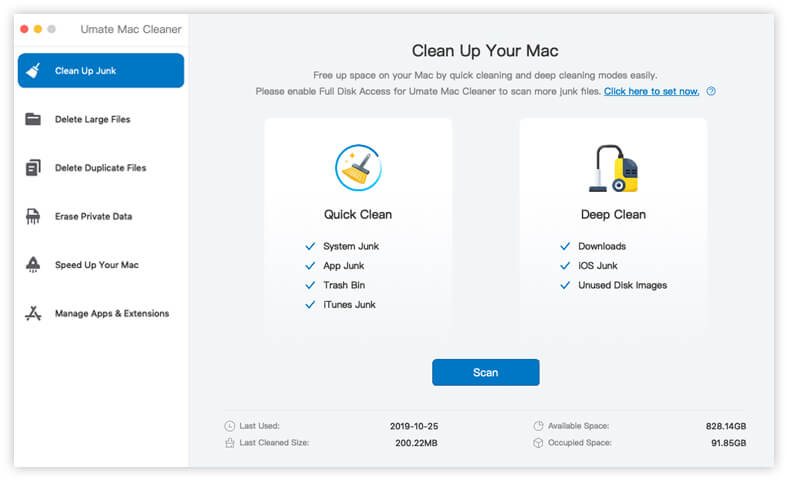
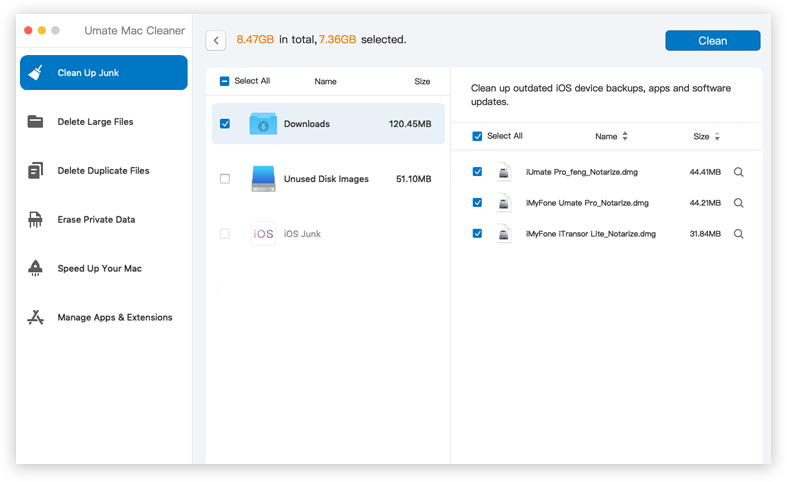
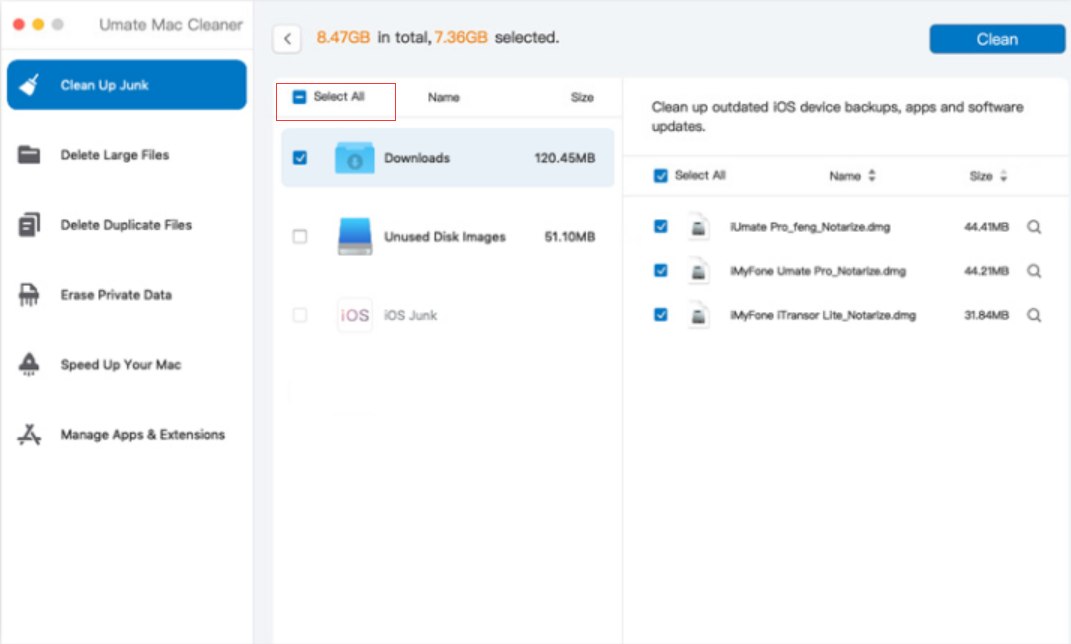
On the left side of the interface, you’ll find six different options. These correspond to the modules that Mac Cleaner has to offer, and they include (1) Clean Up Junk, (2) Delete Large Files, (3) Delete Duplicate Files, (4) Erase Private Data, (5) Speed Up Your Mac, and (6) Manage Apps & Extensions. All you have to do is select Clean Up Junk since it should be able to scan for and delete the following file categories: System Junk, App Junk, Trash Bin, iOS Junk, iTunes Junk, Unused Disk Images, and Downloads. The Spotify cache belongs under App Junk, so Clean Up Junk is the perfect module for the job.
Step #3: Click the Scan Button
Upon selecting the Clean Up Junk module, the software will split into two parts. One side says Quick Clean while the other says Deep Clean. Quick Clean allows you to scan for and delete the following junk files: System Junk, App Junk, Trash Bin, and iTunes Junk. Meanwhile, Deep Clean detects and deletes those categories in addition to the following: Downloads, iOS Junk, and Unused Disk Images. You can select either of the two since they should both include the Spotify cache, though we suggest choosing Deep Clean for a more accurate scan. Afterward, click the Scan button at the bottom of the interface.
Step #4: Choose a File Category and File/s
After the scan is complete, you’ll find a list of items on the left side of the next page. It should contain the categories mentioned earlier like System Junk, Downloads, Trash Bin, Unused Disk Images, and others. Select the App Junk category since that’s where the Spotify cache belongs. Upon selecting a category, a new list will appear on the right side of the interface consisting of actual files. Find and select the files that correspond to the Spotify cache. You can select an item by clicking on the checkboxes to its left. You can also click the checkbox for Select All if you want to include all items in the list.
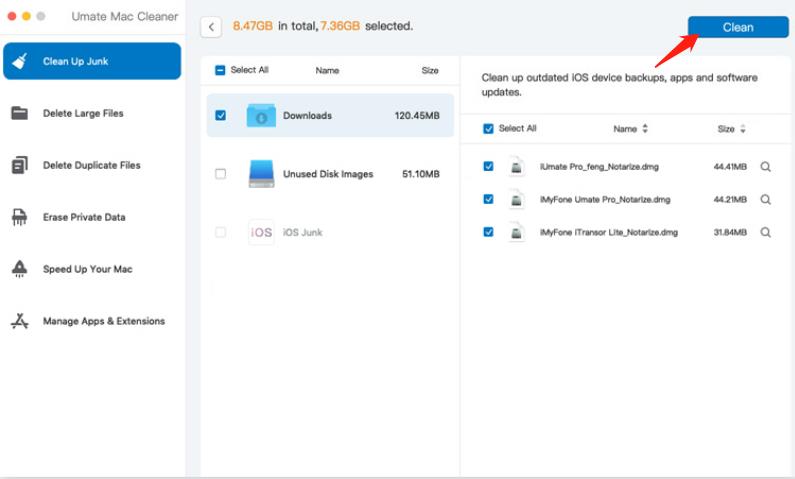
Step #5: Click the Clean Button
Finally, the last thing you must do is click the blue button at the top-right corner of the window, which should say Clean. By doing so, you’re prompting the software to delete the selected files. Now all you have to do is wait for a few seconds.
That’s how easily you can clear Spotify cache on Mac. Though the previous methods are simple, they’re also a bit inefficient. As stated earlier in this section, there are simply far too many issues with those traditional methods. The best part about this method is that you can do it regularly without compromising your time since the process is quite quick. So, as a result, you don’t have to worry about the Spotify cache ever taking up considerable space on your computer ever again.
Takeaways
Though it’s only one app, Spotify consists mostly of multimedia files. And if there’s one thing you need to know about these files, it’s that they tend to be larger than other file types like documents. As a result, the Spotify cache folder is often full of files that make up a considerable amount of storage space on your disk. For that reason, it’s important that you regularly clear the Spotify cache on Mac. It may be a bit difficult, but with this guide, that should be completely plausible, and easy, even, if you opt to use tools like Mac Cleaner.
Latest Articles