

A macOS computer storage consists of several file types. Among these types is the photo category, and it makes up a considerable portion of a Mac storage. Each photo has a size of around 1MB, and if you often deal with photos, it wouldn’t be a surprise if there are tens of thousands of photos on your computer. That’s why it’s common practice to regularly delete photos that you no longer need. iPhoto is usually what people use to do, but that’s no longer the case. Ever since Apple discontinued the iPhoto app, many people forgot how to operate it, much less how to delete photos using the iPhoto app.
If you’re one of the people who are wondering, “How do I delete photos from iPhoto?” This guide should be plenty of help. Read on as this article goes over several things you need to know about iPhoto, particularly, how you can delete photos from the app.
Method #1: Delete A Photo Via The iPhoto App
The most basic method is obviously to open the iPhoto app first and foremost. There are several ways to open the iPhoto app, so that part is entirely up to you. But for the purposes of this guide, we’ll take a look at the most commonly-used steps:
- On your computer, open the Finder app.
- Select Applications from the left sidebar of the interface.
- Find and open the Utilities folder.
- Locate and double-click the iPhoto icon.
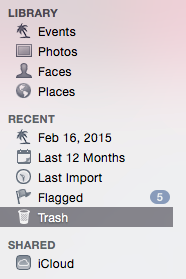
- Once the iPhoto app opens, you’ll find a bunch of things on the screen. In particular, you’ll find a couple of options from the left side of the interface. These are the directories of the app. Select Photos from the list of options.
- A bunch of photos should appear on the right side of the interface. What’s left is to select the ones you want to delete.
- Press the Delete key on your keyboard to delete the selected items.
Keep in mind that just like regular files, when you delete a photo, it’ll go to the Trash. In this case, it’ll go to the exclusive Trash of iPhoto, not the Trash app on your macOS. To permanently delete the photos to ensure they don’t take up disk space, click Trash from the left sidebar of the iPhoto app. There, you’ll find a list of items that correspond to the deleted photos. Select them and press Delete again to permanently delete them. Alternatively, you can empty the Trash and get rid of all its contents by clicking Trash from the left sidebar while holding the Ctrl key on your keyboard. Then, select Empty Trash.
Method #2: Delete Photos from The iPhoto Library
Just like any other app, iPhoto has a library or directory where you’ll find all the files it contains. These include the photos you edited through the app as well as the deleted photos. Through this directory, you can delete the photos the same way you delete a regular file, by pressing the Delete key on the keyboard. That much is easy enough. The difficult part is how you will find the directory since the file path often changes with every application update. Without further ado, here’s what you need to do:
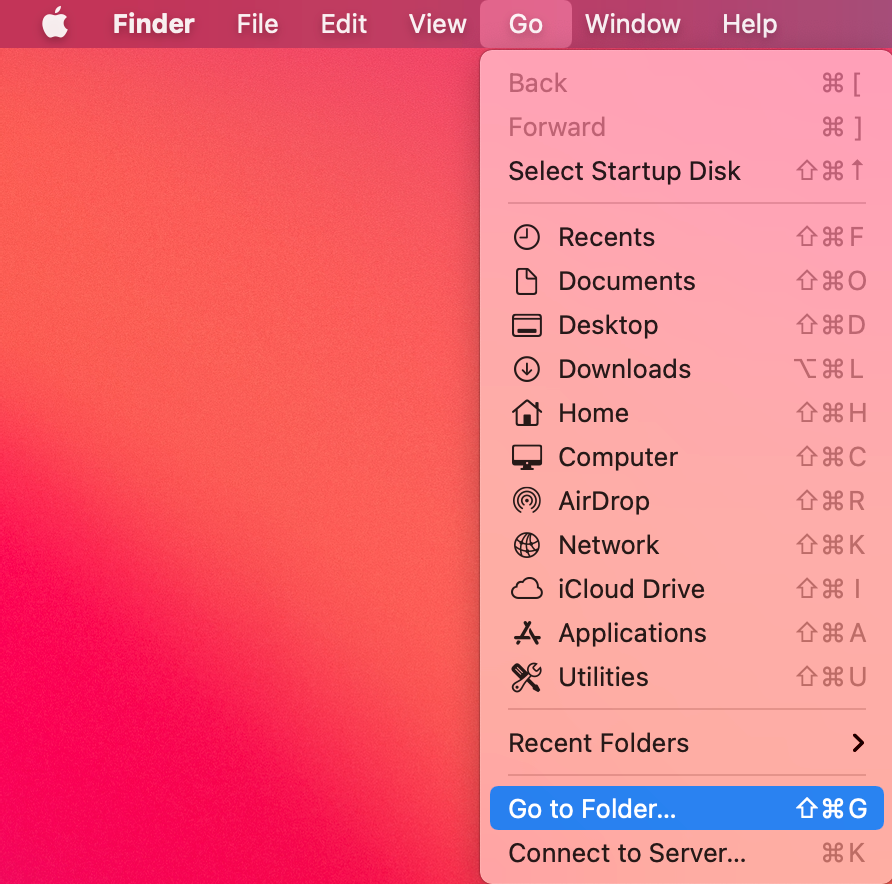
- Open Finder on your computer.
- Click Go from the top menu bar.
- Select Go to Folder… from the resulting dropdown menu.
- A popup window will appear. On the text bar, you must enter the file path of the iPhoto Library directory. It varies according to its version. Here’s a look at the file path of the iPhoto Library directory for each iPhoto app version:
- iPhoto 8: /Pictures/iPhoto Library/Originals/
- iPhoto 9: /Pictures/iPhoto Library/Masters/
- iPhoto 10: ~/Pictures/iPhoto Library.photolibrary/Masters/
- iPhoto 11: ~/Pictures/iPhoto Library.photolibrary/Masters/
- The Finder will take you to the directory, and you’ll find a bunch of items there. Select the ones you want to delete.
- Press the Delete key on your keyboard. Alternatively, you can drag the files over to the Trash icon.
Similar to the previous method, this will not permanently delete the photos. You must go to the Trash app of your macOS computer and then delete the photos from there as well. That way, they don’t take up disk space on your computer.
Method #3: Use Mac Cleaner
There are obviously pros and cons to each method of deletion. Using Finder takes longer since you have to find the files manually, but it at least allows you to search for specific keywords, and ironically, that can make the search faster. Meanwhile, using the iPhoto app itself can make the search easier since there’s a library of all the photos in its folder, but oftentimes, when you press the Delete button, it doesn’t work. That’s because iPhoto has its own Trash, so whenever you delete a photo, it actually goes iPhoto’s Trash and not your system Trash. This often results in photos clogging the iPhoto Trash directory.
Mac Cleaner is a cleaning app that not only allows you to get rid iPhoto files, but also helps empty the iPhoto Trash itself, so there shouldn’t be any photos clogging your storage system. Here are the steps on how to delete photos with this app:
Step #1: Download, Install, and Launch Mac Cleaner
The first step is to go to this link which corresponds to the Mac Cleaner download site. On that page, click the button that says Download Now. Upon doing so, the browser will start the download of a DMG file. Once the download is complete, open the file to start the installer. A popup window will appear, and all you have to do is follow the instructions displayed in that window. Mac Cleaner will open automatically once the installation is complete.

Step #2: Select Clean up Junk
On the left side of the main page, you’ll find six different options, and these include (1) Clean Up Junk, (2) Delete Large Files, (3) Delete Duplicate Files, (4) Erase Private Data, (5) Speed Up Your Mac, and (6) Manage Apps & Extensions. These options are the modules that Mac Cleaner has to offer. Each of them has a use for different scenarios, and in your case, the Clean Up Junk module seems to be the most useful. That’s because it allows you to get rid of junk files, including the system cache, iTunes junk, unused disk images, and app junk, which most likely includes the unnecessary photos from the iPhoto app, though there’s no guarantee. Anyway, to select the module, you simply have to click on it from the left side of the interface.
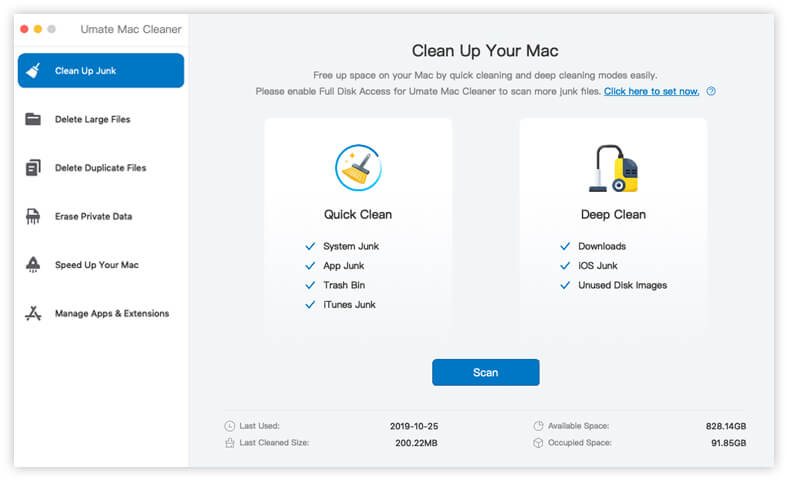
Step #3: Choose Scan Method and Click Scan
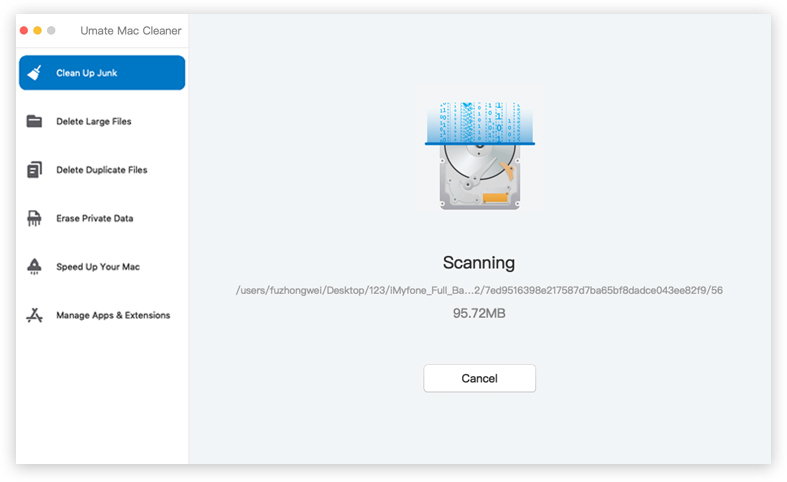
The interface for each module will vary from the other. In the case of the Clean Up Junk module, the interface will split into two parts. The left part says Quick Clean while the right side says Deep Clean. Choose Quick Clean if you want to scan for the following file types: System Junk, App Junk, Trash Bin, and iTunes Junk. Choose Deep Clean if you want to scan for additional file types, including Downloads, iOS Junk, and Unused Disk Images. Note that it also scans for the exact file types Quick Clean does. Once you select a module, click the Scan button located at the bottom area of the interface.
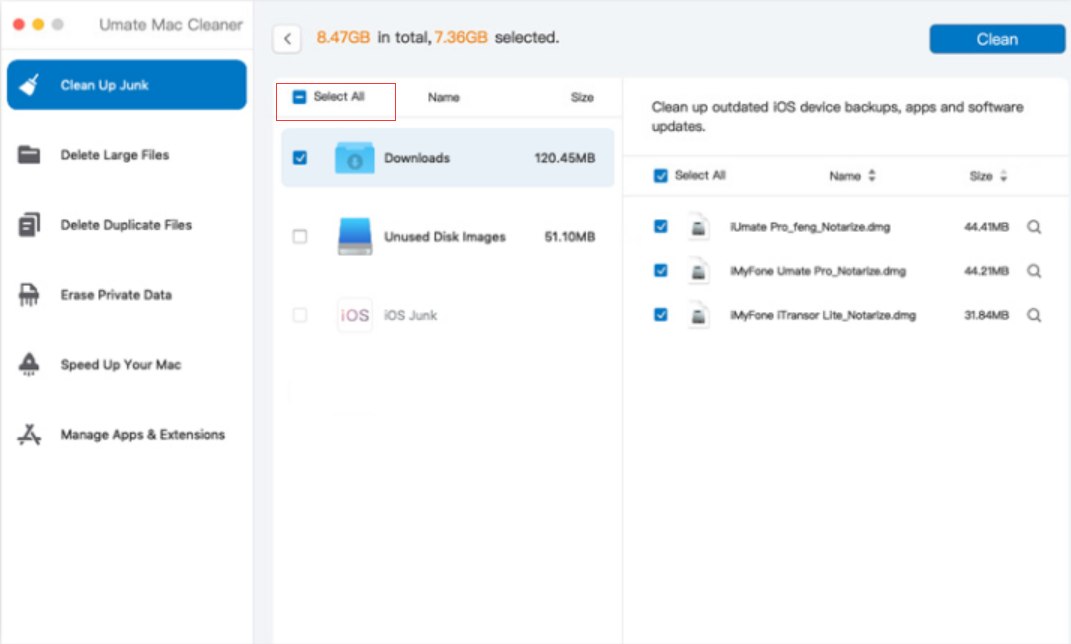
Step #4: Choose a File Category and File/s
The next step involves selecting the files you want to delete. But to do so, you must first pick a file category from the left side of the interface. It may consist of the following items: System Junk, Downloads, Trash Bin, iTunes Junk, and iOS Junk. Once you select a category, a new list will appear on the right side of the interface. This list will consist of actual files. You simply have to select the files you wish to delete by clicking their checkboxes. You can click Select All if you wish to delete them all.
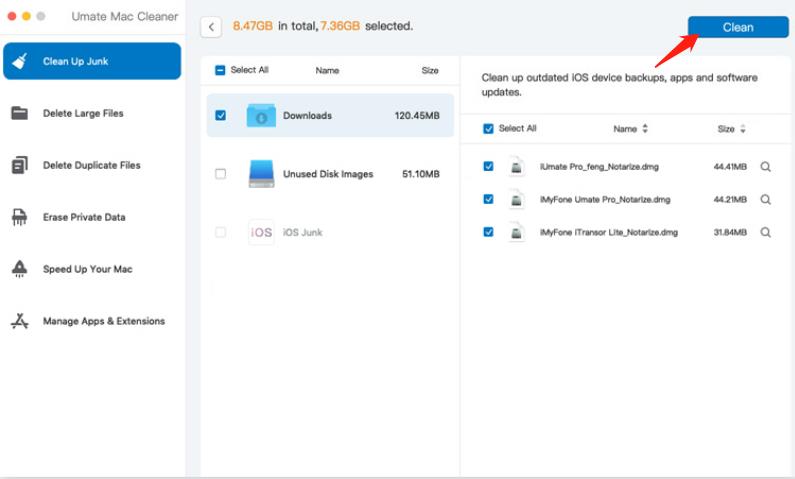
Step #5: Delete the File/s
After you select all the photos you want to delete from iPhoto using the interface, the only thing left to do is click the button at the upper right corner of the window that says Clean. That should finalize the deletion process, though you may have to wait for a few minutes or so for the deletion process to complete.
Keep in mind that Mac Cleaner only includes a file in the list if the software deems it unnecessary. For that reason, you shouldn’t expect that all the photos you want to delete from iPhoto will be included in the interface’s scanned files, since some of them might still have some value. However, you can be sure that the software will detect all the photos you already deleted from iPhoto and are lingering in the iPhoto Trash.
Wrapping up
iPhoto is without a doubt an excellent photo application, but it’s not without flaws. One particular flaw to iPhoto is that it’s lacking in features compared to other applications, so it makes sense why you’d struggle to perform basic tasks. Not to mention it’s also a relatively old app, so its lack of updates would eventually cause you to ask the question, “How do I delete photos from iPhoto?” With this guide, that shouldn’t be a problem, though you should keep in mind that the aforementioned methods won’t always work.
Latest Articles