

Firefox, like other web browsers, saves HTML and media files to its cache to speed up page loading times. However, a large amount of cache files can slow down the browser or cause pages to display incorrectly if the website has been updated. Clearing the cache in Firefox may be necessary to troubleshoot browser issues or free up disk space. This article will guide you on how to clear the cache in Firefox.
Part 1: Why Should You Clear Cache In Firefox
Cache refers to the stored data from web pages viewed through a browser. This includes information about images, videos, and other website content. The cache helps to make browsing faster by allowing the browser to instantly download pages from your hard drive if they are already stored in the cache.
However, over time, cache files can take up a significant amount of disk space and slow down the performance of your Mac and browser.
You should clear the cache in Firefox for several reasons, including:
- To troubleshoot browser issues: Clearing the cache can help to resolve any issues you may be experiencing with the browser, such as crashing or freezing.
- To free up disk space: Cached files can take up a significant amount of space on your hard drive, and clearing them can help to free up space.
- To view updated website content: If a website you frequently visit has been updated, clearing the cache will ensure that you are seeing the most recent version of the site.
- To protect your privacy: Clearing the cache removes stored data from websites, including login credentials and browsing history.
- To prevent errors caused by outdated files: Clearing the cache can prevent errors caused by outdated files that are stored in the cache.
It’s important to note that clearing Firefox cache will require you to log in again to your accounts on different websites, and will also remove any autofill information and log you out of your accounts. You can clear the cache by manually finding the files in the Library folder or by using an app such as Mac Cleaner, which is the quickest way to remove the cache of any application on a Mac, including Firefox.
Part 2: The Standard Way of Clearing Cache in Firefox
Clearing the cache in Firefox can be done by using the built-in option in the browser. Here’s the step-by-step process:
- Open Firefox browser.
- Click on the “Menu” button (three horizontal lines) located in the top-right corner.
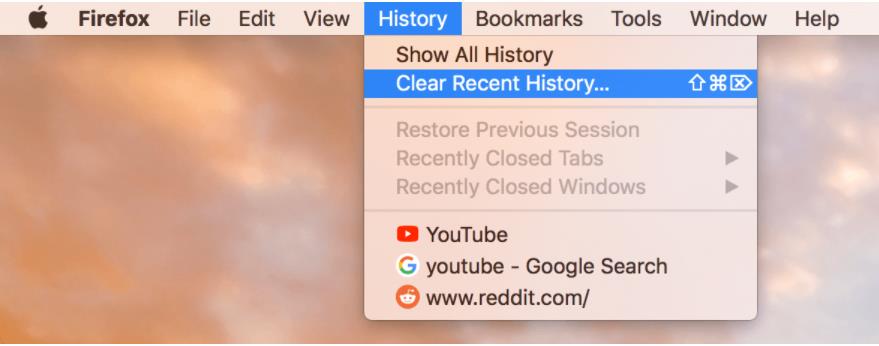
- Select “History” from the menu, then click on “Clear Recent History”.
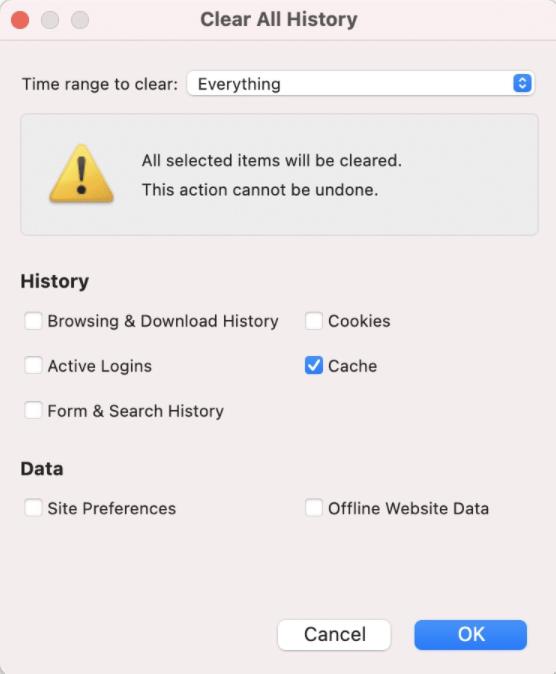
- In the “Time range to clear” select “Everything”
- In the “History” section, check the box next to “Cache”
- Click on the “Clear Now” button.
- Restart the Firefox browser.
This will clear the cache in Firefox, and your browser will no longer have access to the stored files from previously visited websites.
Part 3:What is the “Clear Cache” Shortcut for Firefox
An alternative method for accessing the History window in Firefox and clearing the cache is by using a specific keyboard shortcut:
- Press “Shift + Command + Del” on a Mac. This will open the “Clear Recent History” window.
- Select “Cache” and choose the desired time range.
- Click on the “Clear Now” button.
- This will clear the cache in Firefox, and your browser will no longer have access to the stored files from previously visited websites.
- Using this shortcut will open the “Clear Data” window, which allows you to select what data you want to clear from your browser. By default, the “Cache” option is selected, but you can also choose to clear other data such as cookies, history, form data, etc. Once you have selected the data you want to remove, click on the “Clear Now” button to clear the cache in Firefox.
Note: Clearing cache will also remove other information like cookies, history, form data, etc.
Part 4:How to Clear Firefox Cache on Mac manually
This will clear the cache in Firefox, and your browser will no longer have access to the stored files from previously visited websites.
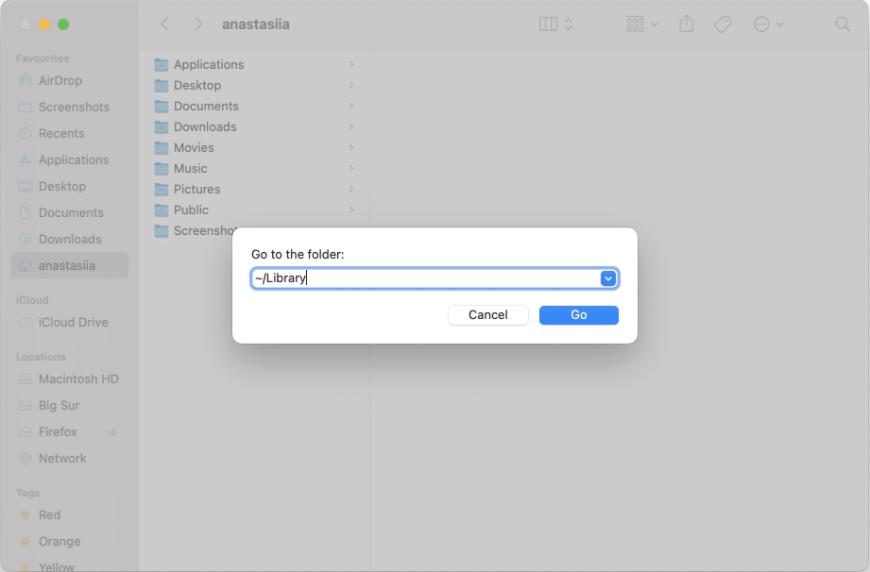
- Open Finder.
- Press “Shift + Command + G” on your keyboard.
- In the search field, enter “~/Library” and press “Go“.
- Locate and open the “Caches” folder.
- Inside the Caches folder, open the “Mozilla” folder.
- Remove the files inside this subfolder.
- Empty the trash and restart Firefox.
This will manually clear the cache files in Firefox and your browser will no longer have access to the stored files from previously visited websites.
Note: Clearing cache manually this way will not log you out of any websites or remove autofill data.
Part 5:Clear Cache in Firefox using Mac Cleaner
Mac Cleaner is a free software tool that can be used to clear cache in Firefox. This app makes it easy to reset Firefox to its default settings by removing cache, cookies, logs, preferences, and other support files.
Additionally, it allows you to completely uninstall apps, delete any remaining files, manage startup programs, and change default apps on your Mac. If you plan on using Mac Cleaner, this is what you need to do:
Step #1: Download, Install, and Set Up Mac Cleaner
To start using Mac Cleaner, follow these steps:
- Visit the Mac Cleaner download page by clicking on the provided link.
- Click the “Download Now” button to download the DMG file.
- Open the DMG file and run the installer.
- Follow the on-screen instructions to complete the installation process.
- Once the installation is finished, the software will open automatically.

Step #2: Pick from Six Modules
Mac Cleaner has a total of six modules, each with its own set of features. The modules include:
- Clean Up Junk, which scans for and deletes unnecessary files;
- Delete Large Files, which searches for files larger than or equal to 50MB;
- Delete Duplicate Files, which locates and removes duplicate files;
- Erase Private Data, which deletes files that may contain sensitive information;
- Speed Up Your Mac, which optimizes the performance of your macOS;
- Manage Apps & Extensions, which allows you to uninstall apps and remove browser extensions.
To access the modules, simply select one from the left sidebar within the software.
Step #3: Click Scan/Start Now/View Items
Mac Cleaner has a total of six modules, each with its own unique functionality. These modules include Clean Up Junk, Delete Large Files, Delete Duplicate Files, Erase Private Data, Speed Up Your Mac, and Manage Apps & Extensions. To scan for files using each module, the steps may vary.
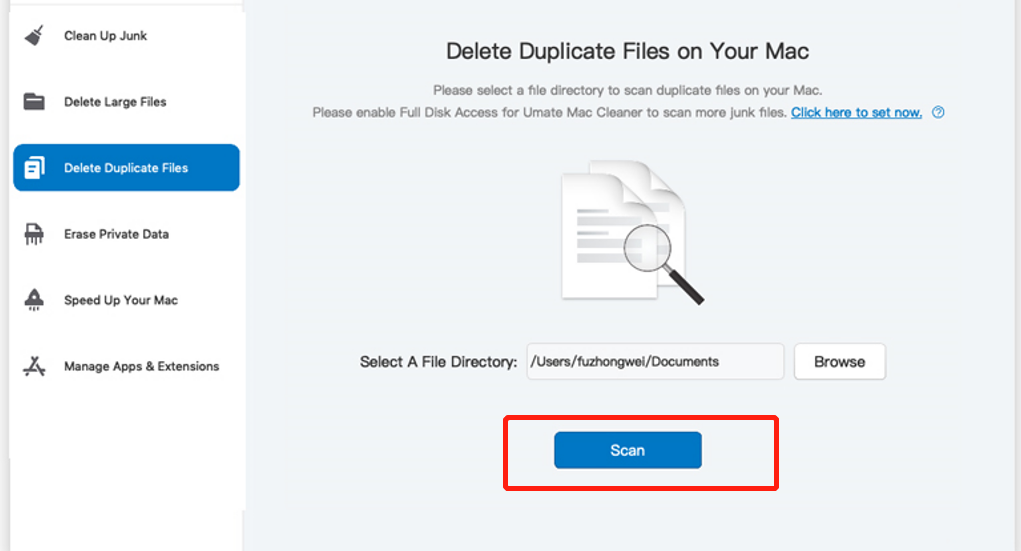
For example, in the Clean Up Junk module, you can choose between Quick Clean or Deep Clean, while in the Delete Large Files module, you simply need to click the Scan button. Similarly, in the Delete Duplicate Files module, you will need to select a file directory and click the Scan button. In the Erase Private Data module, you will also need to click the Scan button.
In the Speed Up Your Mac module, you just need to click the Start Now button. And in the Manage Apps & Extensions module, you will need to select either Uninstall Applications or Remove Extensions and click the View Items button.
Step #4: Select Item/s
The actions required in this step may vary depending on the module you have chosen. The main objective is to select items from a list, which can include files or apps. Here’s a breakdown of what you need to do for each module:
- Clean Up Junk: You will see two lists, with one listing file category such as System Junk, Downloads, Trash Bin, Unused Disk Images, etc. When you select a file category, a second list will appear on the right, containing actual files. Select the files you wish to delete or click Select All to include them all.
- Delete Large Files: Choose an item (such as a file, folder, disk image, or archive) from the list.
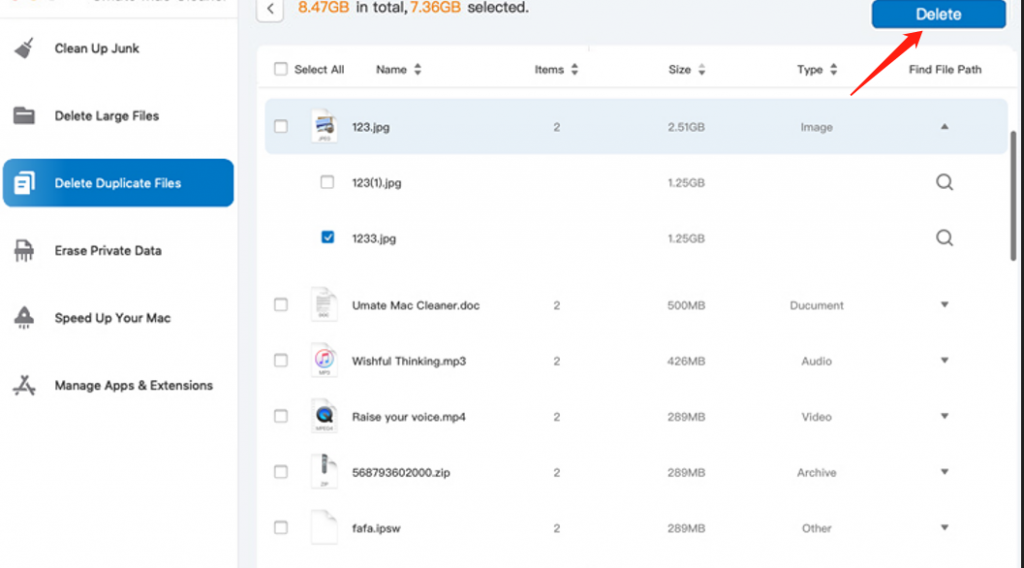
- Delete Duplicate Files: Select an item (such as an image, document, audio, or video) from the list.
- Erase Private Data: Similar to Clean Up Junk, there will be two lists. The left list will include five options, such as Online Traces, Usage Traces, Chat Data, Photo Junk, and Mail Attachment. When you select a category, the right list will display files related to that category. Select the items you want to erase.
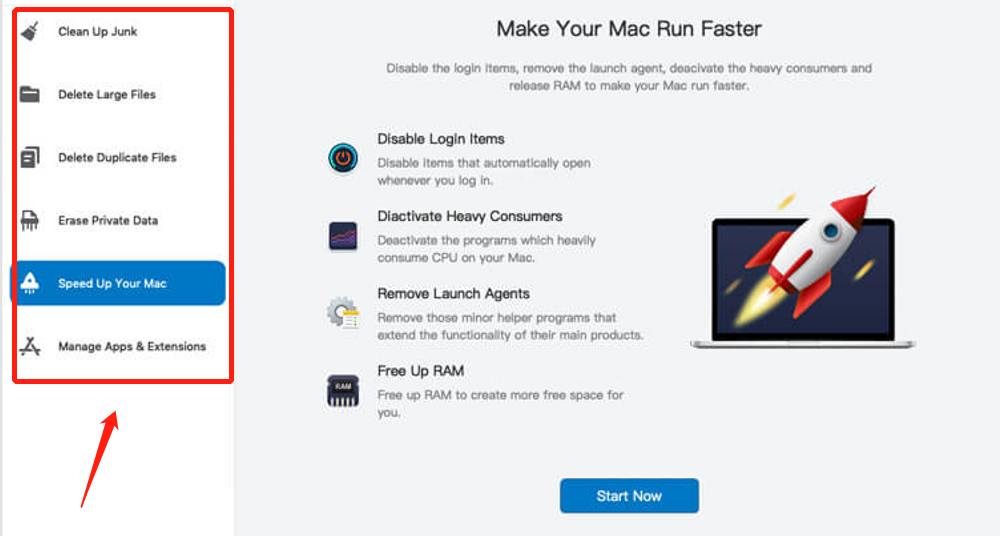
- Speed Up Your Mac: The interface is similar to previous modules, with a left list containing four options: Disable Login Items, Deactivate Heavy Consumers, Remove Launch Agents, and Free Up RAM. Select a category, then choose items from the right list.
- Manage Apps & Extensions: The software will show a list of apps if you have chosen Uninstall Application, in which case no further action is required. If you selected Remove Extensions, the software will display a list of browsers. Select the browser you wish to proceed with.
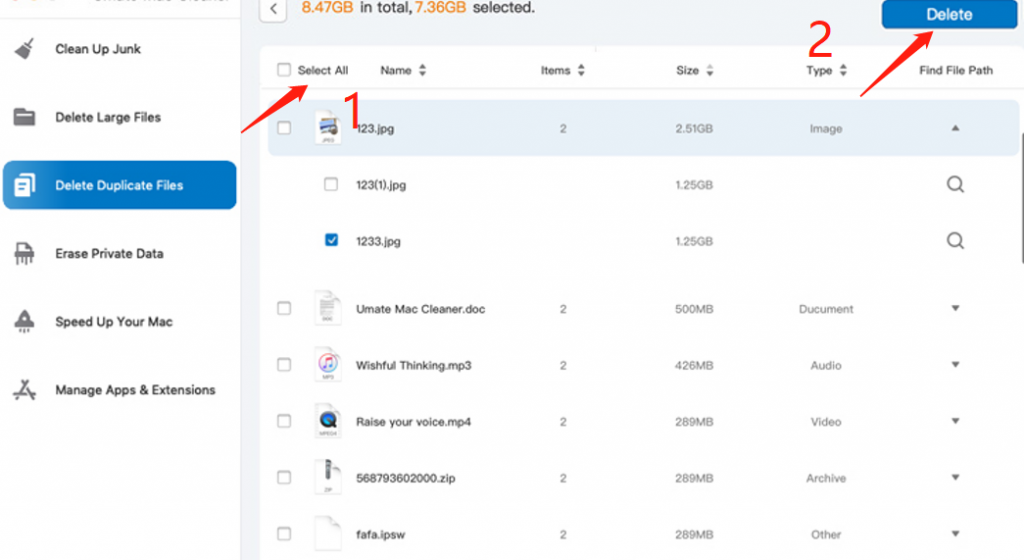
Step #5: Click the Blue Button
The final step is to click the blue button on the screen, which may say Clean, Delete, Erase, Deactivate, Uninstall, or Remove, depending on the module you have chosen. This will complete the process.
Going Forward
Clearing your Firefox cache can help free up disk space on your Mac, prevent errors on websites, fix page loading issues, and improve browser performance. As cache files accumulate over time, they can take up a significant amount of space and cause issues with displaying updated website information or loading pages.
Latest Articles