

FaceTime is an app that allows you to make a video or audio call with a contact. Just like other communication apps like Skype and Messenger, it keeps a record of your most recent calls and messages called the FaceTime history.
Though it’s a rather useful feature, it can be a liability, especially since the history logs may accumulate and eventually consume several hundred MBs worth of storage space. Of course, at that point, the best thing you can do is simply clear the history. If you’ve used other apps before, then you should know that there’s usually a feature that allows the user to delete the history. FaceTime is no exception, as it allows you to delete the records of your most recent calls, but of course, the steps will be different from what you’re used to with other apps. But first, what happens when you clear the FaceTime history?
What Happens If You Clear FaceTime History on Mac?
A common misconception about the FaceTime history is that when you clear it on your device, it would clear the FaceTime history from the other person’s device as well. This is not at all the case. Even if you clear all the call logs, the person can still see the details about it, such as when the call was made or who was on the other side of the call. Therefore, if your main objective in clearing the FaceTime history is to delete its traces, that’s not going to work since there will still be traces on the other person’s device. The only time you’ll ever need to do it is to free up space on your Mac or clean the FaceTime app.
Similarly, when you create a backup of your call logs on an external drive or the cloud, clearing the FaceTime history won’t affect those backups. With that out of the way, let’s take a look at the two methods on how to clear FaceTime history on Mac.
Method #1: Erase Calls Using The App
The first method involves using the FaceTime app to delete the calls. It’s the simpler and easier option between the two as it only requires you to click a few buttons and you’re done. Here’s how to clear FaceTime history on Mac using the app:
- On your Mac, open the FaceTime app. You can do this by simply clicking the icon from the Dock. If it’s not there, then you can instead open Launchpad (the rocket icon) from the Dock, and select FaceTime from there.
- Find the calls you want to delete.
- Click the call while holding the Ctrl key on your keyboard.
- Select Remove from Recents from the resulting dropdown menu.
- Do steps #2 to steps #4 to all the calls you want to delete.
Alternatively, if you want to delete all the calls from the app, here’s what you need to do:
- Open the FaceTime app on your computer.
- Click the FaceTime tab from the top menu bar.
- Select the Remove All Recents button from the dropdown menu.
As you can see, it’s fairly simple, though keep in mind that the texts will vary according to your macOS version. Still, the steps should be roughly the same. However, it has the downside of being only accessible if you can find the FaceTime app from your computer. Moreover, if you don’t want to delete all your calls, you’ll have to select each call individually, which can be time-consuming if you made a ton of calls within the past few days. The second method somehow solves this issue.

Method #2: Delete Files from The FaceTime Directory
Though it’s a much harder and a bit more complex method, you can also delete the FaceTime call history via Finder, the file management app of macOS. It requires a bit more clicking of buttons, but it’s not that difficult. Here’s how you can do it:
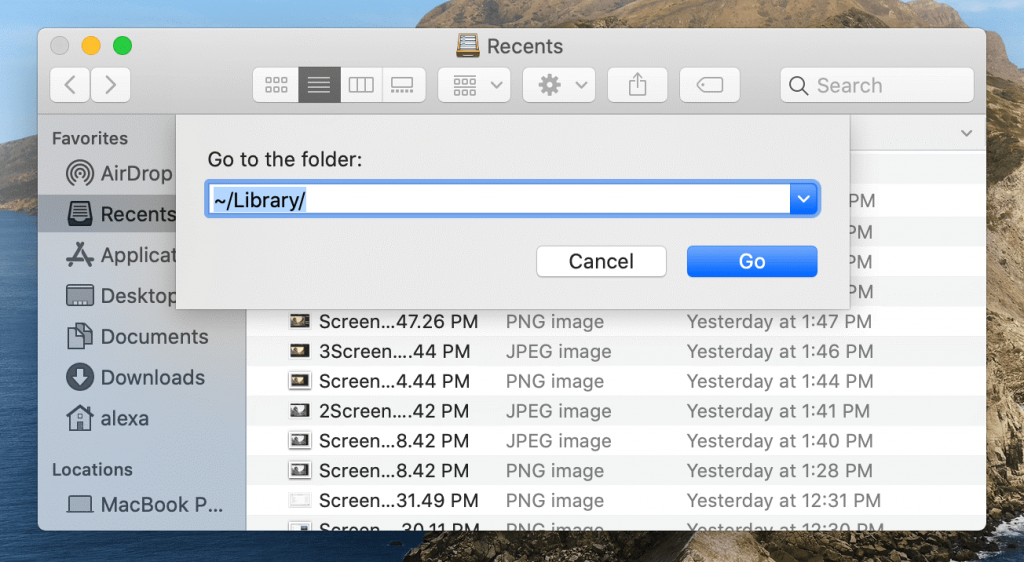
- Open the Finder app.
- Click Go from the top menu bar.
- Select Go to Folder… from the dropdown menu.
- A popup menu will appear. There, type in the following text: ~/Library/Application Support/FaceTime.
- Click the Go button.
- Finder will take you to the FaceTime directory where you can the call history files. Simply delete the ones that you think correspond to the calls you want to clear.
While it does solve the downside of the first method of being too manual and time-consuming, this method also has its downsides of its own. Primarily, it poses a risk of deleting important FaceTime files since the call history has no distinguishing property, meaning you might delete other files unintentionally. Considering the payoff of clearing the FaceTime history, it may seem like it’s really not worth learning how to clear FaceTime history on Mac.
BONUS: Erase Personal Traces With Mac Cleaner
While the FaceTime history does indeed consume disk space from your computer, the amount they can consume isn’t comparable to other file types. At most, it may consume hundreds of MBs worth of space. However, considering how other file types take up tens of GBs worth of storage, deleting the FaceTime history isn’t at all an effective strategy. If your objective is to simply free up space, deleting other file types is more effective, and Mac Cleaner can help in that regard.
Mac Cleaner is a cleaner software that allows you to erase unnecessary files on your computer that are possibly consuming a considerable amount of space. If you wish to free up space using this software, here’s what you need to do:
Step #1: Launch Mac Cleaner on Your Computer
You must first gain access to the software by going to the Mac Cleaner download page. There, click the Download Now button. It should prompt the download of a DMG file, which you must open to run the installer. Follow the onscreen instructions from then on. The software should open automatically once it’s been installed.
Step #2: Choose Erase Private Data
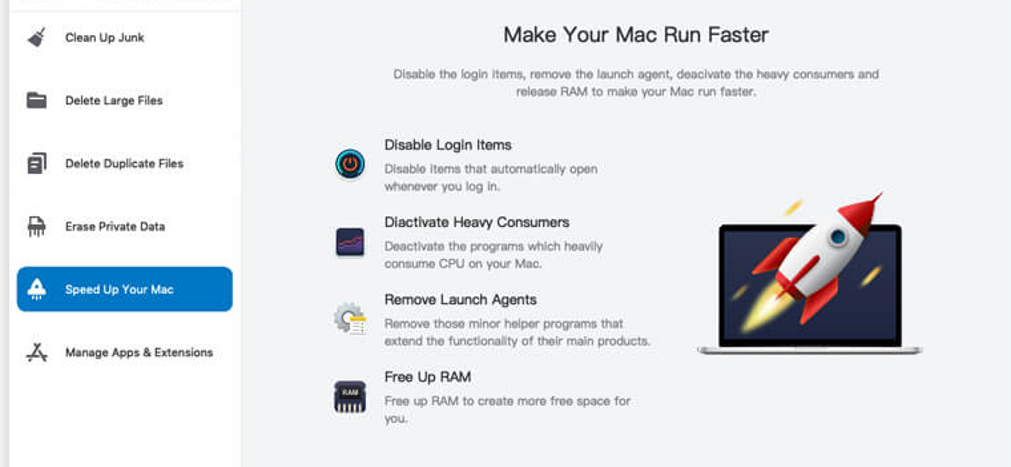
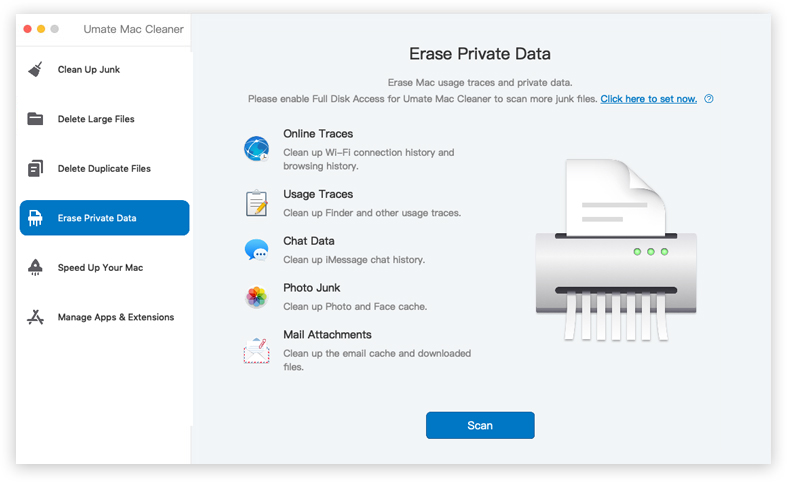
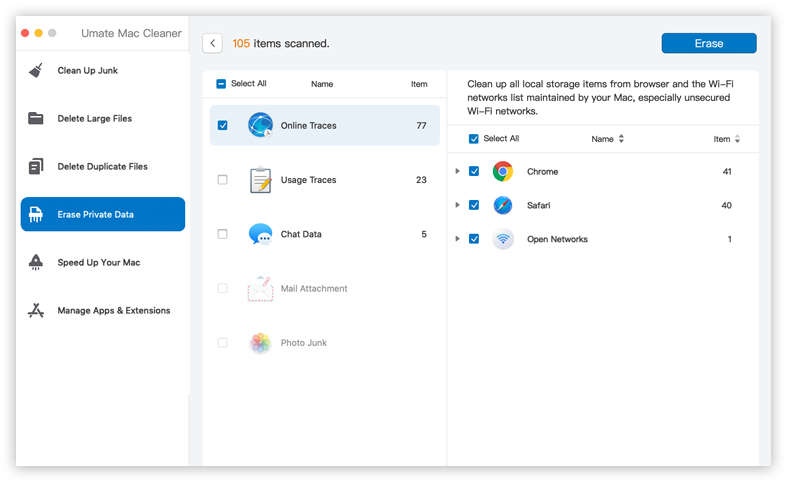
Mac Cleaner has six different modules, and these are (1) Clean Up Junk, (2) Delete Large Files, (3) Delete Duplicate Files, (4) Erase Private Data, (5) Speed Up Your Mac, and (6) Manage Apps & Extensions. Though each module has different features, for your purposes, you’ll only need the Erase Private Data module. It allows you to scan for private data like usage and online traces, which means it’ll include your FaceTime history and other files. To select this module, you simply have to click on it from the left-hand side of the software where the six different modules are located.
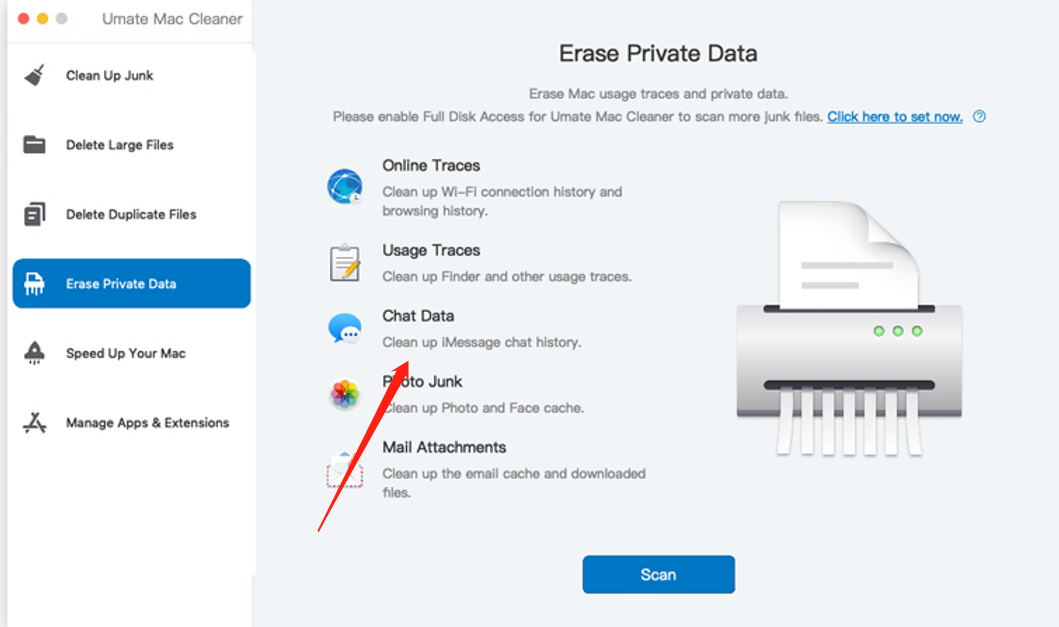
Step #3: Click the Scan Button
Upon selecting a module, you’ll see blocks of text at the center of the interface. The text explains how the selected module works and what features it has. You can read the text if you wish to learn more about the Erase Private Data module. If you want to proceed, however, you need to click the Scan button located underneath the blocks of text.
Step #4: Choose a File Category and File/s
It may take a while for the scan to finish, but once it’s done, the software will display a list of items that it has scanned. To be more precise, the list on the left-hand side of the software will consist of the five file categories of the module, including:
- Online Traces refer to your browsing history and Wi-Fi connection history.
- Usage Traces corresponds to your Finder usage and search history.
- Chat Data is the iMessage chat history.
- Photo Junk refers to files belonging to the Face and Photo cache.
- Mail Attachment represents the downloaded files and cache from your email apps.
Simply select a category by clicking on it from the left sidebar. Once you do, the software will generate a new list on its right sidebar. There, you’ll find the files that belong to the selected file category. If you chose Chat Data, for instance, you’ll find a list of files that represent your iMessage chat history. Select files from this list by clicking on their corresponding checkboxes. If you wish to select all items at once, you can simply click the checkbox for Select All at the top of the list.
Step #5: Delete the File/s
Upon selecting all the files you wish to delete, click the blue button located in the upper-right corner of your screen. It should have the text Erase. Clicking this button will finalize the process and allow you to delete the selected items.
Keep in mind that you can use other modules if you wish to delete files from other categories, such as junk files or duplicate files. You can do this because Mac Cleaner has several modules, and therefore, offers numerous functionalities.
Closing Thoughts
Being able to see your most recent audio and video calls from FaceTime is an excellent feature as it provides a level of convenience to users. But as helpful as it may be, there are times when you’ll need storage space the FaceTime history consumes more than the convenience it provides. That’s why before that happens, you must know how to clear FaceTime history on Mac. Fortunately, it’s not that difficult, not to mention there are several ways to go about it, and this guide should cover all that, and more.
Latest Articles