

In the digital age, photo editing has become an essential skill for anyone looking to enhance their images, whether for personal use or professional purposes. Fortunately, Mac users have access to a range of powerful photo editing tools that can transform their pictures into stunning visual masterpieces. In this blog post, we will guide you through the process of editing photos on Mac, highlighting the key tools and techniques you can utilize to bring out the best in your images.
Part 1: How to Edit Photos on a Mac Through the Photos App
Editing photos on Mac through the native Photos app is a straightforward process. Here’s a step-by-step guide on how to edit photos using the Photos app
- Open the Photos app: Launch the Photos app on your Mac. You can find it in the Applications folder or by searching with Spotlight (Command + Space).
- Import your photos: If the photo you want to edit is not already in the Photos library, import it by dragging and dropping the file into the Photos app or using the Import option in the File menu.
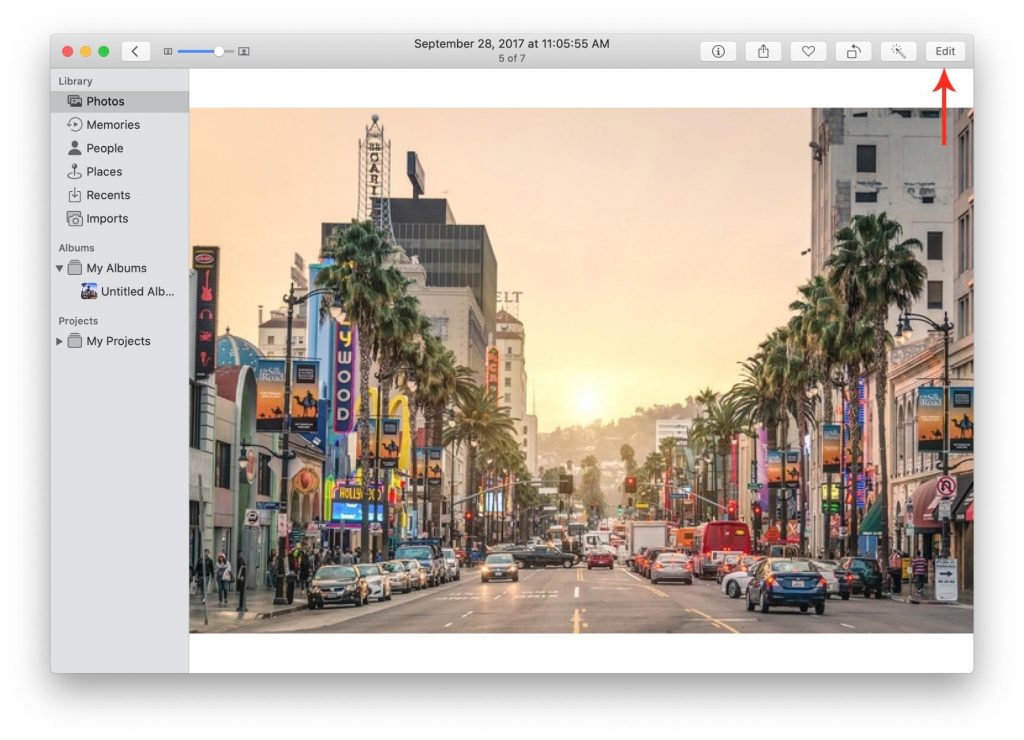
- Select the photo to edit: Navigate to the photo you want to edit by browsing your library or using the search feature.
- Enter Edit mode: Double-click on the photo or click on the Edit button located in the top-right corner of the Photos window. You can also use the Command + Return keyboard shortcut to enter Edit mode.
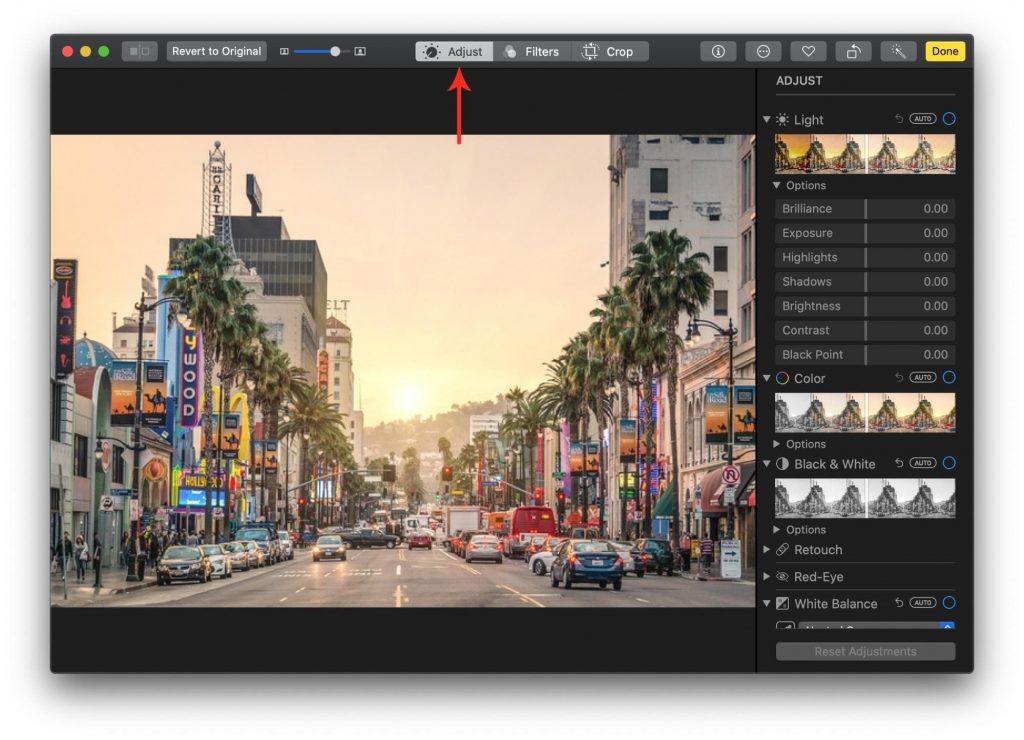
- Make basic adjustments: In Edit mode, you will see various editing options on the right side of the window. Use the Adjust button (dial icon) to reveal basic editing tools. Adjustments such as Enhance, Rotate, Crop, Filters, and Retouch can be found here. Experiment with these tools to enhance your photo.
- Fine-tune your edits: Use the individual adjustment sliders to refine your changes. You can adjust Exposure, Contrast, Saturation, Highlights, Shadows, and other parameters based on your preferences.
- Apply filters: Explore different filter options available under the Filters tab. Click on a filter to apply it to your photo, and use the Intensity slider to control the strength of the effect.
- Use additional editing tools: Explore the other editing tools available in the Edit mode. Adjust specific areas of your photo using the Selective Color, Definition, Noise Reduction, and other tools to achieve the desired look.
- Compare and revert changes: To compare your edited version with the original, press the M key or click on the Show Original button in the top-left corner. If you’re not satisfied with your edits, you can revert to the original photo by clicking on the Revert to Original button.
- Save and export: Once you’re happy with your edits, click on the Done button in the top-right corner. The edited version will be saved and updated in your Photos library automatically.
That’s it! You’ve successfully edited your photo using the Photos app on your Mac. Feel free to experiment with different tools and options to further enhance your images.
Part 2: How to Edit Photos on a Mac Through the Photos App.
Applying photo filters via the Photos app on Mac is a quick and easy way to enhance the look and mood of your images. Follow these steps to apply filters using the Photos app:
- Open the Photos app: Launch the Photos app on your Mac from the Applications folder or use Spotlight search (Command + Space).
- Select the photo to edit: Browse through your photo library or use the search feature to locate the photo you want to edit.
- Enter Edit mode: Double-click on the photo or click on the Edit button located in the top-right corner of the Photos window. Alternatively, you can use the Command + Return keyboard shortcut.
- Access the Filters option: In Edit mode, you’ll see various editing options on the right side of the window. Click on the Filters button (three overlapping circles icon) to reveal the available filter options.
- Choose a filter: The Filters option will present you with a selection of pre-designed filters to choose from. Click on a filter thumbnail to apply it to your photo.
- Adjust the filter intensity (optional): After applying a filter, you can adjust its intensity to fine-tune the effect. Use the Intensity slider located below the filter options to increase or decrease the strength of the applied filter.
- Compare and revert changes: To compare the edited version with the original, press the M key on your keyboard or click on the Show Original button in the top-left corner of the window. If you want to revert to the original photo, click on the Revert to Original button.
- Save and export: Once you’re satisfied with the applied filter, click on the Done button in the top-right corner to save your changes. The edited version of the photo will be updated in your Photos library automatically. By following these steps, you can easily apply photo filters using the built-in options in the Photos app on your Mac. Experiment with different filters to find the one that best enhances the look and mood of your photos.
Part 3: How to Crop a Picture with the Photos App.
- Cropping a picture using the Photos app on Mac is a simple process. Follow these steps to crop your photo:
- Open the Photos app: Launch the Photos app on your Mac from the Applications folder or using Spotlight search (Command + Space).
- Select the photo to crop: Browse through your photo library or use the search feature to locate the photo you want to crop.
- Enter Edit mode: Double-click on the photo or click on the Edit button located in the top-right corner of the Photos window. Alternatively, you can use the Command + Return keyboard shortcut.
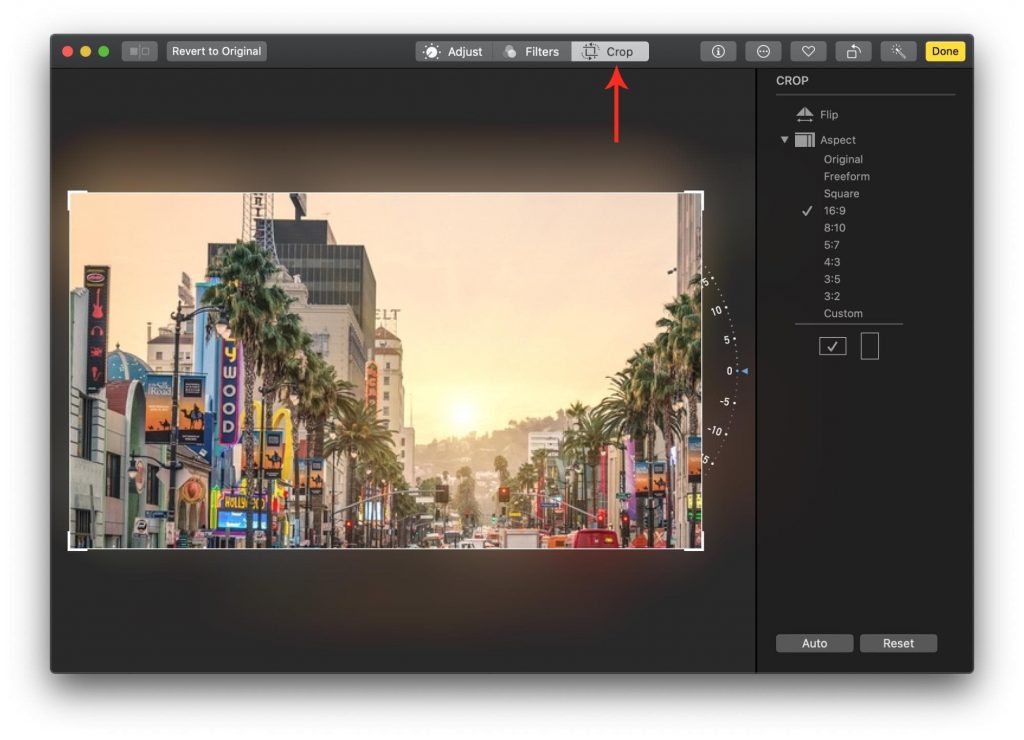
- Access the Crop tool: In Edit mode, you’ll see various editing options on the right side of the window. Click on the Crop button (a square with diagonal lines) to activate the cropping tool.
- Adjust the crop boundaries: Once the Crop tool is active, you’ll see adjustable boundary handles around the photo.
- Click and drag these handles to adjust the crop boundaries as desired. Alternatively, you can click and drag inside the photo to reposition the crop area.
- Maintain aspect ratio (optional): If you want to maintain the original aspect ratio of the photo, hold down the Shift key while dragging the boundary handles. This ensures that the photo is cropped proportionally without distorting its dimensions.
- Rotate or straighten (optional): If your photo needs rotation or straightening, you can use the rotation dial or straightening tool available within the Crop tool. Click on the Rotate button (a circular arrow) to rotate the photo in 90-degree increments. Use the Straighten button (a ruler) to adjust the angle of the photo manually.
- Finalize the crop: Once you’re satisfied with the crop, click on the Done button in the top-right corner to save your changes.
- Save and export: The edited version of the photo with the applied crop will be updated in your Photos library automatically.
By following these steps, you can easily crop your photos using the built-in Crop tool in the Photos app on your Mac. Adjust the crop boundaries and optionally rotate or straighten the photo to achieve the desired composition.
Part 4: How to Markup Photos with the Photos App
To markup photos using the Photos app on Mac, follow these steps:
- Open the Photos app: Launch the Photos app on your Mac from the Applications folder or use Spotlight search (Command + Space).
- Select the photo to markup: Browse through your photo library or use the search feature to locate the photo you want to markup.
- Enter Edit mode: Double-click on the photo or click on the Edit button located in the top-right corner of the Photos window. Alternatively, you can use the Command + Return keyboard shortcut.
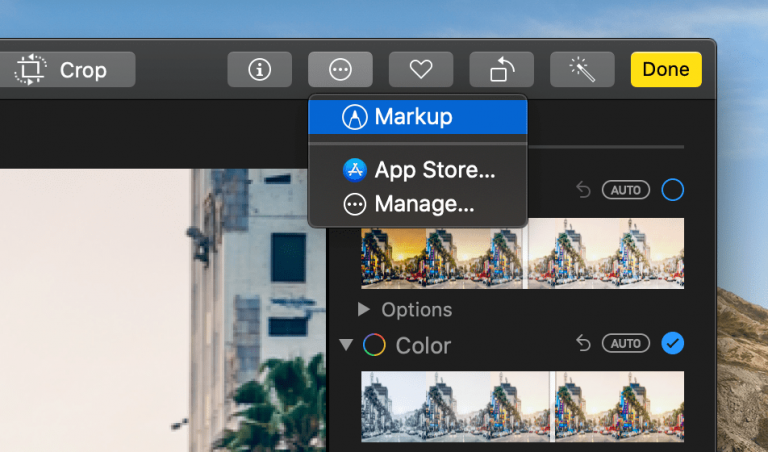
- Access the Markup tools: In Edit mode, you’ll see various editing options on the right side of the window. Click on the Extensions button (three dots in a circle) and choose Markup from the available options.
- Choose a Markup tool: Once the Markup tools are activated, you’ll see a toolbar at the top of the photo with various markup options. Select the desired tool from the toolbar. Options include:
- Drawing tool: Allows you to draw shapes, lines, arrows, and freehand annotations using different colors and line thicknesses.
- Text tool: This lets you add text annotations to your photo. You can customize the font, size, color, and alignment of the text.
- Shape tool: Offers predefined shapes like rectangles, circles, speech bubbles, and more. Adjust the shape’s color, outline, and opacity.
- Loupe tool: This allows you to magnify a specific portion of the photo by creating a circular or rectangular magnifier.
- Signature tool: If you’ve already saved a signature in Preview, you can insert it into the photo.
- Adjust tool: Provides options to adjust brightness, contrast, saturation, and other parameters of the photo.
- Markup your photo: Choose the desired tool and make annotations, drawings, or adjustments to your photo. Customize the properties of the markup tool, such as color, size, and opacity, as needed.
- Save and export: Once you’re done with the markup, click on the Done button in the top-right corner to save your changes. The edited version of the photo with the applied markup will be updated in your Photos library automatically.
By following these steps, you can easily markup your photos using the built-in Markup tools in the Photos app on your Mac. Add annotations, drawings, text, shapes, and more to enhance and personalize your photos.
Conclusion
Editing photos on a Mac offers a wealth of creative possibilities, from basic adjustments to advanced techniques. By leveraging the photo editing software available to you, you can transform ordinary images into captivating works of art. Remember to experiment, practice, and develop your editing skills over time. With dedication and creativity, you’ll soon be able to produce stunning photos that reflect your unique vision and style. So, grab your Mac, unleash your creativity, and let the photo editing journey begin!
Latest Articles