

Google Chrome is one of the most popular web browsers, known for its speed, versatility, and a vast selection of extensions. Chrome extensions are small software programs that integrate seamlessly into the browser, allowing users to enhance their browsing experience with added functionality and features. Among the plethora of Chrome extensions available, “clear” extensions stand out as invaluable tools to declutter, organize, and optimize your online activities. In this blog, we will explore the top clear Chrome extensions that can help you achieve a streamlined and efficient browsing experience.

Part 1: What Are Extensions And Why Should You Remove Them?
Extensions, also known as browser extensions or add-ons, are small software programs that users can install to extend the functionality of their web browsers. These extensions add extra features, tools, and capabilities to the browser, enhancing the overall browsing experience. They are available for various web browsers like Google Chrome, Mozilla Firefox, Microsoft Edge, and others. Extensions can serve a wide range of purposes, such as:
- Enhancing Productivity: Some extensions help users stay organized, manage tasks, take notes, or access productivity tools directly within their browser.
- Improving Privacy and Security: Certain extensions offer features like ad blockers, anti-tracking tools, and VPNs to enhance online privacy and security.
- Customizing Appearance: Extensions allow users to personalize their browser’s appearance by changing themes, adding custom backgrounds, and more.
- Adding Entertainment: Some extensions provide quick access to games, music, or video content to entertain users while they browse.
- Social Media Integration: Many extensions help users interact with their social media accounts, making it easier to share content or manage notifications.
Why Should You Remove Extensions
However, while extensions can be helpful, there are reasons why you might want to remove them:
- Performance Issues: Some extensions can consume a significant amount of system resources, leading to slower browser performance and increased page load times.
- Security Concerns: Not all extensions are trustworthy. Malicious or poorly coded extensions can compromise your privacy and security, potentially leading to data breaches or malware infections.
- Cluttered Interface: Having too many extensions installed can clutter your browser’s interface, making it challenging to manage and access the ones you actually need.
- Compatibility Problems: Extensions may not always work well with each other or with browser updates, causing conflicts and functionality issues.
- Excessive Permissions: Certain extensions request broad permissions to access your browsing data, which may not be necessary for their intended functionality, raising privacy concerns.
- Limited Usefulness: Some users might install extensions that they rarely or never use, taking up space and resources without providing much value.
To maintain a smooth and secure browsing experience, it’s essential to periodically review your installed extensions and remove those that you no longer need or don’t trust. Be cautious when installing new extensions and only download from reputable sources, such as official browser stores, to minimize potential security risks. Keeping your browser extensions organized and optimized will help ensure a more enjoyable and efficient online experience.
Part 2: How to Disable Chrome Extensions Manually
Disabling Chrome extensions manually is a straightforward process that allows you to turn off or deactivate extensions temporarily without uninstalling them completely. Here’s how you can do it:
Option 1: Using Chrome’s Extension Menu
Open Google Chrome on your computer. In the top-right corner of the browser window, click on the three vertical dots to open the Chrome menu. From the dropdown menu, hover over “More tools,” and then click on “Extensions.” This will take you to the Extensions page. On the Extensions page, you will see a list of all the extensions you have installed in Chrome. To disable an extension, simply toggle off the switch located next to the extension’s name. The switch should turn gray, indicating that the extension is now disabled.

Option 2: Using the Extension’s Toolbar Icon
Some extensions may also have their own toolbar icons next to the address bar. If you see an extension icon in the toolbar, right-click on it. In the context menu that appears, select “Manage extensions.” You will be redirected to the Extensions page, where you can disable the extension by toggling off the switch next to its name.
Option 3: Using Developer Mode (Advanced Users)
Open Google Chrome on your computer. In the top-right corner of the browser window, click on the three vertical dots to open the Chrome menu. From the dropdown menu, hover over “More tools,” and then click on “Extensions” to go to the Extensions page. On the Extensions page, look for the toggle switch at the top-right corner labeled “Developer mode.” Toggle it on to enable Developer mode.
Once Developer mode is enabled, you will see additional options for each extension, such as “Load unpacked” and “Pack extension.” To disable an extension, click the “Remove” button next to its name. A confirmation dialog will appear. Click “Remove” again to disable the extension.
Note: Disabling an extension will turn it off temporarily, and you can enable it again later if needed. If you want to remove an extension permanently, you can do so by clicking the “Remove” button on the Extensions page. By following these steps, you can easily disable Chrome extensions manually to improve browser performance, address compatibility issues, or ensure better privacy and security.

Part 3: Clear Chrome Extensions
Simplify your online life with clear Chrome extensions! Enjoy faster browsing and hassle-free organization.
Clear Cache:
As you browse the internet, Chrome stores data such as images, scripts, and other resources in its cache to improve page loading times. Over time, this cache can become cluttered, leading to potential performance issues. The “Clear Cache” extension allows you to clear your browser’s cache with a single click, freeing up valuable disk space and enhancing browsing speed.
Clear Cookies:
Cookies are small pieces of data that websites store on your computer, enabling them to remember your preferences and login information. While cookies have their benefits, they can also compromise your privacy and security. The “Clear Cookies” extension enables you to manage and delete cookies selectively, ensuring your online activities remain private and secure.
Clear History:
Browsing history can reveal a lot about your online habits, and sometimes you may want to clear it for privacy reasons or to declutter your browser. The “Clear History” extension allows you to remove your browsing history, search history, and download history with ease, providing a fresh start for your browsing sessions.
Clear Downloads:
Over time, the downloads folder in Chrome can become cluttered with files you no longer need. The “Clear Downloads” extension automates the process of deleting old and unnecessary downloads, helping you maintain an organized downloads folder and saving disk space.
Clear Tabs:
If you find yourself drowning in a sea of open tabs, the “Clear Tabs” extension is a lifesaver. With one click, you can close all tabs except for the one you are currently viewing, providing a clutter-free workspace and improving overall browser performance.
Clear Bookmarks:
Bookmarks are handy for saving and accessing your favorite websites, but they can quickly become disorganized and overwhelming. The “Clear Bookmarks” extension allows you to remove duplicate bookmarks, sort them into folders, and delete those you no longer need, ensuring a tidy and efficient bookmarking system.
Part 4: How to Turn off Sync in Google Chrome
To turn off sync in Google Chrome, follow these steps:
Option 1: Using the Chrome Settings
Open Google Chrome on your computer. Click on the three vertical dots in the top-right corner of the browser window to open the Chrome menu. From the dropdown menu, hover over “Settings,” and then click on “Sync” to access the Sync settings. In the Sync settings, you’ll see a toggle switch next to “Sync.” Click on the toggle switch to turn off sync. The switch will turn gray, indicating that sync is now disabled. Chrome will prompt you to confirm turning off sync. Click on “Turn off” to confirm.
Option 2: Using the Chrome Flags (Advanced Users)
Open Google Chrome on your computer. In the address bar, type “chrome://flags” and press Enter. This will take you to the Chrome Experiments page. On the Chrome Experiments page, type “Sync” in the search bar to find the “Identity consistency between browser and cookie jar” flag. Click on the dropdown menu next to the flag and select “Disabled” from the options. Chrome will prompt you to relaunch the browser to apply the changes. Click on the “Relaunch” button.
After performing either of the above methods, sync will be turned off in Google Chrome. When sync is disabled, your bookmarks, history, passwords, extensions, and other data will no longer be synced across devices linked to your Google account. Keep in mind that if you have previously synced data, it will still be available on your devices, but any new changes will not be synchronized. If you decide to turn on sync again in the future, you can follow the same steps, but instead of turning off sync, you’ll need to toggle the switch or enable the Chrome flag to turn it on.
Mac Cleaner – The Ultimate Cleaning Solution
Undoubtedly, App Cleaner and Uninstaller are reliable and lightweight, not to mention free. Our tests confirm its safety, making it a worthy choice. However, its limited functionality makes it less impressive. Enter Mac Cleaner – a powerhouse app designed to eliminate unnecessary files from your computer. Here’s how to use Mac Cleaner on your system:
Step #1: Download, Install, and Launch Mac Cleaner
Start by clicking this link to access the software’s download site. Download the DMG file for macOS. Once the download is complete, open the DMG file and follow the installation instructions. Mac Cleaner will launch automatically after installation.

Step #2: Opt for the Manage Apps & Extensions Module
Mac Cleaner boasts six modules, each serving unique purposes. For this guide, focus on the “Manage Apps & Extensions” module. This module lets you remove apps entirely, akin to App Cleaner and Uninstaller.
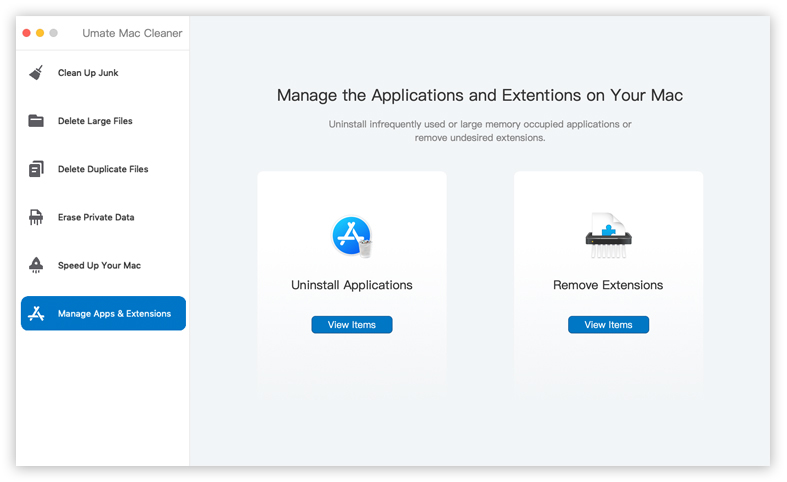
Step #3: Click “View Items”
The interface will display two sections: “Uninstall Applications” and “Remove Extensions.” Under each section lies a “View Items” button. Click “View Items” below “Uninstall Applications” to proceed.

Step #4: Uninstall Apps with Ease
You’ll find a list of items relevant to the module you selected. In “Uninstall Applications,” you’ll see a list of apps. Uninstall any app by clicking “Uninstall” next to its name. On the Extensions page, you will see a list of all the extensions you have installed in Chrome. To uninstall an extension, click on the “Remove” button next to its name. A confirmation dialog will appear. Click “Remove” again to uninstall the extension from Chrome. Repeat these steps for any other extensions you want to remove.
While Mac Cleaner lacks a cache-clearing feature in the “Manage Apps & Extensions” module, it compensates with the “Clean Up Junk” module, which clears the app cache effectively. Essentially, Mac Cleaner offers everything App Cleaner and Uninstaller do, and even more features to optimize your system. Embrace Mac Cleaner as your superior alternative today!

Conclusion
Chrome extensions have revolutionized the way we browse the internet, and clear extensions play a vital role in optimizing our online experience. From clearing cache and cookies to organizing bookmarks and tabs, these extensions help us declutter and streamline our browsing activities, leading to improved speed, privacy, and overall efficiency.
As you explore the Chrome Web Store for clear extensions, be sure to read reviews and check the ratings to find extensions that are reliable and effective. Embrace the power of clear Chrome extensions, and take control of your online experience like never before. Enjoy faster browsing, better privacy, and a clutter-free workspace with these valuable tools at your disposal. Happy browsing!
Latest Articles