

Clearing your history in Firefox and other personal details has become one of the safest security measures you can take. Firefox offers the option to clear this content every time you close it down, which is especially important if you’re highly susceptible to security risks, whether you’re using a shared device or one of Firefox’s major works.
We use browsers every day for activities like checking messages, social media, online shopping, and even using our VR wallet. Over time, the browser can accumulate files that can cause issues when logging in or loading directories. That’s why it’s wise to routinely delete your file history.
Of course, one downside of clearing your history is that you may lose registered user accounts and have to log back into everything. However, the benefit of increased security and faster browser performance make it well worth it. So be sure to follow all the steps and guidelines outlined here when you clear your history in Firefox on your device.
By doing so, you can ensure that your online activity remains safe and secure. Learn how to clear history in Firefox and speed up your Mac today!
Part 1: What does Browsing History include?
Browsing history refers to the record of web pages, websites, and other online content that a user has visited using their web browser. The exact details of what is included in browsing history can depend on the specific browser being used, but generally, it includes:
- URLs: The specific addresses of the websites or pages that were visited.
- Time and date: The date and time of each visit to a web page or website.
- Page titles: The titles of the web pages that were visited.
- Cookies: Small files that are created by websites to store information on a user’s computer or device.
- Form data: Information that was entered into online forms, such as search queries or login information.
- Cache: A temporary storage of website data to speed up subsequent visits.
- Bookmarks: URLs saved by the user for later reference.
It’s important to note that browsing history is typically stored on the user’s device and can be deleted by the user at any time. Additionally, some browsers offer private browsing modes which don’t save browsing history or other data.
Part 2: How to Clear Firefox History Manually
If you want to know how to clear your Firefox history manually, follow these steps:
- Open Firefox on your Mac or PC and click on the Library icon, which can be found in the upper-right corner of your screen. It is represented by a group of books stacked next to each other, with one falling over.
- In the menu that appears, click on “History.“
- Look for the option “Clear Recent History…” at the top of the new menu.
- Once you click on it, a pop-up will appear. You will see a dropdown menu next to “Time range to clear.” Choose an option that fits your needs, such as “Last Hour” or “Everything.” This will clear your entire history since you installed the browser or last cleared your history.
- Ensure that the “Browsing & Download History” box is checked. You may also check off any of the other boxes to clear their data as well.
- Click on “History” in the top left edge of the “Organize Bookmarks” pane, and choose the time period you want to view, such as the past day, week, or month. Finally, check the list of recently visited websites in the correct window screen.
- To complete the process of how to clear history in Firefox, click on the blue “Clear Now” button located in the bottom right-hand corner.

Part 3: How to Clear Your Firefox History Automatically
To learn how to clear history in Firefox, you can decide which browsing data types you want to delete by ticking the corresponding boxes next to them. If there are any types of data you don’t want to clear, simply untick them. You can also choose the time range for clearing the data, such as the last hour, or clear your entire history.
To select the time range, click the option to do so. The browsing data types that you can choose to clear include Browsing & Download History, Cookies, Active Logins, Cache, and Form & Search History, as well as other types of data like Site Preferences and Offline Website Data.

Once you have made your selections, click the “Ok” button to complete the process and have Firefox delete the selected data.

Part 4: Clear History in Firefox on Mac with Mac Cleaner
If you’re looking for a fast and reliable way to clear history in Firefox, you should try using Mac Cleaner. With just a few clicks, this powerful tool can clear all your Firefox browsing history, as well as your history in other popular browsers like Chrome and Safari. To get started, simply follow these easy steps and guidelines to clear your Firefox history in just a few minutes.
And with the built-in Privacy feature, Mac Cleaner will even clear cookies, scans, updates, and reviews for all websites on your Mac, giving you total control over your online privacy. So why wait? Try Mac Cleaner today and discover just how easy it is to keep your browsing history clean and secure!
If you want to securely remove private data from your computer, Mac Cleaner is a useful tool. With this software, you can eliminate private data and protect your identity in case of any potential data leaks. Here are the steps to follow for using the Mac Cleaner software:
Step #1: Set up Mac Cleaner
On your computer, open a browser and head to the Mac Cleaner download site. On that site, click the Download Now button. That should prompt the download of a DMG file, which is the installer of the software. Open the DMG file to run the installer, then follow the onscreen instructions onwards. The software should open automatically once it’s installed.

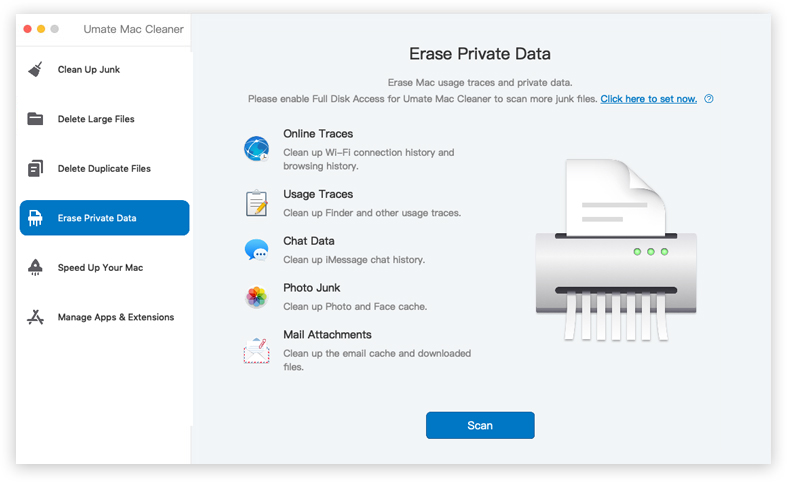
Step #2: Pick Erase Private Data
In the interface, you will see six options on the left side. These are the various modules offered by Mac Cleaner, including (1) Clean Up Junk, (2) Delete Large Files, (3) Delete Duplicate Files, (4) Erase Private Data, (5) Speed Up Your Mac, and (6) Manage Apps & Extensions.
To ensure the security of your computer, it is recommended to select the fourth module, Erase Private Data. This module allows you to remove files that may contain private data on your computer, such as mail attachments, chat data, and usage traces. Simply click on the Erase Private Data option in the left sidebar to select it.
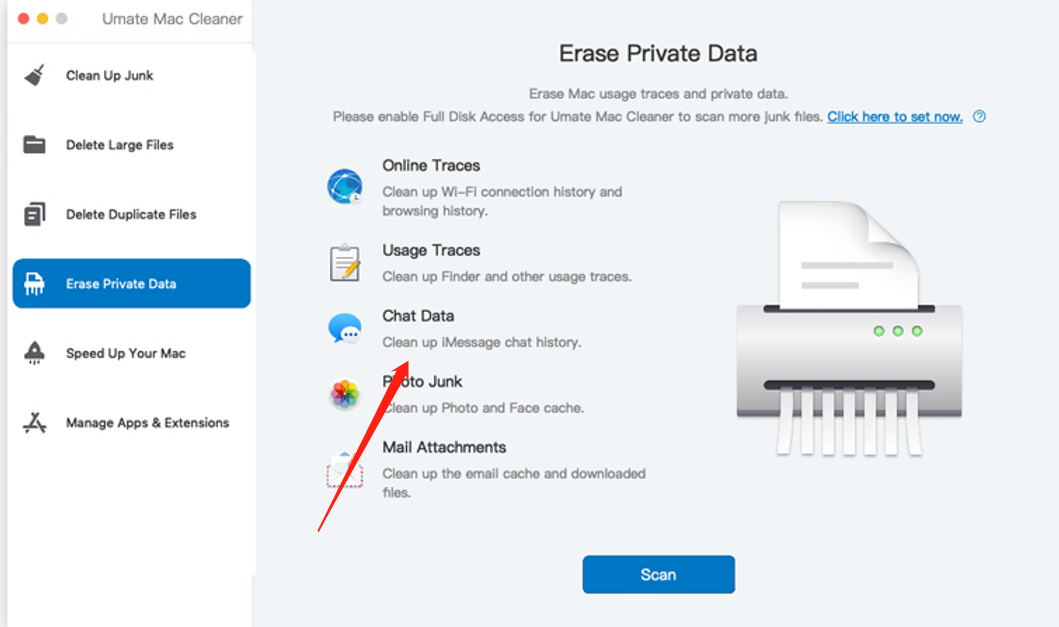
Step #3: Click Scan
After choosing the Erase Private Data module, the software will show you information about its features, which you can read to learn more about it. When you are ready to proceed, click on the Scan button to start the scanning process.
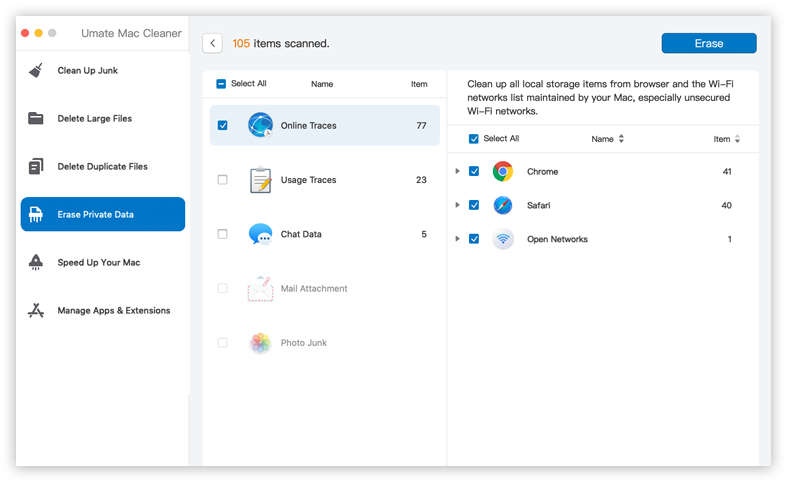
Step #4: Choose a File Category and File/s
After initiating the scan by clicking the Scan button, the software will lead you to a new screen displaying five different options, each representing a file category that the module can scan. These categories and their descriptions are as follows:
- Online Traces: includes files that contain your browsing history and Wi-Fi connection history.
- Usage Traces: includes data corresponding to the Finder usage history.
- Chat Data represents your iMessage chat history.
- Photo Junk: encompasses your Face and Photo cache files.
- Mail Attachment: consists of your email attachments.
To proceed, select the desired file category from these five options. The interface will then display a list of files on the right side that belong to the selected category. You can select the files you want to erase by clicking their corresponding checkboxes. Additionally, clicking the Select All checkbox will mark all the files under that category for deletion.
Step #5: Delete the File/s
To complete the cleaning process, simply click the Erase button located at the top-right corner of the page. This blue button will erase the files you selected, although it may take a few minutes to complete.
It’s important to remember that even though installing an anti-virus, using a VPN, and a password manager are great ways to secure your computer, neglecting small things like leaving your private data exposed can have dire consequences for your security. Fortunately, Mac Cleaner can help eliminate this risk.

Part 5: How to Delete History in Firefox Windows?
If you’re concerned about online safety, Mozilla Firefox is a great browser that prioritizes your protection. Fortunately, it’s also easy to completely erase your search history in Firefox. To learn how to clear history in Firefox, just follow these simple steps
- Launch the Firefox browser on your device.
- Click the three horizontal lines in the top corner of the display.
- Select “Library” and then “History.“
- Click “Clear Recent History.“
- To clear all history, select “Everything.“
- Choose the files you want to clear.
- Click “Clear Now” to start the process of clearing your Firefox history.
It’s important to note that clearing any of these items will affect your future browsing experiences. For example, if you remove current logins, you’ll need to log back in to all the websites you visited during the cleared period. Similarly, clearing cookies will delete your login information and you’ll need to re-enter your passwords. But by following these steps to clear your Firefox history, you’ll have greater control over your online privacy and security.

Part 6: How to Clear Firefox’s History on iOS
To learn how to clear history in Firefox on your iOS device, follow these steps. First, launch Firefox on your iPhone or iPad and tap the menu icon (three lines in a column) located in the bottom-right corner of the screen. Next, tap Settings and navigate to “Privacy” and select Data Management. From there, toggle the switches for the data types that you want to clear and then tap Clear Private Data.
If you want to remove individual sites, you can tap Web Site Data on the last screen to see a breakdown of the sites that Firefox has data for, and then tap the red minus button beside each one.

Conclusion
Nowadays, many people prioritize convenience, utility, and speed over security. As a result, they tend to purchase utility tools that allow them to perform tasks faster, even if they already know how to do them. While there’s nothing inherently wrong with using these tools, it’s essential to remember that securing your data from hackers is crucial.
This is particularly important if you work for a company that deals with confidential data, which may attract hackers’ attention. To find the most suitable security app for your needs and preferences, follow this guide to discover the best security options for Mac.
Latest Articles