

Data loss can occur in pretty much any device. That includes Mac computers, Windows PCs, Android smartphones, and iPhones. That’s why the backup feature of macOS is pretty handy. If you didn’t know, there’s a feature on Mac that allows you to create a backup of your iPhone on the Mac computer by connecting the two devices to each other. Because of this feature, many Mac users often have dozens of iPhone backups on their drives. But since iPhone backups typically have a size of over 1GB. If there are a couple of these backups in your Mac computer, they will definitely take up a considerable amount of space.
Naturally, you’d want to delete them to free up space, but how can you do that if you don’t know where they are? This article will teach you how to find iPhone backups on Mac. But before that, can you even find these backups in the first place?
Can You Find iPhone Backups on Mac?
There are certain files that though they exist on your storage drives, they’re encrypted and hidden. You cannot these types of files. Fortunately, iPhone backups aren’t one of them. Therefore, you can indeed find iPhone backups on Mac if you want. In fact, there are two ways to find iPhone backups. Let’s start with the traditional method that involves the Finder app.
Method #1: Find iPhone Backups on Mac Via Spotlight
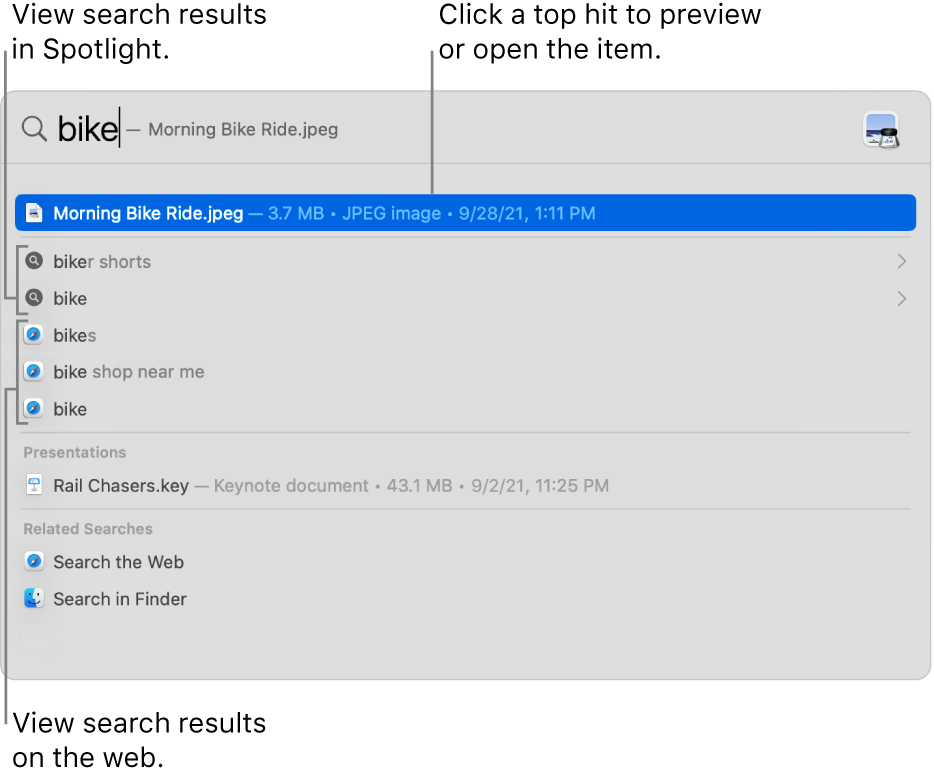
Spotlight is the desktop search feature of macOS computers. It allows you to search through every nook and cranny of your computer by typing in a keyword. You can also enter a file path on the search bar to find the folder located in that specific path. In other words, it’s the perfect solution for your goal since iPhone backups are actually searchable through this particular feature. To use Spotlight to find iPhone backups on Mac, here’s what you need to do:
- At the top of your computer is the menu bar. Click the Spotlight icon which should look like a magnifying glass to open the search bar. You may also press Command + Space bar on your computer as a shortcut.
- On the search field, type in the file path of iPhone backups, which is:
~/Library/Application Support/MobileSync/Backup/
Note: Alternatively, you can type in Backup as it may show the same desired result.
- Click the search result that says “Backup” with items inside with names consisting of a bunch of letters and numbers, like 9adfa5wqeguykc4gbrdj77as4ir5, for example. These folders are your iPhone backups.
- A session of Finder will then open showing you the different backups.
With these four steps, you’ve now successfully found your iPhone backups. You’ll notice that each folder contains items with names consisting of a number and letter (e.g., 00, 0a, 0b, 1a, 2f). These are the folders that contain the different files of the iPhone backup. We recommend leaving them alone as the files there are encrypted and may ruin the backup’s integrity. But you can do whatever you want with the backup folder itself. You can delete them or move them to an external drive.
Method #2: Find iPhone Backups on Mac Using iTunes
When you have iTunes on both your Mac and iPhone, the app automatically creates a backup of your iPhone and stores it into the storage drives of your macOS computer. Of course, you can disable this automatic backup feature. However, it’s an excellent way to find iPhone backups on Mac since you can manage backups through iTunes. Here’s what you need to do:
- Open the iTunes app on your computer.
- Click the iTunes tab from the top menu bar.
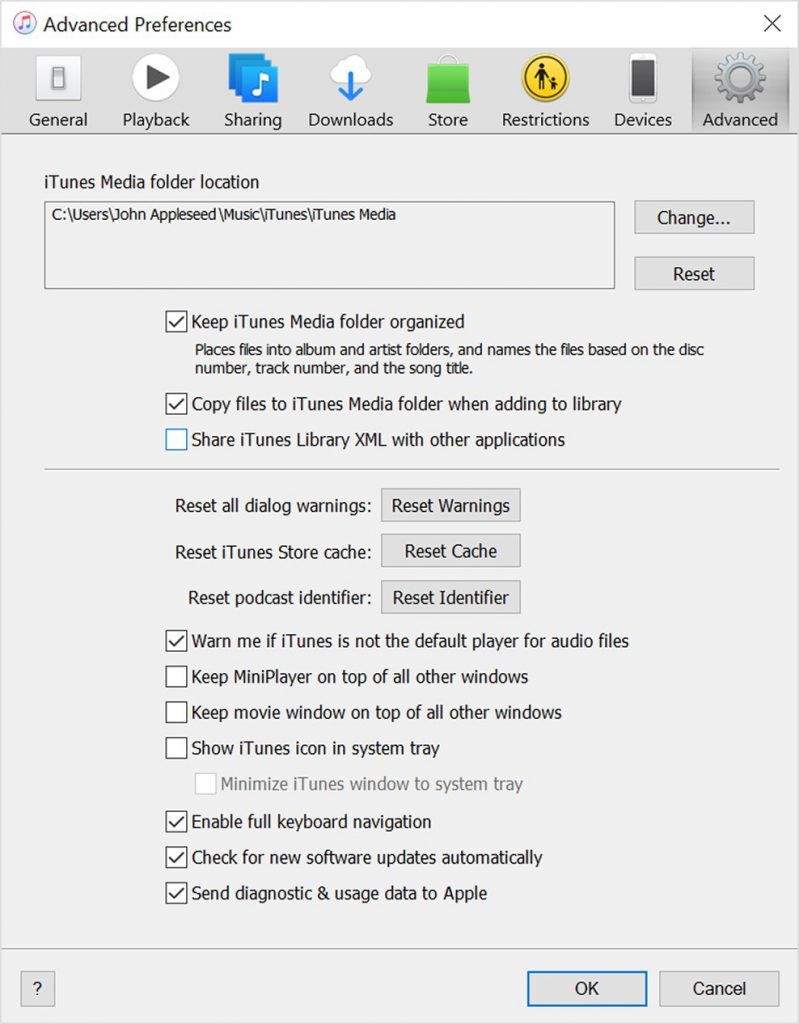
- On the Preferences window, there will be several tabs. Click the Devices tab.
- You will then get a list of items in this tab. These correspond to the backups on each of the devices connected to your iTunes. Simply find the one that says iPhone, or your iPhone’s name. Right-click on that item.
- Select what you want to do to the iPhone. You can select between Delete, Archive, or Show in Finder.
- Delete does exactly what it says.
- Show in Finder takes you to the Backups folder mentioned in the previous section.
- Archive protects that backup so it doesn’t get overwritten when creating a new backup.
Keep in mind that iTunes is already discontinued. In macOS versions Catalina and later, it’s separated into three parts, namely Apple Podcasts, Apple TV, and Apple Music. This means you might not see the iTunes app on your computer if your macOS version is quite recent. However, it still has the device management features in macOS versions before Catalina.
BONUS: Find iPhone Backups on Mac With Mac
While iPhone backups do take up a considerable amount of storage space, they’re not the only file and folder that’s taking up disk space. There are bound to be other more useless files that you can delete from your computer. Duplicate files, junk files, and unused app data are just a few examples. But of course, just like what you did to find iPhone backups on Mac, you’ll also have to do a lot of work to find those unnecessary files and delete them, that is if you don’t have Mac Cleaner.
Mac Cleaner is a software that can find and delete unnecessary files, including iPhone backups. It’s easy to use, and it can detect a variety of useless files on your computer. If that got you interested, here’s how you can use the software:
Step #1: Set Up Mac Cleaner on Your Computer
Before anything else, you must get the software by opening a browser and going to the Mac Cleaner official website. Once you’re there, click the Download Now button to download a DMG file, which you must then open to run the installer. Follow the on-screen instructions to install the software. Once it’s done, Mac Cleaner will open automatically.

Step #2: Pick a Module
The software has a total of six modules, each with its respective functionalities. These include the following: (1) Clean Up Junk, (2) Delete Large Files, (3) Delete Duplicate Files, (4) Erase Private Data, (5) Speed Up Your Mac, and (6) Manage Apps & Extensions. For this guide, you’ll only need to choose between the first three modules as they have the perfect functionality for your purposes—they can delete unnecessary files, including iPhone backups. To select a module, simply click on it from the left sidebar of the interface. There, you’ll find all six options. Pick from the first three.

Step #3: Click the Scan Button
Regardless of which of the three modules you chose, the software will display text that tells you what the select module does. You can read it if you want to learn more about its features. Regardless, to proceed to the next step, you must click the Scan button. You can do it immediately if you chose Delete Large Files. However, for Clean Up Junk, you must first select between Quick Clean and Deep Clean. Quick Clean scans for App Junk, System Junk, Trash Bin, and iTunes Junk, while Deep Clean scans for Downloads, iOS Junk, and Unused Disk Images. Click Scan after selecting between the two.
As for Delete Duplicate Files, there should be a text that says Select a File Directory at the center. Click the Browse button to its left and browser to the directory you want to scan for duplicate files. Click the Scan button once you’re done.

Step #4: Pick an /File
You should then see a list of items on the interface. For Delete Large Files and Delete Duplicate Files, these items are the files (e.g., file, folder, disk image, archives, etc.) you can delete. Select the files you want to delete by clicking on their corresponding checkboxes. You can also click Select All to select all items. But for Clean Up Junk, the items will correspond to a file category (e.g., System Junk, Downloads, Trash Bin, Unused Disk Images, etc.) You must first select a file category from this list, and on the right side will be the files you can delete. You can select files from there.

Step #5: Delete the File/s
After you select all the files you want to delete, click the blue button at the top-right corner of the window. It should either say Clean or Delete depending on the module you’re using. This will get rid of the files you’ve selected in Step #4.
Once you click the button, the software will automatically perform the action. Mac Cleaner is particularly useful since all of its modules can contribute to optimizing the Other category on your Mac storage.

Parting Words
Storage space has a surprisingly significant influence on a Mac computer’s performance. If your Mac has too many files, it likely will slow down, but if you have a ton of free disk space, that likelihood is reduced. That’s why many experts suggest clearing your computer’s storage every now and then. While there are different files you can delete, iPhone backups are among the best options. Not only are most of them unnecessary, but they also take up considerable storage space. Granted, it’s a bit difficult to find iPhone backups on Mac since it’s not exactly a specific file, but with this guide, that shouldn’t be an issue.
Latest Articles