

In today’s digital age, photos have become an integral part of our lives. Whether you’re an aspiring photographer, a social media enthusiast, or just someone who loves capturing moments, the ability to edit JPEG images on your Mac can significantly enhance your creative process. This blog post will guide you through the essential steps and tools needed to effectively edit JPEG images on your Mac.
Part 1: How to Edit JPG on Mac
Learn how to edit JPEG on Mac with Confidence. Elevate your images with our expert techniques and bring your vision to life.
Step 1: Choose Your Editing Software
There are several powerful image editing software options available for Mac users, ranging from beginner-friendly to advanced. Here are some popular choices:
Adobe Photoshop: Known for its extensive capabilities, Photoshop offers a wide range of tools for precise editing and manipulation.
Adobe Lightroom: A versatile software designed for photographers, Lightroom provides intuitive editing and organization features.
Affinity Photo: A budget-friendly alternative to Photoshop, Affinity Photo offers advanced editing tools and features.
Pixelmator: This user-friendly app is perfect for beginners, offering a wide array of tools for basic photo enhancements.
Step 2: Import Your JPEG Image
Once you’ve chosen your editing software, launch the application and import your JPEG image. Most software options provide a straightforward method for importing images – usually through a drag-and-drop interface or the “File” menu.
Step 3: Basic Adjustments
Before diving into advanced edits, start with the basics:
Crop and Straighten: Use cropping tools to remove unnecessary elements and ensure your image is properly aligned.
Exposure and Color Correction: Adjust brightness, contrast, highlights, shadows, and color saturation to enhance the overall look of the image.
White Balance: Correct the color temperature to ensure accurate colors in your photo.

Step 4: Advanced Editing
Once you’ve mastered the basics, move on to more advanced editing techniques:
Layers and Masks: If your chosen software supports layers, utilize them for non-destructive edits. Masks allow you to selectively apply adjustments to specific areas of your image.
Retouching and Healing: Remove blemishes, imperfections, and unwanted objects using retouching tools. The healing brush can help seamlessly blend corrections.
Filters and Effects: Experiment with creative filters and effects to add unique styles to your image. Be cautious not to overdo it – subtlety often yields the best results.
Selective Editing: Use tools like gradient filters or adjustment brushes to selectively edit certain parts of your image, giving you more control over the final result.
Step 5: Saving and Exporting
Once you’re satisfied with your edits, it’s time to save and export your image:
Save As a Project File: If your editing software supports project files, save your work in this format. It allows you to revisit and make changes later.
Export as JPEG: When you’re ready to share your edited image, export it as a JPEG. Choose the appropriate compression level – higher quality for professional use, lower quality for web sharing.
Part 2: How to Edit JPGs on Mac Using Apple’s Photos App
Apple‘s Photos app is a versatile tool that goes beyond organizing your image collection – it’s a powerful photo editing platform right at your fingertips. Whether you’re an amateur photographer or a social media enthusiast, this guide will show you how to utilize the Photos app on your Mac to edit and enhance your JPG images with ease.
Step 1: Open Your Image in Photos
Launch Photos App: Locate the Photos app on your Mac (usually found in the Applications folder) and open it.
Import Your Image: If the image you want to edit is not already in your Photos library, you can import it by dragging and dropping it into the Photos app or using the “Import” option.
Step 2: Basic Edits
Photos provide an array of basic editing tools that can help you quickly enhance your JPG images:
Crop and Rotate: Click the “Edit” button (represented by three sliders) at the top right corner of the Photos window. Then, click the “Crop” button to adjust the crop and rotation of your image.
Adjustments: In the “Adjust” tab, you’ll find sliders for enhancing brightness, contrast, exposure, saturation, and more. Play around with these to fine-tune your image.
Filters: Explore the available filters to instantly change the mood and style of your image. Each filter can be adjusted for intensity using the slider.
Step 3: Advanced Edits
For more intricate enhancements, delve into the advanced editing options:
Retouch and Healing: Click the “Retouch” button to remove blemishes, spots, or unwanted objects from your image. Use the brush to paint over the areas you want to fix.
Selective Adjustments: Click the “Add” button (+) under “Selective” to add control points to your image. Adjust parameters like brightness, contrast, and saturation only in the areas you choose.
Curves: Under the “Adjust” tab, click on “Curves” to have precise control over the tonal range of your image. Adjust the curve to fine-tune highlights, shadows, and mid-tones.
Step 4: Live Photos and Effects
Live Photos: If you’re working with a Live Photo, you can access “Live” mode in the editing options. Here, you can adjust the key photo, apply effects, and create loops or bounces.
Portrait Effects: If you have a portrait photo, explore the “Portrait” tab to adjust depth, lighting, and other effects to enhance the subject’s appearance.
Step 5: Saving and Exporting
Once you’re satisfied with your edits, it’s time to save your enhanced image:
Save Changes: Click the “Done” button at the top right corner of the editing window to save your changes. These edits will be applied to your original image.
Export: If you want to keep a separate edited version, right-click the image and choose “Export” to save it as a separate JPG file.
Apple’s Photos app brings powerful editing capabilities to your Mac without the need for complex software. From basic adjustments to advanced retouching, you can enhance your JPG images and make them stand out in just a few clicks. By following the steps outlined in this guide, you’ll be well on your way to mastering the art of image editing using the Photos app – all while enjoying the convenience of Apple’s user-friendly ecosystem.
Part 3:Use Your Mac’s Preview App to Edit JPG
Your Mac comes equipped with a plethora of built-in tools, and one such gem is the Preview app. Often overlooked, Preview is more than just a document viewer – it’s a versatile image editor capable of handling basic to moderate edits on your JPG images. In this guide, we’ll explore how to leverage Preview to enhance your images effortlessly.
Step 1: Open Your Image in Preview
Locate Your Image: Navigate to the folder where your JPG image is stored.
Right-Click and Open With: Right-click on the image file and select “Open With” from the dropdown menu. Choose “Preview” from the list of available applications.
Step 2: Basic Edits
Preview offers a range of fundamental editing tools that can instantly elevate your images:
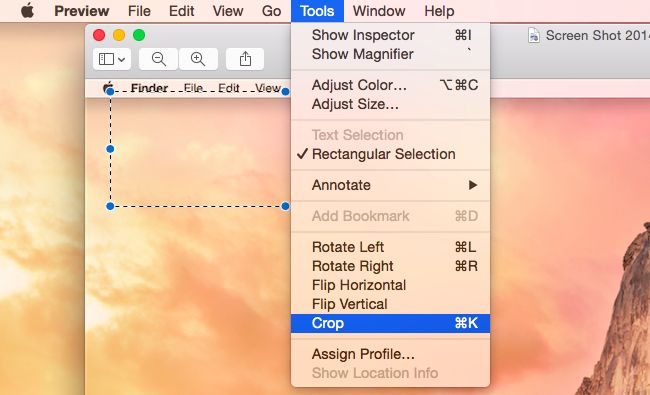
Crop and Rotate: Click the “Show Markup Toolbar” button in the top-right corner (looks like a toolbox). Then, click the “Crop” button and adjust the selection as needed. To rotate, click the rotation icons.
Adjust Color and Exposure: Under the “Tools” menu, choose “Adjust Color” or “Adjust Exposure.” These options provide sliders to tweak color balance, brightness, contrast, and more.
Annotate and Add Text: The Markup Toolbar also contains tools for adding text, shapes, and annotations. Great for highlighting or providing context to your images.

Step 3: Fine-Tuning
Instant Alpha: This tool, found in the Markup Toolbar, lets you remove backgrounds or unwanted areas by clicking and dragging to select the color you want to make transparent.
Selection Tools: In the Markup Toolbar, you’ll find various selection tools like rectangle, ellipse, and lasso. Use these for precise edits.
Step 4: Signature and Drawing
Preview isn’t just about image edits – it’s also handy for adding signatures and drawings:
Signature: If you have a trackpad or a built-in camera, you can create and store your signature to add it to documents or images.
Draw and Sketch: Utilize the drawing tools to add your creative touch to images. Choose colors, line thickness, and shapes to enhance your edits.
Step 5: Save and Export
Once you’re satisfied with your edits, it’s time to save your masterpiece:
Save Your Edited Image: Click “File” in the top menu, then select “Save.” This will overwrite the original image with your edits. If you want to keep the original intact, use “Save As.”
Export to Different Formats: If you wish to export your image in a different format or maintain a higher quality version, choose “Export” from the “File” menu. Here, you can select formats like PDF, PNG, JPEG, and more.
Preview, often seen as a simple document viewer, can actually serve as a capable image editor for your JPG files on Mac. With its intuitive tools and user-friendly interface, you can accomplish a variety of edits without the need for complex software. Whether you’re cropping, adjusting colors, or adding annotations, Preview provides an accessible way to enhance your images and unleash your creativity. So, next time you’re looking to make quick edits to a JPG image, give Preview a try – you might be pleasantly surprised by its capabilities.
Conclusion
Editing JPEG images on your Mac can be both creatively rewarding and practically beneficial. Whether you’re refining your photos for personal use or professional endeavors, the steps outlined above provide a solid foundation for enhancing your editing skills. Remember that practice makes perfect, so don’t hesitate to experiment with different techniques and styles to truly make your images stand out.
Latest Articles