

iCloud is an essential service provided by Apple that allows you to securely store and sync your data across multiple devices. By turning on iCloud, you can effortlessly access your photos, videos, contacts, calendars, documents, and more, from any iCloud-enabled device. In this comprehensive guide, we will walk you through the steps to turn on iCloud on your iPhone, ensuring that your data remains safe, organized, and readily available.
Part 1: How to Turn on iCloud on Your iPhone
Take control of your data with iCloud. Follow our guide on how to turn it on and enjoy easy data management and accessibility.
Step 1: Update to the Latest iOS Version
Before proceeding, ensure that your iPhone is running the latest iOS version. You can check for updates by going to Settings > General > Software Update. If an update is available, download and install it before proceeding with the iCloud setup.
Step 2: Access iCloud Settings
Open the “Settings” app on your iPhone. Scroll down and tap on your name or Apple ID banner at the top of the screen. If you are using an older iOS version, look for “iCloud” directly in the main Settings menu.
Step 3: Sign in to iCloud
On the Apple ID page, you will see your name and email address. Tap on it and enter your Apple ID and password to sign in to iCloud. If you don’t have an Apple ID, tap on “Don’t have an Apple ID or forgot it?” and follow the on-screen instructions to create a new one.
Step 4: Choose iCloud Services
Once signed in, you will be presented with a list of iCloud services. Toggle on the switch next to each service you want to enable, such as Photos, Contacts, Calendars, Notes, Reminders, Safari, and more. You can also tap on “Storage” to manage your iCloud storage settings.
Step 5: Manage App Data
Scroll down further to the “APPS USING ICLOUD” section. Here, you can choose which apps can store data in iCloud. Toggle on the switches next to the apps you want to enable iCloud storage for, such as Pages, Numbers, Keynote, and other supported apps.
Step 6: Sync iCloud Drive
If you want to access your files across devices using iCloud Drive, toggle on the switch next to “iCloud Drive” in the main iCloud settings page. This allows you to store documents and files in iCloud and access them from any iCloud-enabled device.
Step 7: Customize iCloud Backup
To ensure your data is backed up, tap on “iCloud Backup” on the main iCloud settings page. Here, you can enable the automatic backup feature and choose whether to include certain data like photos, videos, app data, and more.
Part 2: How to Backup iPhone/iPad Photos to iCloud Photo Library
To backup your iPhone or iPad photos to iCloud Photo Library, follow these steps:
Update to the Latest iOS/iPadOS Version: Ensure that your device is running the latest version of iOS/iPadOS. Go to Settings > General > Software Update and download any available updates.
Enable iCloud Photo Library: Open the “Settings” app on your iPhone or iPad. Tap on your name at the top of the screen (or “Apple ID” if using an older iOS version) and then select “iCloud” or “iCloud > Photos” from the list.
Toggle on iCloud Photo Library: In the iCloud settings, toggle on the switch next to “iCloud Photo Library.” This will enable the syncing and backup of your photos to iCloud.
Choose Optimization or Download and Keep Originals (Optional): You can select either “Optimize iPhone/iPad Storage” or “Download and Keep Originals” under the “Photos” section in the iCloud settings. The former option allows your device to store optimized versions of photos while keeping the original high-resolution versions in iCloud. The latter option keeps the full-resolution versions of your photos on your device and in iCloud.
Wait for Backup: Once you enable iCloud Photo Library, your device will start uploading your photos to iCloud. The time it takes to complete the backup will depend on the number of photos and the speed of your internet connection. You can monitor the progress by going to the Photos app and looking for the cloud icon next to your photos.
Accessing Photos on Other Devices: If you have other devices connected to the same iCloud account and iCloud Photo Library enabled, your photos will automatically sync across all devices. You can access your backed-up photos on any iCloud-enabled device by opening the Photos app.
It’s worth noting that iCloud provides 5 GB of free storage, which may be insufficient for storing a large photo library. If you need more storage, you can upgrade your iCloud storage plan by going to Settings > [Your Name] > iCloud > Manage Storage > Change Storage Plan. By following these steps, you can backup your iPhone or iPad photos to iCloud Photo Library, ensuring that your precious memories are securely stored and accessible across all your iCloud-enabled devices.
Part 3: How to Enable iCloud Photos on a Mac
To enable iCloud Photos on a Mac, follow these steps:
Update macOS: Ensure that your Mac is running the latest version of macOS. Click on the Apple menu in the top-left corner of the screen, select “About This Mac,” and check if any updates are available. If updates are available, download and install them.
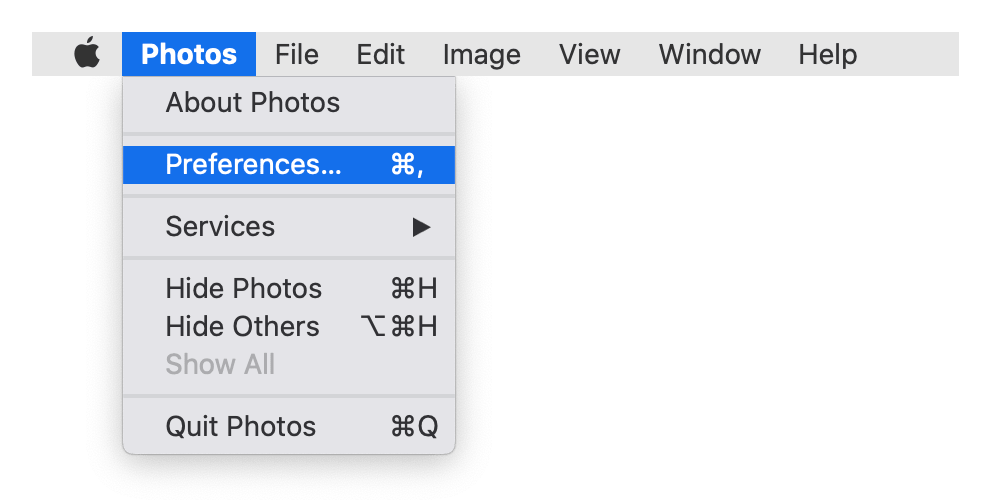
Open System Preferences: Click on the Apple menu and select “System Preferences” from the dropdown menu.
Access iCloud Settings: In the System Preferences window, click on the “Apple ID” or “iCloud” icon. If you’re using an older version of macOS, you may find the iCloud settings directly in the System Preferences window.
Sign in to iCloud: If you’re not already signed in to iCloud, enter your Apple ID and password to sign in.
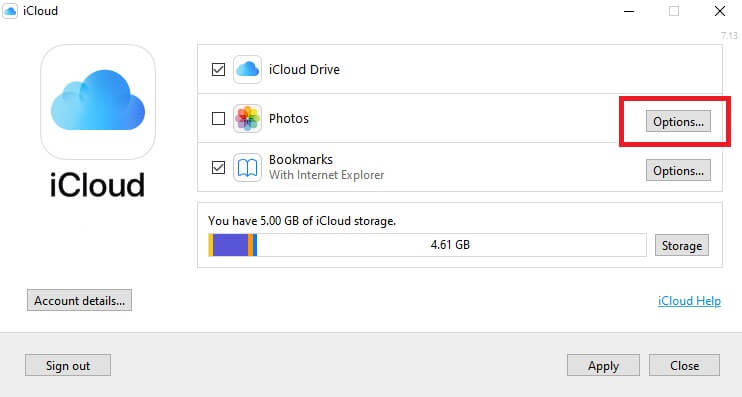
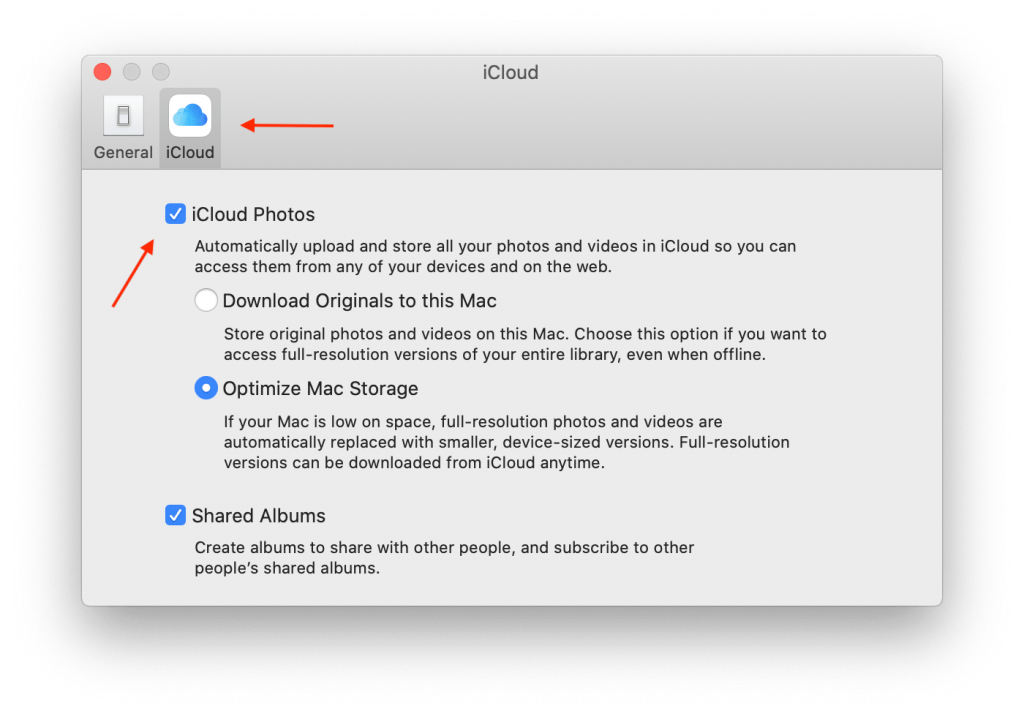
Enable iCloud Photos: In the iCloud settings, locate and click on the checkbox next to “Photos” or “iCloud Photos.” This will enable iCloud Photos on your Mac.
Choose Options (Optional): If you want to customize the iCloud Photos settings, click on the “Options” button next to “Photos” or “iCloud Photos.” Here, you can select options such as “Download Originals to this Mac” or “Optimize Mac Storage.” Choosing the latter option will store smaller, optimized versions of photos on your Mac while keeping the original full-resolution versions in iCloud.
Wait for Syncing: After enabling iCloud Photos, your Mac will start syncing your photos with iCloud. The time it takes to complete the initial sync will depend on the size of your photo library and the speed of your internet connection. You can monitor the progress by clicking on the Photos app in the dock and looking for the cloud icon in the sidebar.
Once the syncing is complete, your photos will be available in the Photos app on your Mac. Any changes you make to your photo library, such as adding or deleting photos, will sync across all your iCloud-enabled devices.
By following these steps, you can enable iCloud Photos on your Mac and enjoy the convenience of accessing and managing your photos seamlessly across all your Apple devices.
How to Backup iPhone/iPad photos to iCloud Photo Library
To backup your iPhone or iPad photos to iCloud Photo Library, follow these steps:
Update to the Latest iOS/iPadOS Version: Ensure that your device is running the latest version of iOS/iPadOS. Go to Settings > General > Software Update and download any available updates.
Enable iCloud Photo Library: Open the “Settings” app on your iPhone or iPad. Tap on your name at the top of the screen (or “Apple ID” if using an older iOS version) and then select “iCloud” or “iCloud > Photos” from the list.
Toggle on iCloud Photo Library: In the iCloud settings, toggle on the switch next to “iCloud Photo Library.” This will enable the syncing and backup of your photos to iCloud.
Choose Optimization or Download and Keep Originals (Optional): You can select either “Optimize iPhone/iPad Storage” or “Download and Keep Originals” under the “Photos” section in the iCloud settings. The former option allows your device to store optimized versions of photos while keeping the original high-resolution versions in iCloud. The latter option keeps the full-resolution versions of your photos on your device and in iCloud.
Wait for Backup: Once you enable iCloud Photo Library, your device will start uploading your photos to iCloud. The time it takes to complete the backup will depend on the number of photos and the speed of your internet connection. You can monitor the progress by going to the Photos app and looking for the cloud icon next to your photos.
Accessing Photos on Other Devices: If you have other devices connected to the same iCloud account and iCloud Photo Library enabled, your photos will automatically sync across all devices. You can access your backed-up photos on any iCloud-enabled device by opening the Photos app.
Conclusion
Enabling iCloud on your iPhone opens up a world of convenience and accessibility for your data. By following the steps outlined in this guide, you can seamlessly turn on iCloud, sync your important information, and ensure that your data remains safe and accessible across all your iCloud-enabled devices. Embrace the power of iCloud and experience the freedom of having your digital world at your fingertips.
Latest Articles