

Among the many files and folders that can be found on your macOS computer, iPhone backups are arguably the largest of the bunch. After all, even the smallest iPhone backup can take up to 5GBs worth of disk space. And since the average maximum storage capacity of macOS computers is only around 128GB, that 5GB is already huge. While some may argue that they can minimize the iPhone backup size by simply deleting some of the files, that’s not going to work. The files inside the iPhone backup are often encrypted, so you don’t know which of the files is which, making the task quite risky.
Unfortunately, that’s unavoidable, so your only option is to delete the entirety of the iPhone backup altogether, but that won’t happen if you don’t even know where it is. With that said, read on as this guide goes over the iPhone backup location on Mac.
Part 1: Where Is The iPhone Backup Location on Mac?
Many users assume that iPhone backups can be found anywhere on the macOS computer. Though you can indeed move the backups into a different location, there’s such a thing called a default file path where the iPhone backups go automatically as soon as they’re created. So, unless you actively move your iPhone backups from one place to another, there’s a good chance they should still be in that default directory. That directory can be found in the following file/folder path:
~/Library/Application Support/MobileSync/Backup/
The tilde (~) part of this file path is crucial as it basically indicates that the folder is in your home directory or the main storage drive. If there’s no tilde, it can be in other disks that are currently inserted in the computer.
Now, the question is, how do you make use of this file path in order to go to the iPhone backup location?
Part 2: How Do You Go to The iPhone Backup Location?
Contrary to common belief, there are actually several ways to use the aforementioned file path to go to the iPhone backup location. This section will go over three of these methods so you can have several options. Let’s start with the manual method.
Method #1: Finder
Finder is the file management app for macOS computers, basically the Mac counterpart of File Explorer from Windows PC. It allows you to jump from one folder to another. In this case, we’ll use Finder to go to the iPhone backup location manually.
Here’s what you need to do:
- Open Finder on your computer.
- Click Library from the left sidebar of the window. If Library isn’t present, then click your username.
- In the Library folder, find and open the Application Support folder.
- Repeat step 3 for the MobileSync folder, then for the Backup folder.
With this, you have successfully gone to the iPhone backup location on Mac.
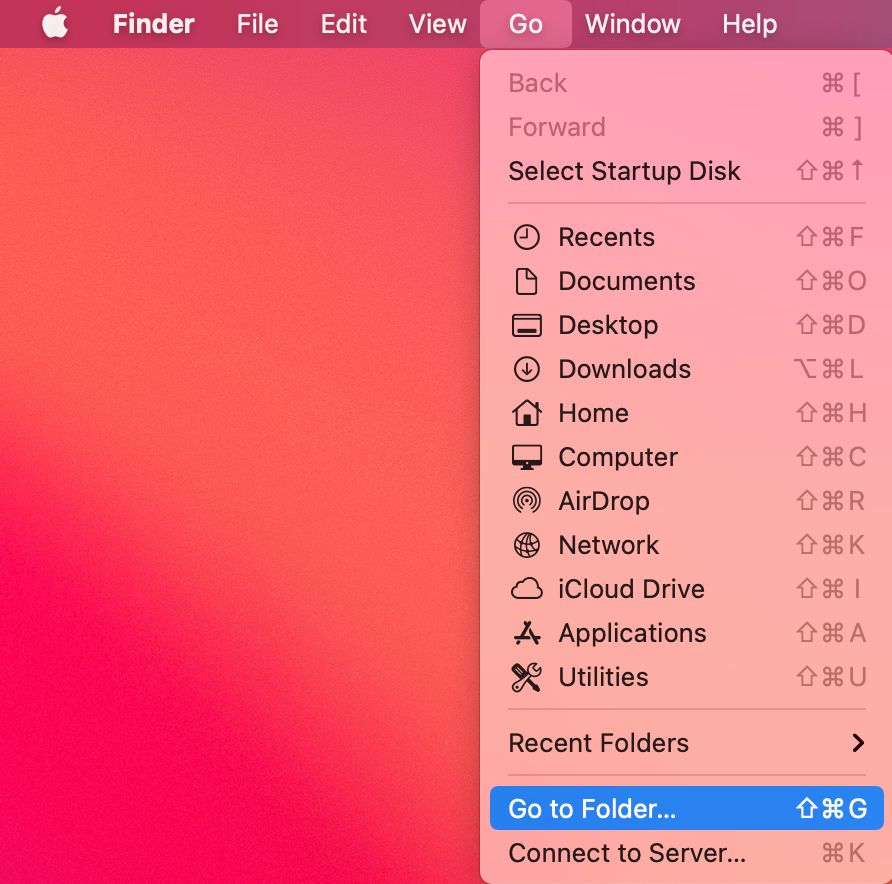
Method #2: Go to Folder
Finder has a feature called Go to Folder which allows you to go to a specific folder without having to open its parent folders, like what you did in method #1. It’s a much quicker method than the previous one. Here’s how you can use it:
- Open Finder.
- Click Go from the top menu bar.
- Select Go to Folder… from the resulting dropdown menu.
- A popup window will appear. Type in the following text: ~/Library/Application Support/MobileSync/Backup/
- Click Go.
You can do this for other folders as well. It shortens the time it takes to go to a folder that’s deep inside your computer.
Method #3: Spotlight
Your last option is to use the Spotlight feature. It’s perhaps the easier method since it only requires you to click two to three times. For your reference, Spotlight is the system search system of the computer. It allows you to search for files and folders, and you can do that with the iPhone backup location. To use the feature, simply press Command + Space on your keyboard as a shortcut to open Spotlight. Then, on the search bar, type in the following text, the location of iPhone backups:
~/Library/Application Support/MobileSync/Backup/
A folder should appear on the search results. Click on that to go directly to the folder. That’s pretty much all you need to do if you use the Spotlight search feature. You can also just click on the search bar on your desktop if you don’t want to use the Command + Space shortcut. Keep in mind that this only works for existing folders.

Part 3: Should You Delete iPhone Backups?
There are several reasons why you might be looking for the iPhone backup location on Mac. One of the most common reasons is that you need to delete it, but is that advisable? The answer to that question may vary from case to case.
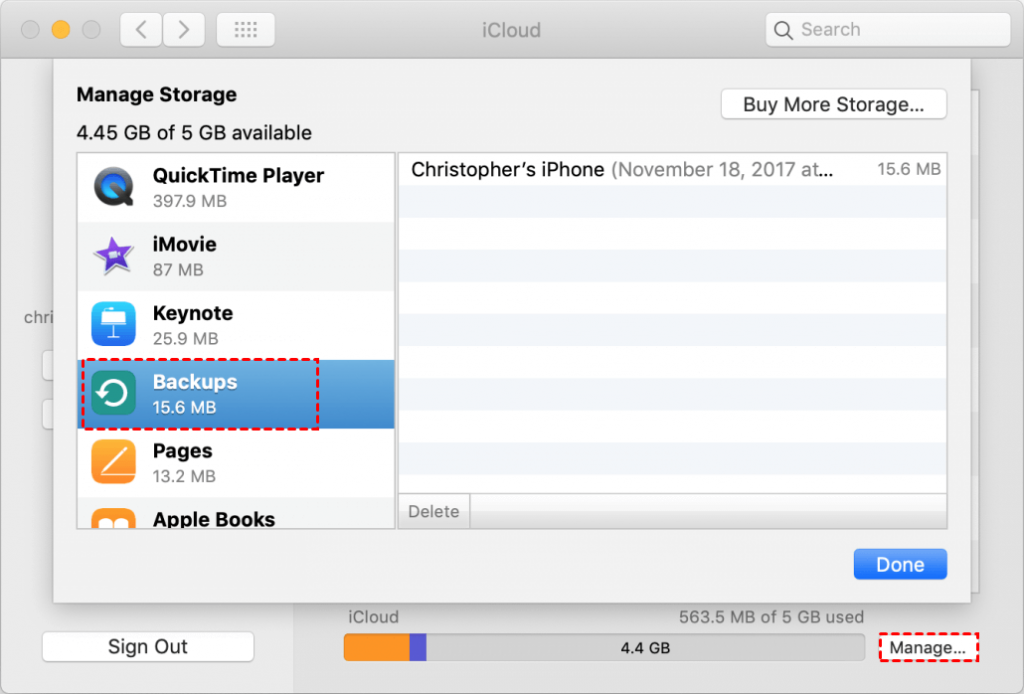
It’s important to remember those iPhone backups were created for a reason. It’s basically one of the few methods to recover your files if your iPhone happens to encounter data loss. However, there are instances where there is more than one iPhone backup in the location. In that case, then it should be fine to delete the older ones. The only backup you should keep is the most recent version, which should be easy to spot by looking at the date created.
Part 4: BONUS: How to Delete iPhone Backups With Mac Cleaner
As stated earlier, iPhone backups are large in size, so leaving them alone is detrimental. But at the same time, you cannot simply delete them even if you know the iPhone backup location on Mac, and for one main reason—you may not be able to even if you wanted. Perhaps the directory where they’re located is encrypted. Maybe you don’t have the necessary permissions to make changes to the folder. Regardless, there’s a chance you won’t be able to do as you want with the iPhone backups, meaning the aforementioned methods wouldn’t work. For that, you need to use apps like Mac Cleaner.
Mac Cleaner is an app designed to help users delete certain files. Among these files are large files, which most likely include iPhone backups since they’re one of the largest files on your computer. Here’s how you can use this software:
Step #1: Launch Mac Cleaner on Your Computer
To start with, you must open a browser and go to this link. It’ll take you to the Mac Cleaner download site where you must click the Download Now button, which should prompt the download of a DMG file. Once the download is complete, open the file to start the installer. Follow the onscreen instructions from that point onwards. The software should open automatically once the installation is complete.

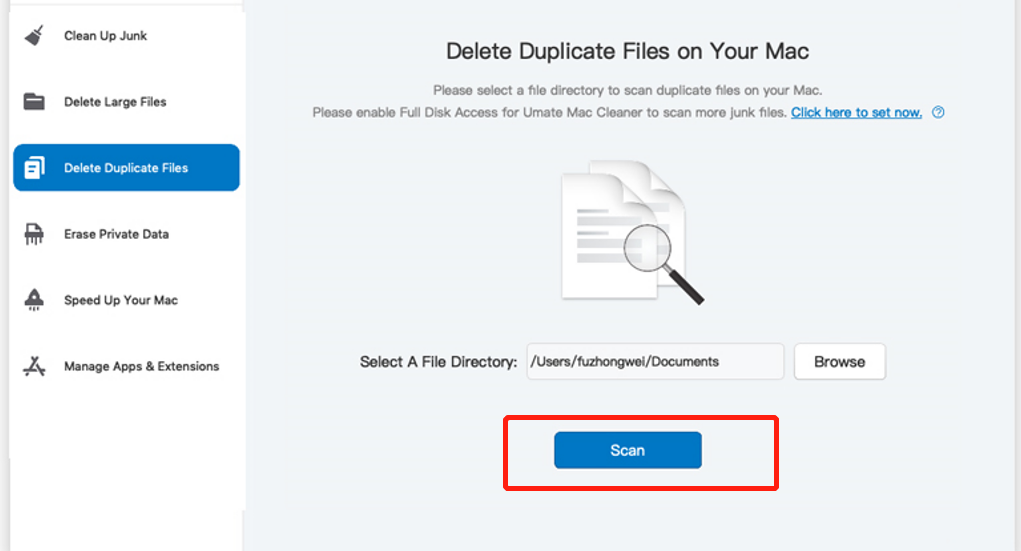
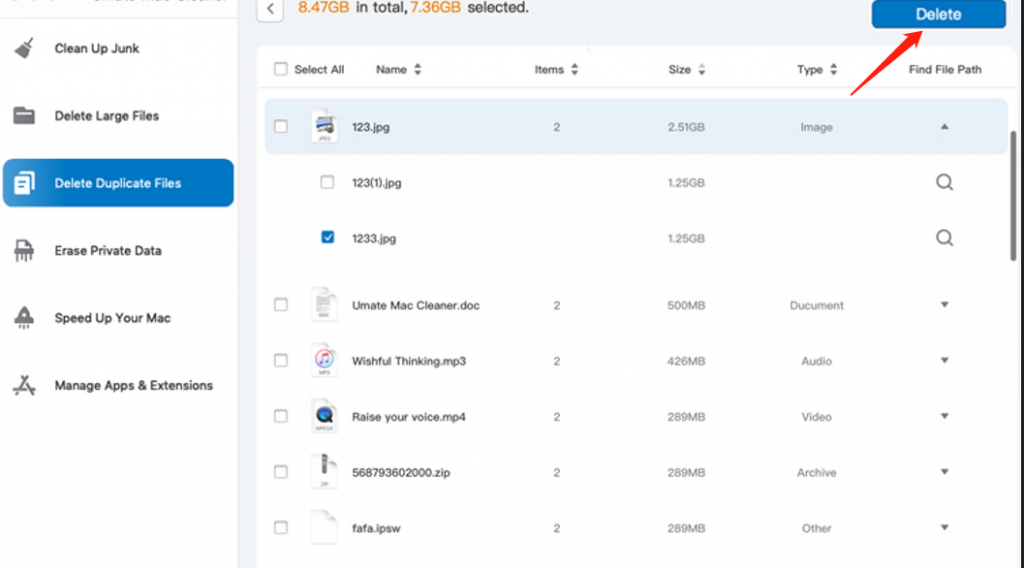
Step #2: Choose the Delete Large Files Module
If you look at the left side of the software, you’ll find a sidebar that consists of six options. These are the six modules Mac Cleaner offers, and include (1) Clean Up Junk, (2) Delete Large Files, (3) Delete Duplicate Files, (4) Erase Private Data, (5) Speed Up Your Mac, and (6) Manage Apps & Extensions. As iPhone backups belong to the category of “large files,” you must select the Delete Large Files module. That particular module allows you to detect and delete files that exceed the size of 50MB. To select the module, simply select the option from the left sidebar.
Step #3: Click Scan
Upon selecting the module, you may notice that the software changes appear to display information about the module’s functionality and features. A button that says Scan will also appear in the interface. Click that button to proceed.
Step #4: Choose an File/s
The software will then take you to the next screen where you can find a list. The list consists of several items, and those items correspond to files that have a size greater than 50MB. Simply select the ones you think correspond to your iPhone backups. It should be easy enough since you can see various details about each item, such as their file type, size, and when they were last used. If you cannot specifically find the iPhone backups, you can click Select All instead to include all items.
Step #5: Delete the File/s
To finalize the process, you simply need to click the button at the top-right corner which should say Delete. It’ll start the deletion process of the files you selected from the list. It’ll take a while, but that should be the last thing you need to do.
As you can see, compared to the previous methods, using tools like Mac Cleaner is much more effective. After all, you don’t have to find the backup. Heck, you don’t even need to know the iPhone backup location on Mac. Furthermore, this should allow you to delete the backup directory even if it’s encrypted or protected since the software bypasses protection.
Final Words
One of the many mistakes of macOS computer users is that they tend to delete the iPhone backup without any awareness of what it contains. They don’t know what files the archive has, if it’s a recent backup that shouldn’t be deleted, or if the backup you found is even the backup at all. Oftentimes, this can lead to confusion, which can lead to issues like data loss. That’s why before you jump into deleting the iPhone backup or moving it somewhere else, you must at least have a basic understanding of the matter, including the iPhone backup location on Mac. With this guide, that should already be covered.
Latest Articles