

As a Mac user, one of the most important components of your system is your Home folder. This folder is the central location for all of your user-specific data, including documents, photos, music, and more. Understanding the Mac Home folder is essential for managing your files and customizing your system to your needs. In this article, we’ll show you everything you need to know about your Mac home folder.
Part 1: What is the Mac Home Folder?
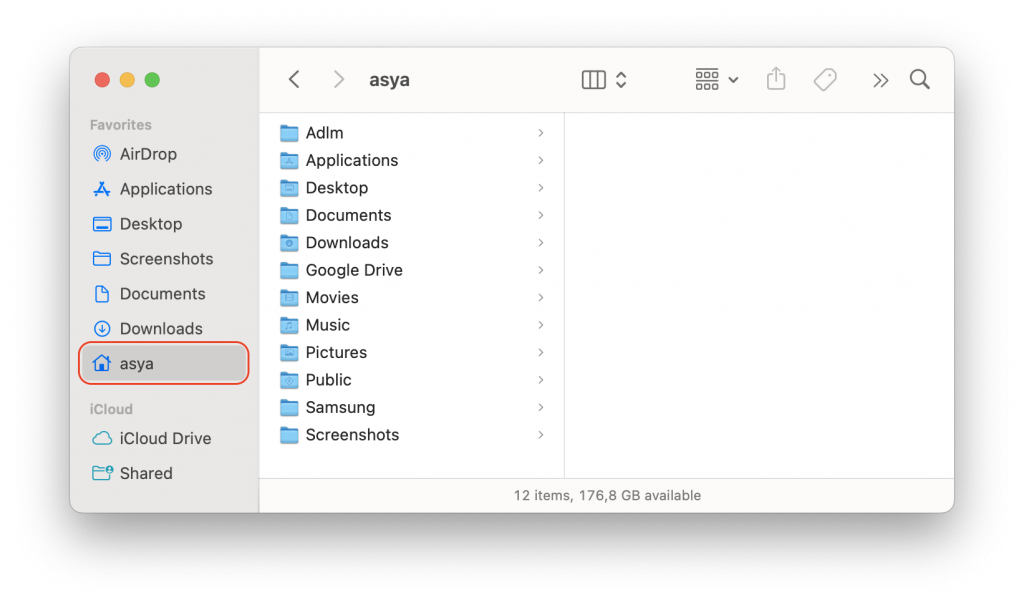
The Home folder is the default folder for your user account on a Mac. When you log in to your Mac, you’ll be taken directly to your Home folder, which is located in the Users folder on your Mac’s hard drive. This folder is named after your user account and is represented by a house icon in the Finder
The Home folder contains several subfolders, including Documents, Downloads, Music, Pictures, and more. These folders are designed to help you organize your files and keep everything in one place. You can also create your own custom folders within your Home folder to further organize your data.

Part 2: What’s in the Mac Home Folder?
The contents of your Home folder will vary depending on how you use your Mac. However, some of the most common items you’ll find in your Home folder include:
- Documents: This folder is where most of your important files will be stored, including word-processing documents, spreadsheets, and presentations.
- Downloads: Any files you download from the internet will typically be saved to this folder. This includes software installers, images, and other types of files.
- Music: If you use iTunes to manage your music library, your music files will be stored in this folder.
- Pictures: Your photo library is typically stored in this folder, along with any other image files you have.
- Library: This folder contains application support files, preferences, and other system files that are specific to your user account.
- Desktop: Any files you save to your desktop will be stored in this folder.
Part 3: Customizing your Mac Home Folder
One of the great things about the Mac Home folder is that it’s highly customizable. You can create your own custom folders within your Home folder to help you organize your files however you like. For example, you might create a folder called “Work” to store all of your work-related files, or a folder called “Projects” to keep track of your personal projects.
To create a new folder in your Home folder, simply open the Finder and navigate to your Home folder. Then, click the “File” menu and choose “New Folder.” You can then give your new folder a name and start adding files to it.
You can also customize the appearance of your Home folder by changing the icon or background image. To do this, right-click on your Home folder and choose “Get Info.” Then, click on the icon or background image and choose “Edit” to make changes.
Part 4: How to Rename Your Home Folder
Renaming your Home folder on a Mac can be a bit tricky, as it involves changing the name of your user account. It’s important to note that this process can potentially cause issues with certain applications or services that rely on your Home folder path, so it’s best to proceed with caution and make sure you have a backup of your data before proceeding. Here’s how you can rename your Home folder:
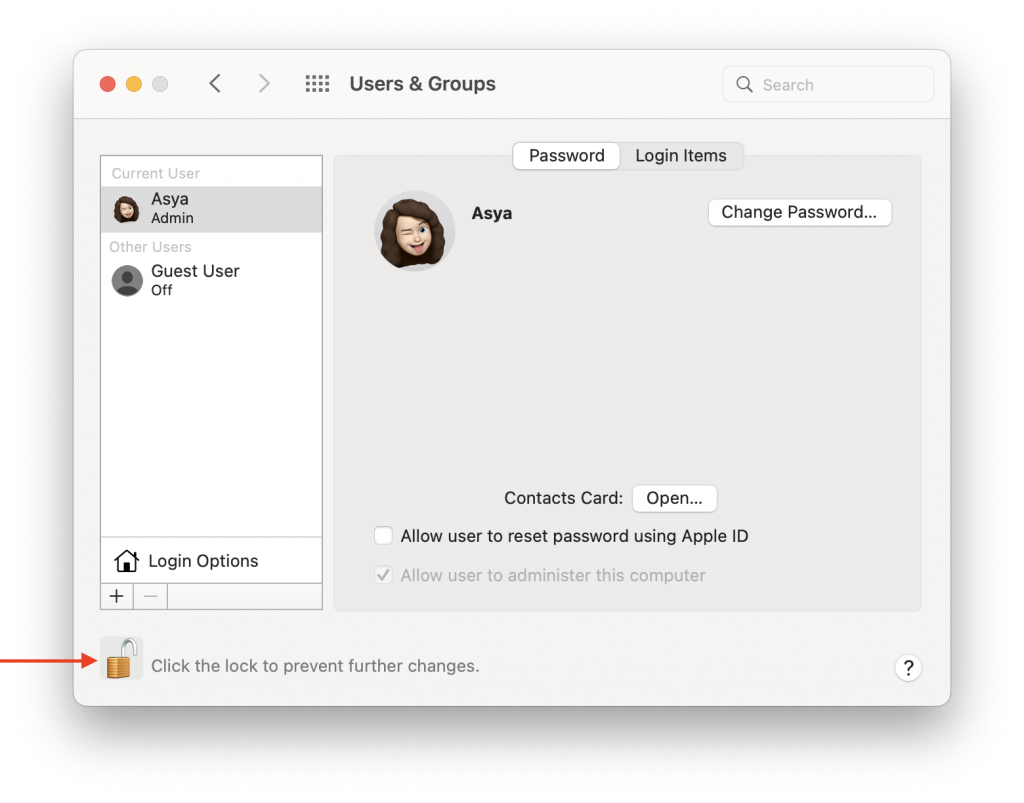
- Create a new administrator user account: Before you can rename your Home folder, you’ll need to create a new administrator user account. This is because you can’t rename your Home folder while you’re currently logged into your user account. To create a new administrator account, go to System Preferences > Users & Groups, and click the lock icon in the bottom left corner to unlock the settings. Then, click the “+” button to add a new user, and set the account type to “Administrator.“
- Log out of your current user account: Once you’ve created the new administrator account, log out of your current user account by going to the Apple menu and selecting “Log Out [username].“
- Log in to the new administrator account: After logging out, log in to the new administrator account you just created.
- Rename your Home folder: Open Finder and go to the Users folder, then right-click on your old Home folder and select “Get Info.” In the “General” section, click the lock icon and enter your administrator password to unlock the settings. Then, change the name of your Home folder in the “Name & Extension” field. You’ll be prompted to confirm the change; make sure to select “Use English (US) as the primary language” if it’s not already selected, and click “OK” to proceed.
- Update your account settings: After renaming your Home folder, you’ll need to update your user account settings to reflect the new folder name. Go to System Preferences > Users & Groups, select your user account, and click the lock icon to unlock the settings. Then, click the “Advanced Options” button and change the “Home directory” field to the new folder name. Click “OK” to save the changes.
- Restart your Mac: After updating your account settings, restart your Mac to ensure the changes take effect.
Once your Mac has restarted, log in to your user account and make sure everything is working as expected. If you encounter any issues, try repairing disk permissions or restoring from a backup.
Part 5: How to Go to Home Folder
To go to your Home folder on a Mac, you can use any of the following methods:
- Using Finder: Open a new Finder window by clicking on the Finder icon in the Dock or using the keyboard shortcut Command+N. Then, click on your Home folder in the sidebar, which is represented by a house icon.
- Using Go menu: Click on the Finder menu at the top of your screen and select “Go” from the menu bar. Then, select “Home” from the drop-down menu or use the keyboard shortcut Command+Shift+H to go directly to your Home folder.
- Using keyboard shortcut: You can also use the keyboard shortcut Command+Shift+H to go directly to your Home folder from anywhere on your Mac.
- Using Terminal: If you prefer using the command line, you can open Terminal and type “cd ~” (without quotes), and press Enter. This will take you directly to your Home folder in the Terminal.
No matter which method you choose, once you’re in your Home folder, you can access all of your user-specific data, including Documents, Downloads, Music, Pictures, and more.
Part 6: How to Create a Folder
Creating a folder on a Mac is a simple process and can be done in several ways. Here are three methods you can use to create a folder:
Method 1: Using Finder
- Open a new Finder window by clicking on the Finder icon in the Dock or using the keyboard shortcut Command+N.
- Navigate to the location where you want to create the folder.
- Right-click (or Control-click) on the empty space and select “New Folder” from the context menu.
- A new folder will be created with the default name “untitled folder.” You can change the name by clicking on the folder’s name and typing the new name.
Method 2: Using the keyboard shortcut
- Navigate to the location where you want to create the folder.
- Press Shift+Command+N on your keyboard.
- A new folder will be created with the default name “untitled folder.” You can change the name by clicking on the folder’s name and typing the new name.
Method 3: Using Terminal
- Open Terminal by searching for it in Spotlight or using the Applications > Utilities folder.
- Type “mkdir foldername” (without the quotes) in the Terminal window, where “foldername” is the name you want to give to the new folder.
- Press Enter.
- The new folder will be created in the current directory.
Part 7: How to Create a Zip Folder
Creating a zip folder, also known as a compressed folder, on a Mac is a simple process and can be done in a few easy steps using the built-in Archive Utility app. Here’s how to create a zip folder on a Mac:
- Select the files or folders you want to compress into a zip folder. You can select multiple files or folders by holding down the Command key while clicking on each item.
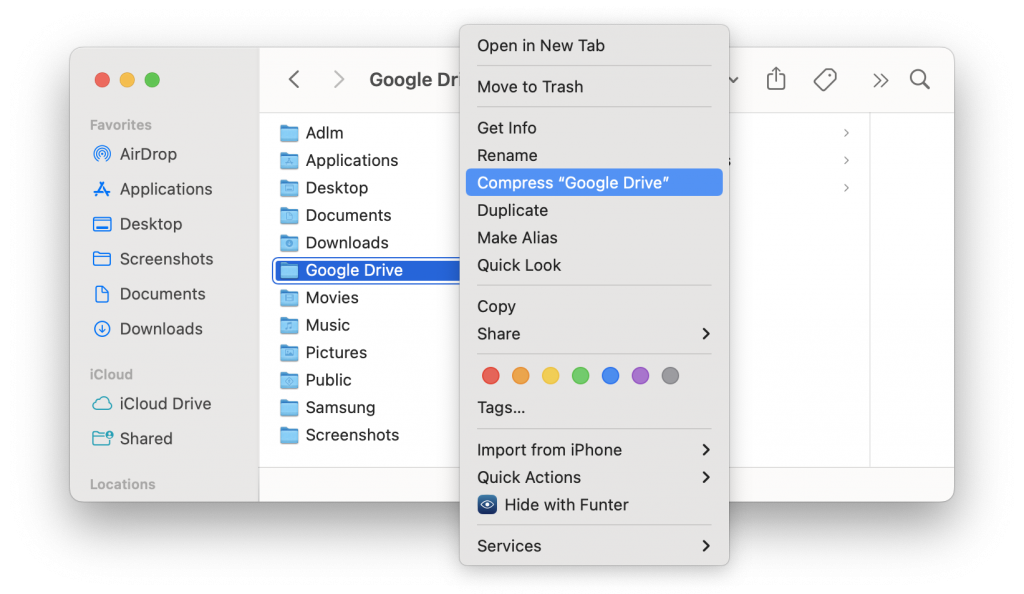
- Right-click (or Control-click) on the selected items and choose “Compress [number] items” from the context menu. Alternatively, you can click on the File menu in the menu bar and choose “Compress [number] items.“
- The Archive Utility app will create a zip folder with the name “Archive.zip” in the same directory as the original files or folders. If you want to give the zip folder a different name, you can rename it by selecting it and pressing the Return key, then typing in the new name.
- Once the zip folder is created, you can double-click on it to open it and access the compressed files or folders. To extract the contents of the zip folder, simply drag and drop them to a new location or right-click (or Control-click) on the zip folder and choose “Open With > Archive Utility” to extract the contents to a new folder in the same directory as the zip folder.
Part 6: Find Duplicate Files on Mac With Mac Cleaner [RECOMMENDED]
Many Mac users frequently download, create, and copy files that end up being identical duplicates. This can result in numerous copies being stored in the Home folder, taking up valuable disk space. Luckily, Mac Cleaner offers a solution to this problem by allowing you to compare folders on your Mac and easily remove duplicate files.
Additionally, the application provides advanced features for even more efficient file management. To compare folders and identify duplicates, all you have to do is launch the application and initiate a scan of your Home folder with a single click.
While you may be eager to locate duplicate files on your Mac, there is no built-in feature to make this task easy. The previous method described is simply an improvised approach. Not only does it require manual effort and some technical knowledge of Mac, but it also takes some time. Fortunately, there are tools available that have a specific feature designed for finding duplicate files on Mac. One such tool is Mac Cleaner.
Mac Cleaner is a software application designed to remove unnecessary files from your computer. Among its many features is the ability to identify and eliminate duplicate files on your Mac. To use this software, follow these steps:
Step #1: Open Mac Cleaner on Your Computer
To begin, launch Mac Cleaner on your computer. To obtain the software, you must first open a web browser and navigate to the official Mac Cleaner website. From there, click on the “Download Now” button to retrieve a DMG file. After downloading the file, open it to initiate the installation process and follow the on-screen instructions. The installation may take some time, but once it’s finished, the software will launch automatically.

Step #2: Select the Delete Duplicate Files Module
The following step involves selecting a module from the interface. The interface should display six options on the left-hand side, including (1) Clean Up Junk, (2) Delete Large Files, (3) Delete Duplicate Files, (4) Erase Private Data, (5) Speed Up Your Mac, and (6) Manage Apps & Extensions. Each module offers unique functions, and it’s crucial to choose the one that aligns with your objective.
In this scenario, you should select the “Delete Duplicate Files” module for obvious reasons, as it allows you to locate and remove duplicate files on your Mac. Click on the module to choose it and proceed to the next step.
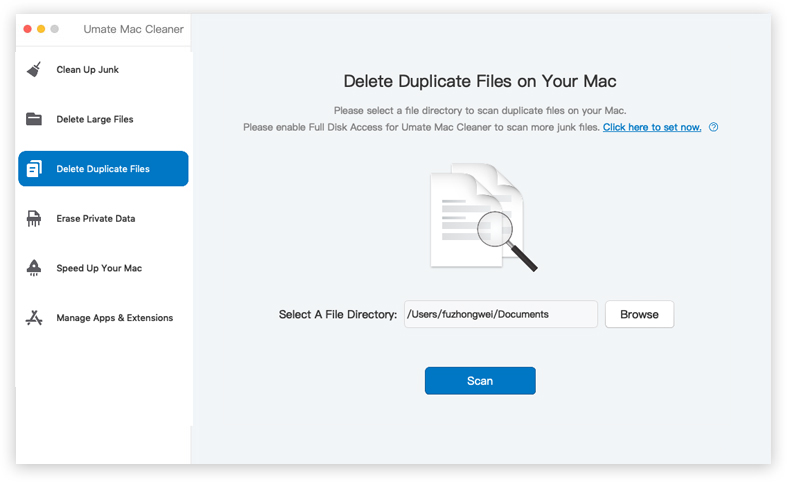
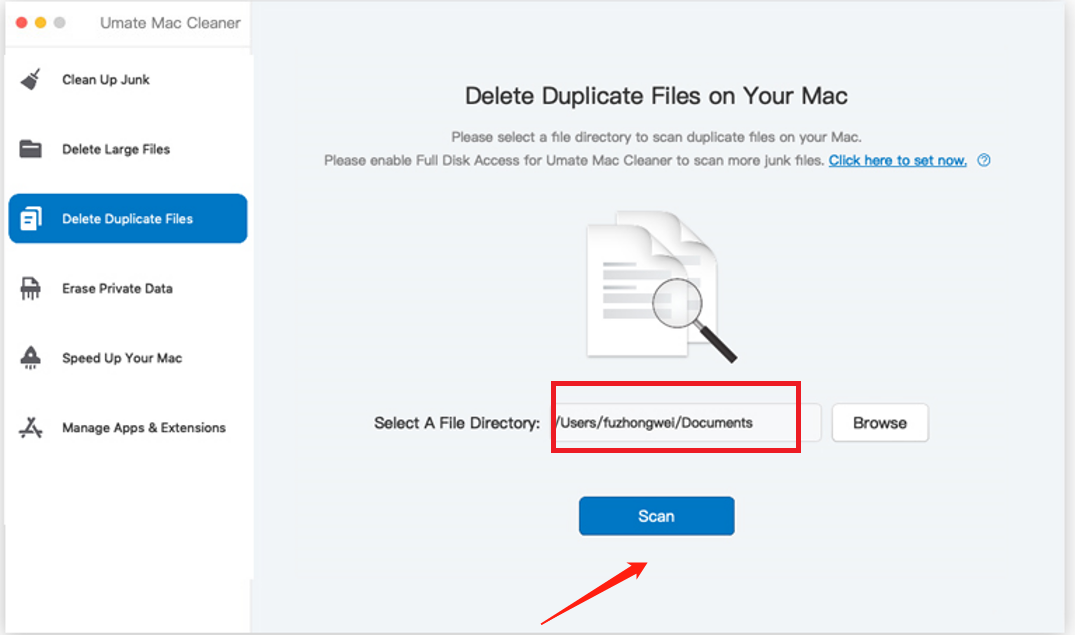
Step #3: Click the Scan Button
Once you have selected the Delete Duplicate Files module, a description of the module will appear in the center of the software, which you can read to learn more about the module, although it’s not mandatory. To proceed, click the Browse button located to the left of the Select a File Directory field, and then navigate to the directory you want to scan for duplicate files. After specifying the directory, click the Scan button to move on to the next step.
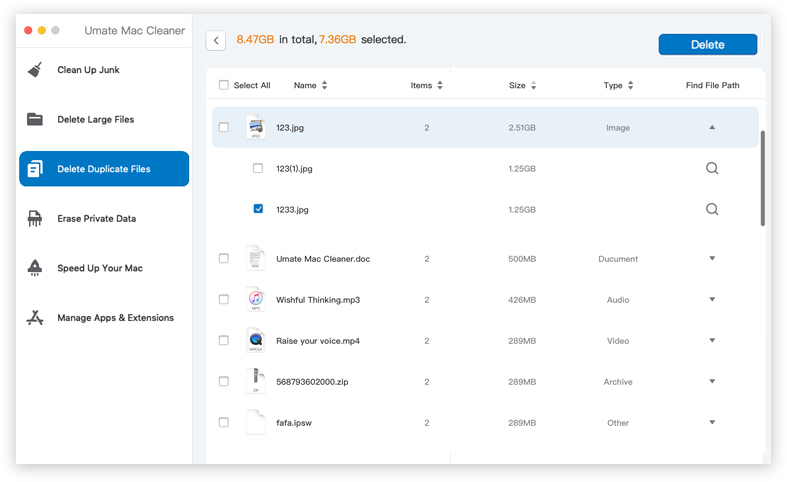
Step #4: Select a File/s
After successfully locating the duplicate files (e.g., image, document, audio, video, etc.) on your Mac computer, Mac Cleaner will display a list of these items. To delete the files, you may click on the checkboxes beside the items you wish to remove. If you want to select all the items at once, you may simply click the checkbox for “Select All.“
Step #5: Delete The File/s
To finalize the deletion process, select the files you wish to delete and then click on the “Delete” button located at the top-right corner of the window. By doing so, you won’t have to go through the hassle of manually searching for files with the same name using Finder. This method is not only time-saving, but it also ensures that no files are left behind.
Final Words
In conclusion, the Mac Home folder is an essential part of your system that helps you organize your files and customize your user experience. By understanding how it works and taking advantage of its customization options, you can create a personalized, efficient system that works the way you want it to.
The significance of storage space on a Mac is often underestimated by many. It not only affects the available storage for your files but can also impact your computer’s performance indirectly. A higher amount of free disk space can lead to faster performance, and removing unnecessary files can minimize the possibility of errors and problems.
Hence, it’s crucial to eliminate as many redundant files as possible, and duplicate files are an excellent place to start. While it may seem daunting, this guide can assist you in locating and removing duplicate files on your Mac with ease.
Latest Articles