

Screenshots are a great way to capture what you see on your computer screen, whether it’s for work or personal use. On a Mac, taking a screenshot is easy, and the default location where the screenshots are saved is on the desktop. But where do screenshots go on Mac if you change the default location or accidentally forget where you saved them?
Don’t let lost screenshots stress you out. Find out where do screenshots go on Mac and keep them organized. In this blog, we’ll explore the answer to this question and some tips on how to locate your screenshots.
By default, when you take a screenshot on a Mac, the image is saved as a PNG file on the desktop with a filename that starts with “Screen Shot.” This is true whether you take a screenshot of the entire screen, a selected area, or a particular window. However, if you change the default location for saving screenshots, they will be saved to the new location instead of the desktop.
If you’re not sure where you saved your screenshots or you changed the default location and can’t remember where you set it to, don’t worry.
Part 1: Where do Mac Screenshots Go?
By default, when you take a screenshot on a Mac, the screenshot image file is saved on the desktop. The screenshot file is automatically given a name based on the date and time it was taken, such as “Screen Shot 2023-03-30 at 10.30.45 AM”.
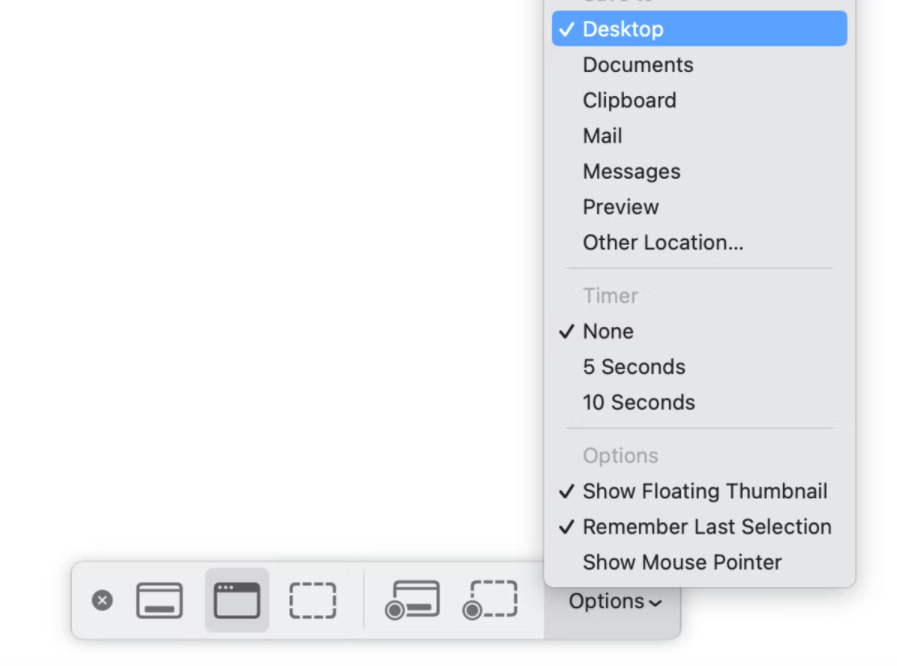
However, you can also choose to save screenshots to a different location by changing the default save location in the Screenshot app or using keyboard shortcuts to save the screenshot to a specific location. To change the default save location, you can open the Screenshot app, click on the Options menu, and select the desired save location from the “Save to” dropdown menu.
Part 2: How to Change the Default Location for Screenshots
To change the default location for screenshots on your Mac, follow these steps:
- Open the “Screenshot” app on your Mac. You can find this app by using Spotlight search or by navigating to the Applications folder and then to the utility folder.
- In the “Screenshot” app, click on the “Options” button in the bottom left corner of the window.
- In the “Options” menu, you will see a “Save to” dropdown menu. Click on this menu to see the available options.
- From the dropdown menu, select the location where you want to save your screenshots. You can choose any folder on your Mac or an external drive connected to your Mac.
- Once you have selected the desired location, close the “Screenshot” app.
From now on, all screenshots you take on your Mac will be saved to the location you selected as the default save location. If you want to save a screenshot to a different location, you can use the keyboard shortcuts for screenshots and then manually move the file to the desired location.
Part 3: How to change the default screenshot location using Terminal
To change the default screenshot location using Terminal, follow these steps:
- Open Terminal by searching for it in Spotlight Search or by navigating to Applications > Utilities > Terminal.
- Type the following command and press Enter: defaults write com. apple. screen capture location /path/to/new/location/
Replace “/path/to/new/location/” with the file path of the new location you want to save your screenshots to.
For example, if you want to save your screenshots to a folder named “Screenshots” on your desktop, the command should look like this: defaults write com. apple.screen capture location ~/Desktop/Screenshots/
- After entering the command, press Enter.
- To apply the changes, type the following command and press Enter: killall SystemUIServer
- You can now close Terminal and take a screenshot using the standard keyboard shortcut (Command + Shift + 3 or Command + Shift + 4) and it will be saved to the new location.
Note: If you want to change the default location back to the default desktop location, use the following command: defaults write com. apple.screen capture location ~/Desktop/
Part 4: How to Take a Screenshot of a Window on Mac
To take a screenshot of a window on a Mac, follow these steps:
- Click on the window you want to capture to make it active.
- Press Command + Shift + 4 on your keyboard. The cursor will change to a crosshair pointer.
- Press the Spacebar. The cursor will change to a camera icon.
- Move the camera icon over the window you want to capture. The window will be highlighted in blue.
- Click on the window. A screenshot of the window will be taken and saved to your desktop by default.
- To cancel the screenshot, press the Escape key.
Note: If you want to capture only a portion of the window, you can adjust the selection by dragging the edges of the highlighted area.
Part 5: How to Record Videos on Your Screen on Mac
Mac has a built-in feature that allows you to record videos of your screen, called “Screen Recording“. Here are the steps to do so:
- Open QuickTime Player. You can find it by searching for it in Spotlight or by navigating to Applications > QuickTime Player.
- Click on “File” in the menu bar, and then select “New Screen Recording”.
- A screen recording window will appear. You can choose to record your entire screen or a portion of it by clicking on the arrow next to the red record button.
- If you want to record audio along with the video, click on the small arrow next to the record button and select “Internal Microphone” or “External Microphone” depending on your setup.
- Click the red record button to start the screen recording. You can also click and drag to select a specific area of the screen to record.
- Once you’ve finished recording, click on the stop button in the menu bar or press Command + Control + Esc.
- Your video will be saved to your desktop by default. You can also choose to save it to another location by selecting “File” and then “Save” in the menu bar.
That’s it! You can now record videos on your screen on your Mac using the built-in Screen Recording feature in QuickTime Player.
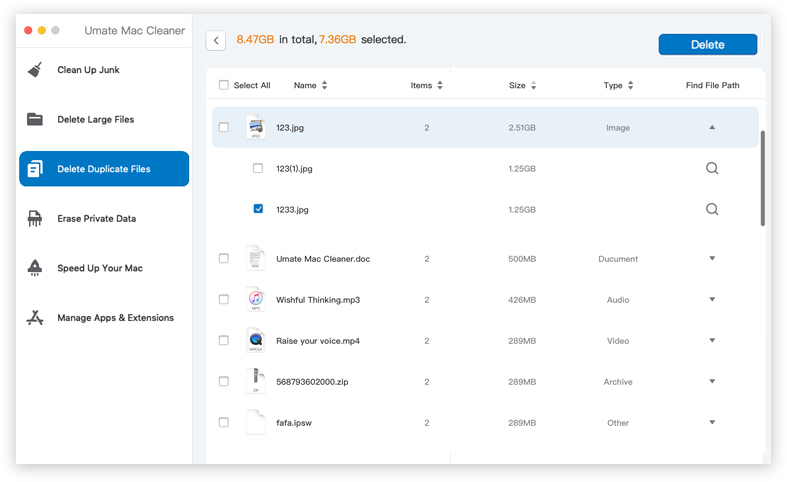
Part 6: How to Find Screenshots using Mac Cleaner
Mac Cleaner is a modular software that can help you find and delete unnecessary files from your Mac, including screenshots. Here’s how to find screenshots using Mac Cleaner:
Step 1: Open Mac Cleaner on your Mac
To get started, open Mac Cleaner on your Mac. If you haven’t already downloaded the software, you can do so from the developer’s website. Once you’ve downloaded and installed Mac Cleaner, open the application.

Step 2: Select the “Delete Duplicate Files” module
Mac Cleaner has several modules that can help you clean up your Mac, including “Delete Duplicate Files.” Click on this module to proceed.
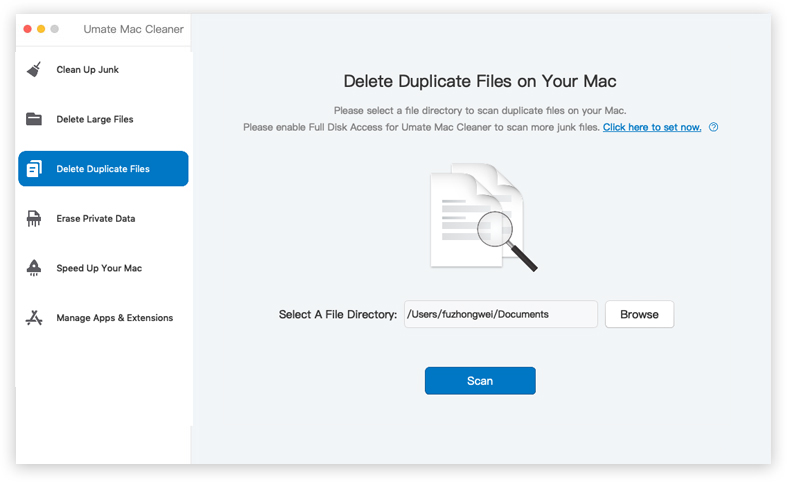
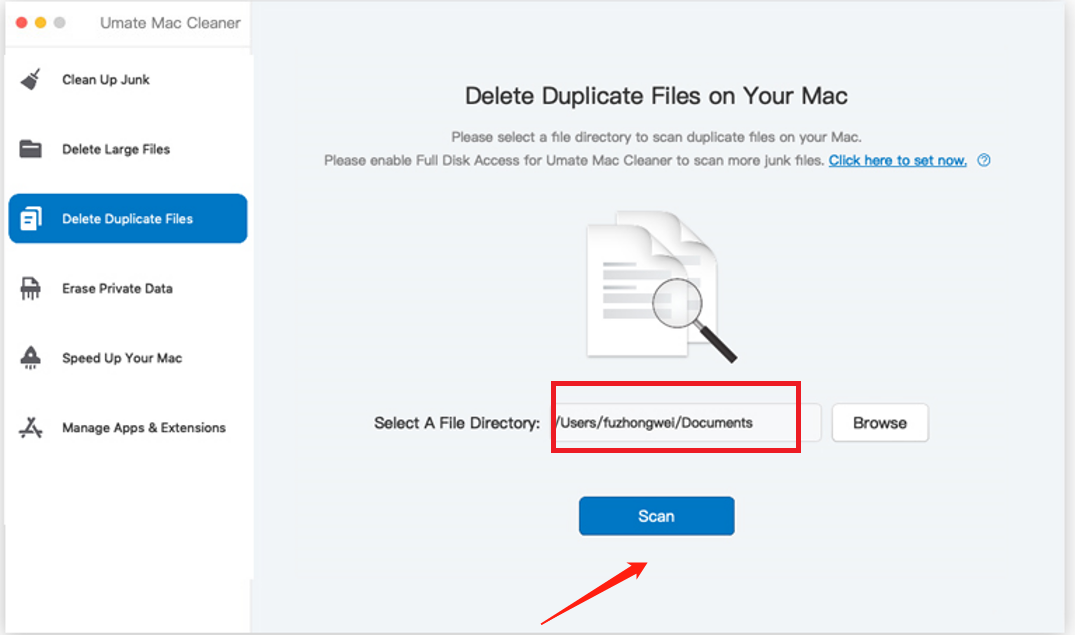
Step 3: Select the folder to scan
After selecting the “Delete Duplicate Files” module, you will be prompted to select the folder or directory you want to scan for duplicate files. To find your screenshots, select the folder where your screenshots are typically saved.
Step 4: Scan for duplicate files
After selecting the folder to scan, click on the “Scan” button to start the scan. Mac Cleaner will search for all duplicate files in the folder you selected, including duplicate screenshots.
Step 5: View and delete duplicate screenshots
After the scan is complete, Mac Cleaner will display a list of all duplicate files found in the folder you selected. To find your duplicate screenshots, look for files with the names “Screen Shot” or “Screenshot.” Check the boxes next to the duplicate screenshots you want to delete, and then click on the “Delete” button to remove them from your Mac.
By following these steps, you can use Mac Cleaner to easily find and delete duplicate screenshots on your Mac.
conclusion
In conclusion, the default location for screenshots on a Mac is the desktop, but if you change the default location, they will be saved in a folder called “Screenshots” by default. If you’re having trouble finding your screenshots, you can use the above tips to locate them. Remember, taking screenshots is a great way to capture important information, so it’s important to know where to find them later.
Latest Articles