

In today’s digital age, capturing precious moments on our iPhones has become a daily occurrence. However, storing and organizing those memories can be challenging. Fear not! In this blog post, we will guide you through the process of transferring photos from your iPhone to your MacBook, allowing you to preserve and enjoy your cherished memories on a larger screen.
Part 1: Transfer Photos from iPhone to Mac Using Image Capture
Are you looking for a straightforward method to transfer photos from your iPhone to your Mac? Look no further! We will walk you through the process of using the Image Capture app on your Mac to effortlessly transfer your photos, giving you full control over your precious memories.

- Connect Your iPhone to Your Mac:
Start by connecting your iPhone to your Mac using a Lightning cable. Once connected, ensure your iPhone is unlocked and trusted by your Mac.
- Launch the Image Capture App:
Open the Image Capture app on your Mac. You can find it in the Applications folder or search for it using Spotlight. The app will detect your connected iPhone and display it in the sidebar.
- Select Photos for Transfer:
In the Image Capture window, you’ll see all the photos and videos on your iPhone. Browse through the list or use the thumbnail view to select the specific photos you want to transfer. You can select multiple photos by holding down the Command key while clicking on the desired photos.
- Choose Destination and Settings:
At the bottom of the Image Capture window, choose the destination folder on your Mac where you want to save the transferred photos. You can also customize settings such as file format, naming convention, and more.
- Transfer Photos:
Click on the “Import” button to start the transfer process. A progress bar will show the status of the transfer. Once completed, the transferred photos will be saved in the selected destination folder on your Mac.
- Review and Disconnect:
After the transfer is complete, you can review the transferred photos by accessing the destination folder on your Mac. Once you’re satisfied, safely disconnect your iPhone from your Mac by clicking on the eject icon next to your iPhone’s name in the Image Capture sidebar.
With the Image Capture app, transferring photos from your iPhone to your Mac has never been easier. By following these simple steps, you can quickly and efficiently transfer your precious memories to your Mac for safekeeping, editing, or sharing. Enjoy the convenience and control offered by Image Capture as you seamlessly transfer photos and unlock the full potential of your iPhone and Mac

Part 2: Transfer Photos from iPhone to Mac using the Photos App
If you’re an iPhone user looking to transfer your photos to your Mac effortlessly, the built-in Photos app is your go-to solution. In this blog post, we will guide you through the simple process of using the Photos app on your Mac to transfer your precious photos from your iPhone, allowing you to organize and enjoy them on a larger screen.
- Connect Your iPhone to Your Mac:
Begin by connecting your iPhone to your Mac using a Lightning cable. Ensure your iPhone is unlocked and trusted by your Mac.
- Open the Photos App:
On your Mac, open the Photos app. You can find it in the Applications folder or search for it using Spotlight. The app will automatically recognize your connected iPhone.
- Import Photos:
In the Photos app, select your iPhone from the sidebar. You’ll see a grid view of your iPhone’s photo library. Choose the specific photos you want to transfer by clicking on them or use Command + A to select all.
- Click “Import Selected” or “Import All”:
At the top-right corner of the Photos app, click on either “Import Selected” if you’ve chosen specific photos, or “Import All” if you want to transfer the entire photo library from your iPhone.
- Choose Destination and Customize Options:
Select the destination folder on your Mac where you want to import the photos. You can create a new album or choose an existing one. Additionally, you can customize options such as whether to delete the imported photos from your iPhone after the transfer.
- Start Import:
Click on the “Import” button to initiate the transfer. A progress bar will show the status of the import process. Once completed, the imported photos will be available in the selected destination album within the Photos app on your Mac.
- Review and Disconnect:
After the import is finished, you can review and organize the transferred photos within the Photos app on your Mac. Once you’re satisfied, safely disconnect your iPhone from your Mac by clicking on the eject icon next to your iPhone’s name in the sidebar.
With the Photos app on your Mac, transferring photos from your iPhone has never been simpler. Follow these steps to seamlessly import your photos, allowing you to organize, edit, and cherish your memories on a larger screen. Experience the convenience and efficiency of using the Photos app as you effortlessly transfer your photos from your iPhone to your Mac.

Part 3: Transfer Photos from iPhone to Mac using AirDrop
Looking for a quick and wireless solution to transfer your photos from iPhone to Mac? Look no further than AirDrop! In this blog post, we’ll guide you through the simple steps of using AirDrop to effortlessly transfer your photos, allowing you to enjoy and organize your memories on your Mac in no time.
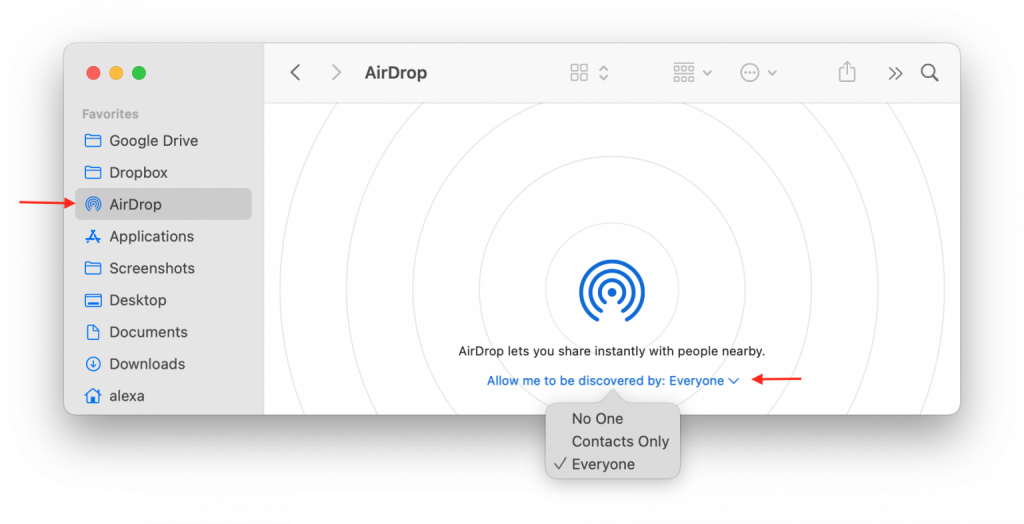
- Enable AirDrop on Your iPhone and Mac:
Ensure that both your iPhone and Mac have AirDrop enabled. On your iPhone, swipe up from the bottom of the screen to access Control Center and tap on the AirDrop icon. On your Mac, open Finder and go to AirDrop in the sidebar. Set AirDrop to “Everyone” or “Contacts Only” based on your preferences.
- Select and Share Photos from Your iPhone:
Open the Photos app on your iPhone and navigate to the album or photo you want to transfer. Tap the “Select” button, then choose the desired photos by tapping on them. Once selected, tap the Share icon, represented by a square with an upward arrow.
- Choose Your Mac from AirDrop:
In the Share menu, you’ll see a list of available devices. Tap on your Mac’s name under the AirDrop section. A notification will appear on your Mac, prompting you to accept the incoming photos.
- Accept Photos on Your Mac:
On your Mac, click “Accept” on the notification that appears, or open Finder and locate your Mac under AirDrop. You’ll see the incoming photos displayed. Choose the destination folder on your Mac where you want to save the transferred photos.
- Transfer and Access Your Photos:
Once you’ve selected the destination folder, click “Save” on your Mac. The photos will be transferred wirelessly from your iPhone to your Mac via AirDrop. You can then access and organize the transferred photos within the selected folder on your Mac.
- Disconnect and Enjoy:
After the transfer is complete, safely disconnect your iPhone from AirDrop on your Mac and enjoy your photos on the larger screen. You can edit, share, or further organize them as desired.
AirDrop offers a convenient and wireless solution for transferring photos from your iPhone to your Mac. By following these steps, you can quickly and effortlessly transfer your precious memories, allowing you to enjoy and organize them on your Mac with ease. Embrace the speed and simplicity of AirDrop as you seamlessly transfer your photos and unlock the full potential of your iPhone and Mac.
Part 4: Transfer Photos from iPhone to Mac using iCloud
If you’re seeking a seamless and automatic way to transfer your photos from iPhone to Mac, utilizing iCloud is the perfect solution. In this blog post, we’ll guide you through the process of using iCloud to effortlessly sync and access your photos on both devices, allowing you to seamlessly manage and enjoy your memories.
- Enable iCloud Photo Library on iPhone and Mac:
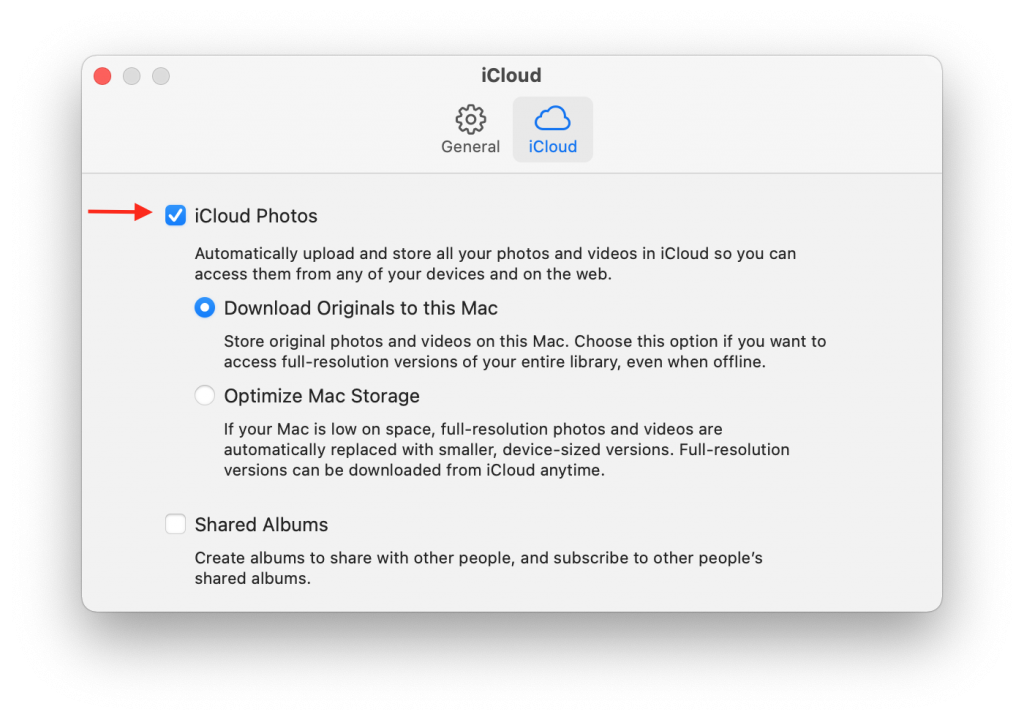
On your iPhone, go to “Settings” and tap on your Apple ID. Select “iCloud” and then “Photos.” Enable the “iCloud Photo Library” option. On your Mac, open the Photos app, click on “Photos” in the menu bar, and select “Preferences.” In the iCloud tab, check the box next to “iCloud Photo Library.”
- Connect iPhone and Mac to the Same iCloud Account:
Ensure that both your iPhone and Mac are signed in to the same iCloud account. This will allow them to sync seamlessly.
- Wait for Photos to Sync:
After enabling iCloud Photo Library, your photos will start syncing between your devices. The time required depends on the number of photos and your internet connection speed. Make sure your devices are connected to Wi-Fi for faster syncing.
- Access Photos on Your Mac:
Once the sync is complete, open the Photos app on your Mac. You’ll find all your iPhone photos organized in the Photos app, under the “Photos” tab. You can create albums, edit, and organize them as desired.
- Manage iCloud Photo Settings:
To customize iCloud Photo settings, go to “Settings” on your iPhone, tap your Apple ID, select “iCloud,” and then “Photos.” Here, you can enable “Optimize iPhone Storage” to save storage space on your iPhone by storing lower-resolution versions of photos in iCloud.
- Edit and Share Photos:
With your photos now accessible on your Mac, take advantage of the editing tools in the Photos app to enhance your images. You can also easily share your photos with friends and family directly from the app.
By leveraging the power of iCloud Photo Library, transferring photos from your iPhone to your Mac becomes a seamless and automated process. With just a few steps, you can effortlessly sync and access your photos on both devices, allowing you to manage, edit, and enjoy your memories. Embrace the convenience and efficiency of iCloud as you seamlessly transfer and organize your photos, unlocking the full potential of your iPhone and Mac.
Part 5: Transfer Photos from iPhone to Mac using Finder
Looking for a straightforward and direct method to transfer your photos from iPhone to Mac? Using Finder is a reliable and efficient solution. In this blog post, we will guide you through the simple steps of using Finder on your Mac to transfer your photos, enabling you to organize and enjoy your memories on a larger screen.
- Connect Your iPhone to Your Mac:
Begin by connecting your iPhone to your Mac using a Lightning cable. Ensure your iPhone is unlocked and trusted by your Mac.
- Open Finder and Locate Your iPhone:
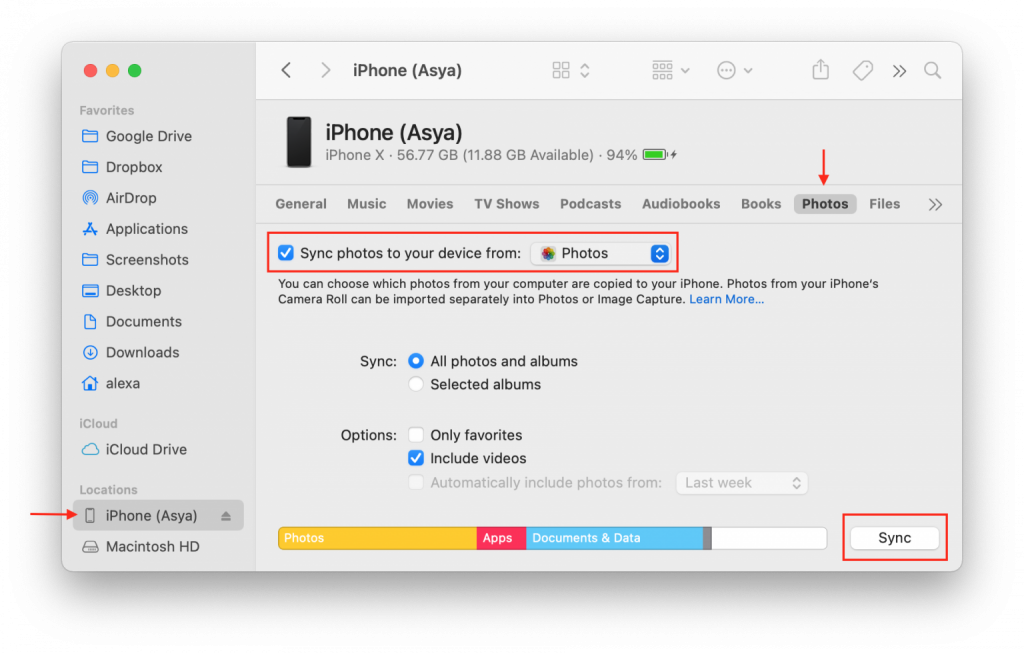
On your Mac, open Finder either from the Dock or by clicking on the Finder icon in the menu bar. In the sidebar, under the “Locations” section, you will see your connected iPhone listed.
- Access iPhone Photos in Finder:
Click on your iPhone’s name in the sidebar. You will be presented with different tabs, including “General,” “Music,” “Movies,” and “Photos.” Select the “Photos” tab to access your iPhone’s photo library.
- Select and Import Photos:
In the Photos tab, you will see a grid view of your iPhone’s photos. Choose the specific photos you want to transfer by clicking on them or use Command + A to select all photos. To import selected photos, click on the “Import Selected” button. Alternatively, click “Import All” to transfer the entire photo library.
- Choose Destination and Customize Options:
A window will appear, allowing you to choose the destination folder on your Mac where you want to import the photos. You can create a new folder or select an existing one. Additionally, you can customize options such as whether to delete the imported photos from your iPhone after the transfer.
- Start Import:
Click on the “Import” button to initiate the transfer. A progress bar will show the status of the import process. Once completed, the imported photos will be available in the selected destination folder within Finder on your Mac.
- Review and Disconnect:
After the import is finished, you can review and organize the transferred photos within the destination folder in Finder. Once you’re satisfied, safely disconnect your iPhone from your Mac by clicking on the eject icon next to your iPhone’s name in the sidebar.
With Finder on your Mac, transferring photos from your iPhone becomes a seamless and straightforward process. By following these steps, you can easily transfer and organize your photos, allowing you to enjoy and share your memories on a larger screen. Embrace the convenience and efficiency of Finder as you effortlessly transfer your photos from your iPhone to your Mac, unlocking the full potential of both devices.
Conclusion
Preserving your precious memories is essential, and transferring photos from your iPhone to your MacBook ensures a secure backup and convenient access. Whether you opt for iCloud Photo Library, AirDrop, iTunes, third-party apps, or manual import, our comprehensive guide has provided you with the knowledge and tools to transfer photos seamlessly. Embrace the process and enjoy reliving your cherished moments on the big screen of your MacBook!
Latest Articles